Whispering Aspen Leaf Ear Warmer Free Pattern – Knit a Forest Floor Crown
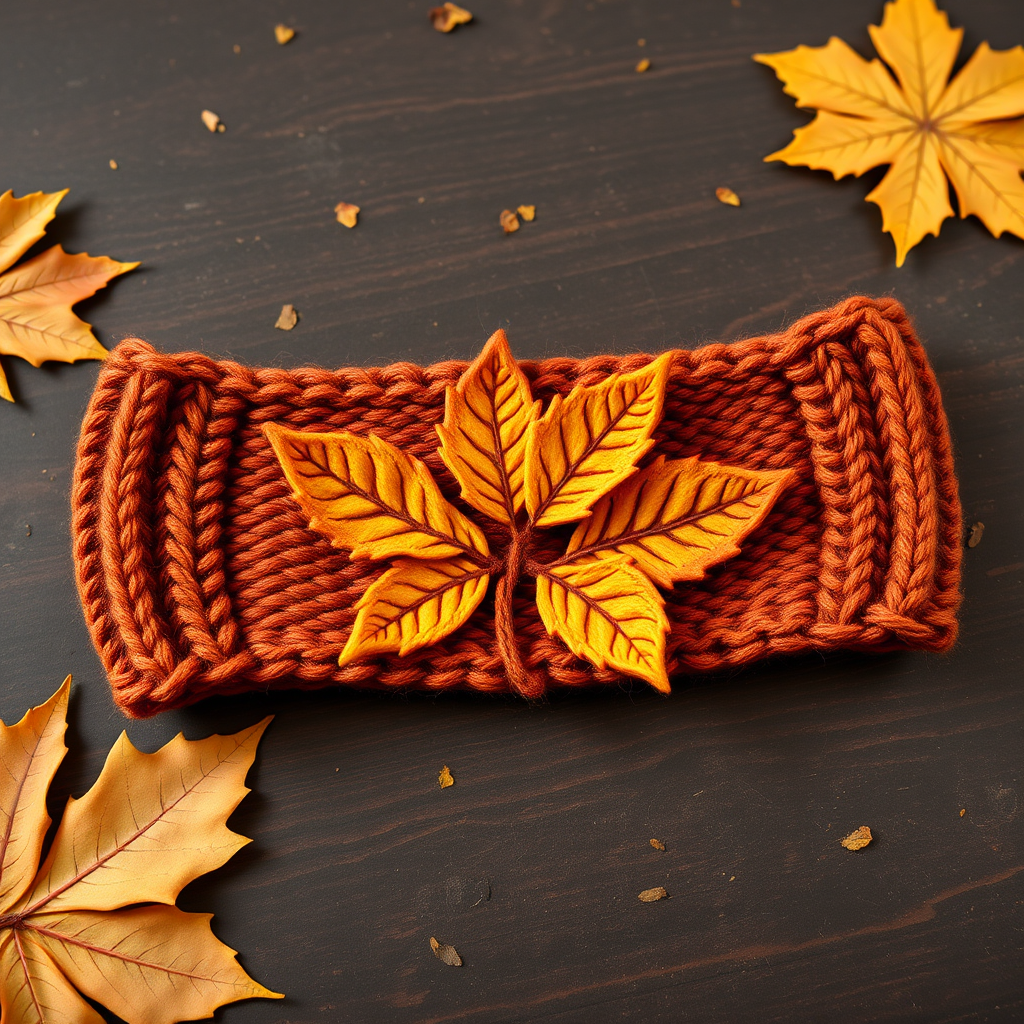
Whispering Aspen Leaf Ear Warmer: A Free Knitting Pattern for Autumn's Crown
Wrap your head in the quiet rustle of autumn with this textured ear warmer, knit to mimic a cascade of falling aspen leaves. The clever leaf-stitch panel and cozy ribbed band create a woodland accessory that's both sculptural and snug. Whether you're strolling through crisp forests or sipping cider at a harvest market, this handmade headband adds a touch of rustic elegance to any fall outfit. Best of all, this free pattern is beginner-friendly, using simple knit/purl techniques and a repeating leaf motif that's easier than it looks.
Why You'll Love This Pattern
This ear warmer is the perfect weekend project. It works up quickly in worsted weight yarn, requires minimal yardage, and teaches you a beautiful textured stitch that looks far more complex than it actually is. The alternating burnt orange and golden yellow leaves evoke the changing season, while the ribbed edges ensure a comfortable, secure fit. Plus, it makes a thoughtful handmade gift for friends and family who love nature-inspired accessories.
Materials Needed
Before you begin, gather the following supplies. All items are readily available at your local yarn shop or online.
- Yarn: Worsted weight yarn in two colors:
- Main Color (MC) – Burnt Orange (approx. 120 yards)
- Contrast Color (CC) – Golden Yellow (approx. 40 yards)
- Needles: US 7 (4.5 mm) knitting needles – straight or circular for flat knitting
- Notions: Tapestry needle for weaving in ends, stitch markers (at least 2), stitch holder or waste yarn
Gauge
20 stitches x 26 rows = 4 inches in stockinette stitch (after blocking). Gauge is important for achieving the correct finished size, so take a moment to knit a small swatch and adjust your needle size if needed.
Finished Size
Fits adult head circumference 20–22 inches; width approx. 3.5 inches. The ribbed bands stretch comfortably, making this a versatile one-size-fits-most design.
Special Stitches: The Leaf Stitch
This pattern features a beautiful leaf motif worked over 5 stitches. Don't be intimidated – each row is simple knit/purl combinations with yarn overs and decreases. Here's the complete stitch pattern:
Leaf Stitch (worked over 5 stitches)
- Row 1 (RS): k2, yo, k1, yo, k2 (7 sts)
- Row 2 (WS): p2, k1, p1, k1, p2 (7 sts)
- Row 3: k2, yo, k3, yo, k2 (9 sts)
- Row 4: p2, k1, p3, k1, p2 (9 sts)
- Row 5: k2, yo, k5, yo, k2 (11 sts)
- Row 6: p2, k1, p5, k1, p2 (11 sts)
- Row 7: k2, ssk, k3, k2tog, k2 (9 sts)
- Row 8: p2, k1, p3, k1, p2 (9 sts)
- Row 9: k2, ssk, k1, k2tog, k2 (7 sts)
- Row 10: p2, k1, p1, k1, p2 (7 sts)
- Row 11: k2, ssk, k2tog, k2 (5 sts)
- Row 12: p5 (5 sts)
Abbreviations: k = knit, p = purl, yo = yarn over, ssk = slip slip knit (decrease), k2tog = knit two together (decrease), RS = right side, WS = wrong side, st(s) = stitch(es).
Step-by-Step Instructions
Follow these detailed instructions carefully, and you'll have a beautiful leaf-adorned ear warmer in no time. The pattern is worked in three main sections: two ribbed bands and a central leaf panel.
Ribbed Band (Make 2)
- With MC, cast on 10 stitches.
- Work in k1, p1 rib for 4 inches (approx. 20 rows). This creates a stretchy, comfortable band that will sit against your ears.
- Place stitches on a holder or leave them on the needle. Cut the yarn, leaving a tail for weaving in later.
- Repeat to make a second ribbed band. Important: Do not cut the yarn on the second band – you will continue directly into the leaf panel.
Leaf Panel (Worked Flat)
Now you'll create the stunning leaf motifs that give this ear warmer its name. The panel is worked over the 10 stitches from the second ribbed band, with a 3-stitch rib at each edge and the leaf stitch in the center.
- Set-Up Row (RS): With the second ribbed band still on your needle (10 sts), continue with MC. Work as follows: k1, place marker, work Leaf Stitch Row 1 over the next 5 stitches (using MC), place marker, k1, then k1, p1, k1 (rib) over the remaining 3 stitches. Total: 10 sts.
- Row 2 (WS): Work rib over the first 3 sts (k1, p1, k1), then purl across to the last marker, then rib the last 3 sts (k1, p1, k1).
- Rows 3–12: Continue as established, working the Leaf Stitch over the 5 marked stitches (following the 12-row leaf pattern above), while keeping the 3-stitch rib at each edge. After Row 12, the first leaf is complete, and you'll have 5 stitches remaining in the center.
- Next Row (RS): k1, remove marker, k5, remove marker, k1, then rib the last 3 sts (k1, p1, k1). You're back to 10 stitches total.
- Next Row (WS): Rib the first 3 sts, purl to the last 3 sts, rib the last 3 sts.
Leaf Color Changes
To create the beautiful alternating color effect, you'll switch yarn colors between leaves. Here's how:
- First CC Leaf: On the next RS row, switch to CC (Golden Yellow). Work another complete Leaf Stitch (all 12 rows) over the center 5 stitches, keeping the rib edges as before. Remember to carry the MC yarn loosely up the side or cut and rejoin as preferred.
- Continue Alternating: Repeat the leaf motif, alternating between MC and CC, until the panel measures approximately 16 inches from the cast-on edge of the first ribbed band. End after completing a full leaf (Row 12). You should have about 4 leaves total (2 in MC, 2 in CC).
Final Ribbed Band
- With MC, work in k1, p1 rib over all 10 stitches for 4 inches. This completes the second ribbed band.
- Bind off loosely in rib pattern. Cut yarn, leaving a long tail (approx. 12 inches) for seaming.
Finishing Touches
Now it's time to bring your ear warmer to life. Follow these steps for a professional, polished finish.
Blocking
- Gently wet-block the piece to open up the leaf stitches and even out the fabric. Soak in lukewarm water with a drop of mild soap for 15 minutes.
- Rinse gently, squeeze out excess water (never wring), and lay flat on a towel.
- Shape to the correct dimensions (approx. 24 inches long total, 3.5 inches wide) and pin if needed. Allow to dry completely.
Seaming
- With right sides together, align the cast-on edge of the first ribbed band with the bind-off edge of the last ribbed band.
- Using the long tail from the bind-off and a tapestry needle, sew the two edges together using mattress stitch. This creates an invisible, stretchy seam.
- Weave in all loose ends securely using the tapestry needle. Trim any excess yarn.
Optional Embellishment
For extra charm, add a small button or decorative leaf-shaped pin at the seam. This not only adds a personal touch but also cleverly hides the join.
Wear and Care Tips
Your Whispering Aspen Leaf Ear Warmer is now ready to wear! Here are a few tips to keep it looking beautiful:
- Wearing: Position the seam at the back of your head, with the leaf panel centered on your forehead or slightly to the side for a stylish asymmetric look.
- Care: Hand wash in cold water with mild detergent, lay flat to dry. Avoid wringing or machine washing to preserve the textured stitches.
- Storage: Fold gently and store in a drawer or on a shelf away from direct sunlight to prevent fading.
Customization Ideas
Once you've mastered this pattern, feel free to make it your own:
- Color Variations: Try deep forest green and cream for a wintery look, or dusty rose and blush for spring.
- Add More Leaves: Extend the panel for a wider headband or to wrap around twice for a cozy neck warmer.
- Texture Play: Substitute a different textured stitch for the ribbed edges, such as seed stitch or moss stitch.
This pattern is a wonderful way to practice your knitting skills while creating something truly special. The leaf stitch is a delightful technique that you'll want to use again and again. Happy knitting, and may your autumn be filled with warmth and creativity!