Sand Dollar Keepsake Sachet Free Crochet Pattern: Ocean Blues Drawstring Pouch
A Little Ocean Keepsake You Can Make This Weekend
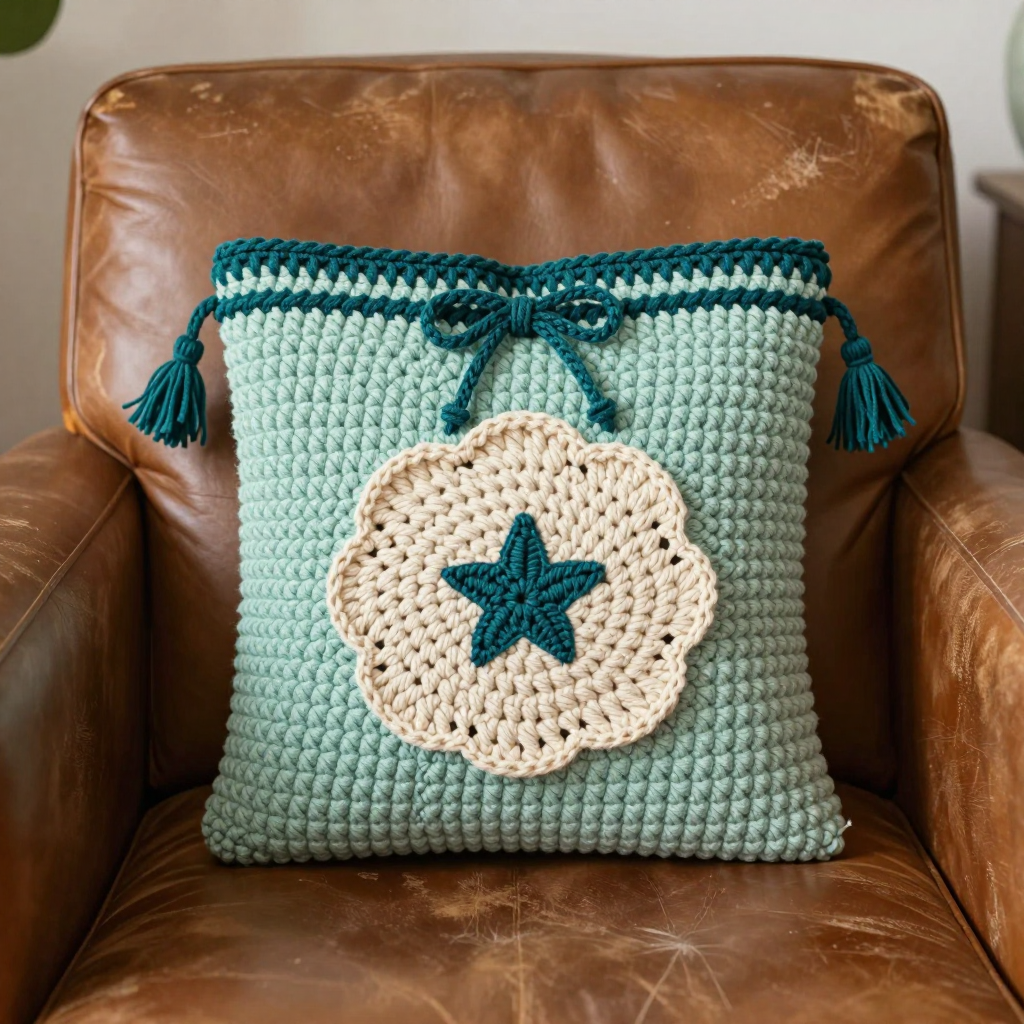
If you have ever wanted to make something small, sweet, and genuinely useful with your own hands, this Sand Dollar Keepsake Sachet is the perfect first project. It is a tiny square pillow pouch, about 3.5 inches across, worked in soft seafoam cotton with a deep teal drawstring top and a cream sand dollar appliqué centered on the front. The finished piece feels smooth and slightly crisp from the cotton, holds a flat square shape, and smells wonderful when you tuck a lavender sachet inside. It is designed for advanced beginners, which means if you can make a single crochet stitch and count to thirteen, you can absolutely make this. Best of all, it works up in an afternoon, so you get that lovely finished-object feeling fast.
Materials Needed
- Yarn: Worsted weight (category 4) cotton or cotton-blend yarn, approximately 60–70 yards total.
- Color A (soft seafoam / pale aqua): approx. 40 yds
- Color B (deep ocean teal): approx. 15 yds
- Color C (sand / cream): approx. 10 yds
- Crochet hook: US H/8 (5.0 mm)
- Stitch markers: 2–4 (or use a scrap of contrasting yarn)
- Tapestry needle: a blunt-tipped yarn needle with a large eye, for seaming and weaving in ends
- Scissors
- Stuffing: a small amount of polyester fiberfill OR a ready-made dried lavender sachet insert
- Optional: 2 small beads for the tassel tops
- Finished size: approx. 3.5" wide x 3.5" tall (9 cm x 9 cm), plus tassels
Abbreviations and Beginner Glossary
Every term below is written in US crochet terms. Read this list once before you begin — you do not need to memorize it.
- ch – chain. Make a loop of yarn on your hook, then pull the working yarn through that loop. Each loop you pull through is one chain.
- sl st – slip stitch. Insert your hook into the stitch, yarn over (wrap yarn around hook), and pull that loop straight through both the stitch and the loop on your hook. It makes a nearly invisible joining stitch.
- sc – single crochet. Insert hook into stitch, yarn over, pull up a loop (2 loops on hook), yarn over again, pull through both loops. One loop remains.
- hdc – half double crochet. Yarn over first, insert hook into stitch, yarn over, pull up a loop (3 loops on hook), yarn over, pull through all 3 loops at once.
- dc – double crochet. Yarn over, insert hook into stitch, yarn over, pull up a loop (3 loops on hook), yarn over, pull through 2 loops, yarn over, pull through last 2 loops.
- sc2tog – single crochet 2 together (a decrease). Insert hook into first stitch, pull up a loop, insert hook into next stitch, pull up a loop (3 loops on hook), yarn over, pull through all 3 loops. Turns two stitches into one.
- st(s) – stitch(es). One completed loop or "V" shape in your fabric.
- sp – space. The little gap created by a chain, which you will work into on the next round.
- FO – fasten off. Cut the yarn a few inches from your work, then pull the tail all the way through the last loop to lock it.
- magic ring – an adjustable loop of yarn you crochet into, then pull tight so the center closes with no hole.
- yarn over – wrap the working yarn over your hook from back to front.
- whipstitch – a seaming stitch: bring the needle up through both layers, over the edge, and back up again in a spiral of small slanted stitches.
- right side – the "pretty" outside face of your work. Wrong side is the back face.
Gauge
14 sc x 16 rows = 4" (10 cm) in single crochet. Each square panel measures approximately 3.5" x 3.5" (9 cm x 9 cm).
Why gauge matters: Gauge is simply how big your stitches turn out. If your stitches are looser than the pattern, your pouch will be too big and the drawstring casing will not line up; if tighter, the panels will be too small to hold a sachet. How to check: chain 20, then single crochet in every row for about 4 inches. Lay the swatch flat, place a ruler across the middle, and count how many single crochet stitches fit in 4 inches. If you count more than 14, go up one hook size; if fewer than 14, go down one hook size. It takes ten minutes and saves you an entire redo.
Beginner Tips Before You Start
- Count every row. Each panel row is exactly 13 stitches. Count before you turn — it is the single easiest way to keep your square square.
- Use a stitch marker in the first stitch of every round on the sand dollar appliqué. Rounds worked in the round spiral easily, and the marker tells you where a round began.
- Do not pull your yarn tight. Tension should be relaxed enough that your hook slides easily. Tight stitches make seaming painful and the pouch stiff.
- Work the appliqué before seaming. It is far easier to attach a flat circle to a flat panel than to a stuffed pouch.
- Keep your turning chain small. The ch 1 at the start of each row is not a stitch — do not work into it, and do not count it.
- Block the panels first. A quick spritz of water and a pin to 3.5" square makes seaming line up beautifully.
Step-by-Step Instructions
Note: Work the front and back panels identically in Color A, then add the sand dollar appliqué to the front panel before seaming. The drawstring casing is worked along the top edge after seaming.
Body: Panel (make 2)
With Color A, ch 14.
Row 1: Sc in 2nd ch from hook and in each ch across. (13 sc)
Row 2: Ch 1, turn. Sc in each st across. (13 sc)
Rows 3–16: Repeat Row 2. (13 sc per row; 16 rows total; panel measures approx. 3.5" wide x 3.5" tall)
FO the first panel. Do not FO the second panel yet — leave a long tail for seaming. Block both panels lightly to 3.5" x 3.5".
Sand Dollar Appliqué (make 1, with Color C)
Work in the round. Place a stitch marker in the first stitch of each round.
Round 1: Make a magic ring, ch 1, work 10 sc into ring, join with sl st to first sc. (10 sc)
Round 2: Ch 1, 2 sc in each st around, join with sl st. (20 sc)
Round 3: Ch 1, [sc in next st, 2 sc in next st] around, join with sl st. (30 sc)
Round 4 (petal edge): Ch 1, *sl st in next st, ch 2, dc in same st, ch 2, sl st in next st; repeat from * around to create 10 small rounded petals. Join with sl st to first sl st. FO leaving a 10" tail.
Sand Dollar Detail (with Color B)
Using a tapestry needle and a 12" length of Color B, embroider a small five-point star in the center of the sand dollar: bring the needle up at the center, make 5 short straight stitches radiating outward like a star, then add a tiny center dot. Weave in ends on the back.
Attach Appliqué
Center the sand dollar on the right side of the front panel (approx. 1/4" from each edge). Pin in place. With the Color C tail and tapestry needle, whipstitch around the outer petal edge, catching only the back loops of the appliqué and the front panel. Weave in ends.
Assembly: Seam Panels
Place front and back panels wrong sides together (or right sides together for a cleaner seam; turn after seaming). Using Color B and a tapestry needle, whipstitch or backstitch around three sides (left, bottom, right), leaving the top edge open. If seaming right sides together, turn the pouch right side out after seaming. Lightly stuff with fiberfill or insert a lavender sachet bag. Do not overstuff — the sachet should stay flat and square.
Top Edging and Drawstring Casing
Round 1: With Color B, join yarn at top-right corner of the open top edge. Ch 1, work sc evenly around the entire top opening (approx. 26 sc), join with sl st to first sc. (26 sc)
Round 2: Ch 1, sc in each st around, join with sl st. (26 sc)
Round 3 (eyelet round): Ch 1, *sc in next 2 sts, ch 1, skip next st; repeat from * around, join with sl st. (approx. 8 eyelets)
Round 4: Ch 1, sc in each st and in each ch-1 sp around, join with sl st. FO.
Drawstring (make 1, with Color B)
Ch 40, sl st in 2nd ch from hook and in each ch across. FO leaving tails. Weave the drawstring through the eyelet round, beginning and ending at the center front. Tie a small bow.
Tassels (make 2, with Color B)
Cut 12 strands of Color B, each 6" long. Fold in half and tie a 4" strand tightly around the middle to form a tassel head. Trim ends evenly to approx. 1". Attach one tassel to each end of the drawstring. Optional: slide a small bead over the tassel head.
Assembly and Finishing
Seaming: Thread your tapestry needle with Color B. Hold the two panels together with the outside faces touching if you want hidden seams, or facing out if you like a visible stitched edge. Starting at the bottom-left corner, bring the needle up through both layers, then over the edge and up again about 1/4" along, repeating in a small spiral. Keep your stitches even and snug but not tight, so the fabric does not pucker. Stop when you reach the top-right corner.
Weaving in ends: Thread each tail onto the tapestry needle and run it through the back of several stitches in one direction, then back through a few in the opposite direction to lock it. Trim close to the fabric. Never knot your ends — knots work loose and create bumps.
Blocking: Lightly mist the finished sachet with water (or steam it from a few inches away), pat it into a neat square, and let it dry flat. This relaxes the cotton, evens out your stitches, and makes the appliqué sit flat.
Scenting: Add a few drops of lavender or ocean-scented oil to the stuffing if desired. The sachet can be tucked into a drawer, hung from a hook, or gifted as a keepsake.
Pro Tips and Variations
- Change the palette: Swap the seafoam for blush pink and the teal for dusty rose for a romantic version, or use a single solid color for the panels and let the appliqué be the only contrast.
- Resize it: For a larger sachet, chain 20 instead of 14 and work rows until the panel is square (about 22 rows). Keep the appliqué the same size and center it — the proportions still look lovely.
- Substitute yarn: Acrylic worsted works fine, but cotton holds the crisp square shape and absorbs scent oils better. If you use a thinner DK yarn, drop to a 4.0 mm hook and add a few extra rows to reach 3.5".
- Make it a hanging ornament: Skip the tassels and instead crochet a 30-chain loop, then attach it to the top corner so the sachet can hang in a closet or from a hook.