Free Pattern: Courtyard Cutout Tile Knit Dress in Moss and Lichen
Introduction
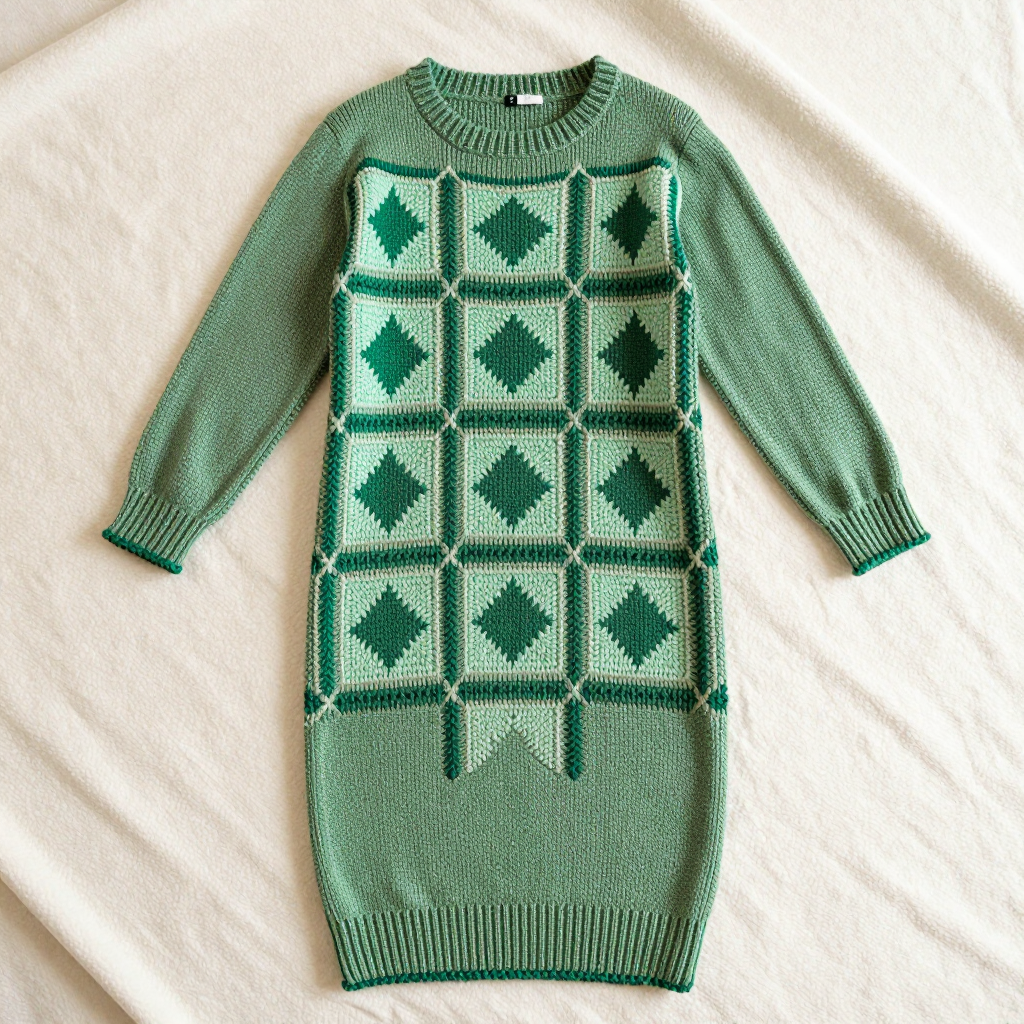
Welcome to the Courtyard Cutout Tile Dress — a calm, mid-century modern tube dress that looks far more complicated than it actually is. If you have knit a hat or a scarf in the round and can knit, purl, and decrease, you have every skill you need for this project. It is worked seamlessly from the hem up in soft bamboo cotton, so there is no seaming at the end — just a beautiful, drapey dress that falls to mid-calf. The upper body carries a grid of large square Moroccan tile motifs in moss green and lichen, and the whole thing finishes with a narrow ribbed yoke and a simple ribbed hem. The finished dress feels cool and smooth against the skin, with a soft matte finish and a straight, close-fitting silhouette that skims the body with about 1.5 inches of negative ease at the bust.
Materials Needed
- Yarn: Bamboo cotton DK weight (approx. 50% bamboo, 50% cotton; 125 m / 137 yds per 50 g skein).
- Main color (MC) moss green: approx. 7 (8, 9, 10, 11) skeins
- Contrast color (CC) lichen: approx. 2 (2, 3, 3, 3) skeins
- Main needles: 3.75 mm (US 5) circular needle, 80 cm / 32 in cable
- Yoke needles: set of 3.75 mm (US 5) double-pointed needles (or use the magic loop technique on your circular)
- Ribbing needle: 3.25 mm (US 3) circular needle (and 3.25 mm double-pointed needles for the neckband)
- Stitch markers (at least 4, plus optional markers between tile repeats)
- Stitch holders or waste yarn
- Tapestry needle (blunt tip, for weaving in ends)
- Scissors
- Finished sizes: XS (S, M, L, XL). Finished bust circumference: 84 (92, 100, 108, 116) cm / 33 (36, 39.5, 42.5, 45.5) in. Finished length from hem to shoulder: 100 cm / 39.5 in for all sizes.
Abbreviations and Beginner Glossary
- st / sts – stitch / stitches (one loop on your needle is one stitch)
- k – knit (insert the right needle into the front of the stitch, wrap yarn around, pull the loop through)
- p – purl (insert the right needle into the front of the stitch from right to left, wrap yarn, pull the loop through to the back)
- k2tog – knit 2 together (insert needle through two stitches at once and knit them as one — this decreases by one stitch and leans right)
- ssk – slip, slip, knit (slip two stitches one at a time as if to knit, then knit them together through the back loops — decreases by one and leans left)
- yo – yarn over (wrap the yarn over the needle to create a new stitch and a small hole)
- m1L – make 1 left (lift the bar between stitches from front to back and knit it through the back loop — increases by one)
- m1R – make 1 right (lift the bar between stitches from back to front and knit it through the front loop — increases by one)
- MC – main color (moss green)
- CC – contrast color (lichen)
- BOR – beginning of round (the marker that tells you where each round starts)
- stockinette stitch – when working in the round, knit every stitch on every round (the smooth "V" fabric)
- rib – alternating knit and purl stitches (2x2 rib = k2, p2; 1x1 rib = k1, p1)
- bind off – finishing the edge so stitches cannot unravel (knit or purl each stitch, then lift the previous stitch over it)
- pick up and knit – insert your needle into the edge of the fabric, wrap yarn, and pull up a new loop to create stitches
Gauge
22 sts and 30 rows = 10 cm / 4 in in stockinette stitch on 3.75 mm needles, after blocking.
Gauge matters because the tile grid depends on it: if your stitches are too big, the squares will stretch and the dress will be too wide; if too small, the dress will be tight. To check, cast on about 30 stitches on 3.75 mm needles and work in stockinette for about 12 cm / 5 in. Block it gently, lay it flat, and count how many stitches fit in 10 cm / 4 in. If you have more than 22, go up a needle size; if fewer, go down. Always measure the middle of the swatch, not the edges.
Beginner Tips Before You Start
- Use stitch markers to track rounds. Place one at the BOR and one at each side seam, and add markers between tile repeats so you never lose your place in the 24-stitch pattern.
- Do not pull your yarn too tight. Bamboo cotton has little stretch; tight tension makes the dress stiff and hard to get into. Keep your stitches relaxed and even.
- Check your stitch count at the end of every decrease round. The counts in parentheses are your safety net — if a number is off, fix it before moving on.
- Try the dress on as you go. Slip the live stitches onto waste yarn and try it on over your shoulders to check the fit before the yoke gets too narrow.
- Keep your floats loose when changing colors. Carry the unused color loosely along the wrong side so the fabric does not pucker.
- Read the whole pattern once first. Understanding the order — hem, body, tile grid, yoke, neckband, armhole edging — makes every step feel easy.
Step-by-Step Instructions
Hem
With the 3.25 mm (US 3) needle and MC, cast on 184 (200, 220, 240, 256) sts. Join to work in the round, being careful not to twist the stitches. Place a marker at the beginning of the round (BOR) and another after 92 (100, 110, 120, 128) sts for the side seam.
Rounds 1–18: Work in 2x2 rib (k2, p2) around. (184, 200, 220, 240, 256 sts) — this gives about 6 cm / 2.5 in of ribbing.
Change to the 3.75 mm (US 5) circular needle.
Body (Plain Stockinette)
Rounds 1–120: Knit every stitch around in MC. (184, 200, 220, 240, 256 sts) — this gives about 40 cm / 15.75 in from the cast-on edge. End after a full round.
Tile Grid Section
The tile grid begins at the 40 cm mark. The body is divided into front and back by the side markers, each half being 92 (100, 110, 120, 128) sts. The tile motif is a 24-stitch repeat; work 3 (4, 4, 5, 5) full repeats across each half, centering the motif with a 2-stitch CC separator at each side seam.
Round 1 (setup): *k2 in CC (side separator), work Row 1 of the Tile Chart across the next 24 sts, repeat from * around, ending with k2 CC. Place markers between each tile repeat if desired. (184, 200, 220, 240, 256 sts)
Tile Chart (written, 24-stitch repeat):
- Row 1 (CC): p2, k20, p2.
- Row 2 (CC): k2, p20, k2.
- Row 3 (CC): p2, k2, p16, k2, p2.
- Row 4 (CC): k2, p2, k16, p2, k2.
- Row 5 (CC): p2, k2, p2, k12, p2, k2, p2.
- Row 6 (CC): k2, p2, k2, p12, k2, p2, k2.
- Row 7 (CC): p2, k2, p2, k2, p8, k2, p2, k2, p2.
- Row 8 (CC): k2, p2, k2, p2, k8, p2, k2, p2, k2.
- Row 9 (CC): p2, k2, p2, k2, p2, k4, p2, k2, p2, k2, p2.
- Row 10 (CC): k2, p2, k2, p2, k2, p4, k2, p2, k2, p2, k2.
- Row 11 (CC): p2, k2, p2, k2, p2, k4, p2, k2, p2, k2, p2.
- Row 12 (CC): k2, p2, k2, p2, k8, p2, k2, p2, k2.
- Row 13 (CC): p2, k2, p2, k2, p8, k2, p2, k2, p2.
- Row 14 (CC): k2, p2, k2, p12, k2, p2, k2.
- Row 15 (CC): p2, k2, p2, k12, p2, k2, p2.
- Row 16 (CC): k2, p2, k16, p2, k2.
- Row 17 (CC): p2, k2, p16, k2, p2.
- Row 18 (CC): k2, p20, k2.
- Row 19 (CC): p2, k20, p2.
- Row 20 (CC): k2, p20, k2.
- Row 21 (CC): p2, k2, p16, k2, p2.
- Row 22 (CC): k2, p2, k16, p2, k2.
- Row 23 (CC): p2, k2, p2, k12, p2, k2, p2.
- Row 24 (CC): k2, p2, k2, p12, k2, p2, k2.
Rows 1–24 form one tile square: the outlined square border is worked in CC, and the stepped diamond center is worked in MC. Repeat Rows 1–24 two more times (72 rounds total, approx. 24 cm / 9.5 in). The tile grid ends approx. 64 cm / 25 in from the cast-on edge. (184, 200, 220, 240, 256 sts)
Yoke (Narrow Seamless Yoke)
After completing the tile grid, work 4 rounds in plain stockinette in MC, then begin yoke shaping.
Round 1 (decrease): *k2tog, k6, repeat from * around. (161, 175, 193, 210, 224 sts)
Rounds 2–4: Knit. (161, 175, 193, 210, 224 sts)
Round 5 (decrease): *k2tog, k5, repeat from * around. (138, 150, 165, 180, 192 sts)
Rounds 6–8: Knit. (138, 150, 165, 180, 192 sts)
Round 9 (decrease): *k2tog, k4, repeat from * around. (115, 125, 138, 150, 160 sts)
Rounds 10–12: Knit. (115, 125, 138, 150, 160 sts)
Round 13 (decrease): *k2tog, k3, repeat from * around. (92, 100, 110, 120, 128 sts)
Rounds 14–16: Knit. (92, 100, 110, 120, 128 sts)
Round 17 (decrease): *k2tog, k2, repeat from * around. (69, 75, 83, 90, 96 sts)
Rounds 18–20: Knit. (69, 75, 83, 90, 96 sts)
Round 21 (decrease): *k2tog, k1, repeat from * around. (46, 50, 55, 60, 64 sts)
Rounds 22–24: Knit. (46, 50, 55, 60, 64 sts)
Round 25 (decrease): *k2tog, repeat from * around. (23, 25, 28, 30, 32 sts)
Rounds 26–28: Knit. (23, 25, 28, 30, 32 sts)
Round 29: k1, *k2tog, repeat from * around. (12, 13, 14, 15, 16 sts)
Neckband
Change to the 3.25 mm (US 3) needle. Work in 1x1 rib (k1, p1) for 3 cm / 1.25 in. Bind off loosely in rib. (12, 13, 14, 15, 16 sts)
Sleeve Openings (Armhole Edging)
With the 3.25 mm (US 3) needle and MC, pick up and knit approx. 60 (64, 68, 72, 76) sts around each armhole opening. Work 3 rounds in 1x1 rib. Bind off loosely in rib. Repeat for the second armhole.
Assembly and Finishing
Weave in all ends. Thread each yarn tail onto the tapestry needle and run it through the back of several stitches, then back through itself, and trim. Do this on the wrong side so no ends show.
Block the dress. Soak it gently in cool water for about 15 minutes, squeeze (do not wring) out the water in a towel, and lay it flat to the finished measurements. Pin the tile grid flat so the squares stay crisp, and steam gently to set the motifs. The bamboo cotton will relax slightly after blocking.
Check the underarms. Because this dress is seamless, no seaming is needed — but if a small gap appears at the underarm, use a short length of MC and the tapestry needle to close it with a few small stitches.
Pro Tips and Variations
- Change the colors. Swap moss and lichen for any two-tone pairing — try charcoal and cream, or terracotta and sand — for a completely different mood.
- Adjust the length. For a longer or shorter dress, simply add or remove rounds in the plain stockinette body section before the tile grid; the tile grid and yoke stay unchanged.
- Substitute yarn. Any DK-weight yarn with a similar gauge works; a cotton-linen blend gives a crisper, more structured tile, while a bamboo blend keeps the soft drape.
- Add a little waist shaping. For a more fitted look, work a few evenly spaced decreases just below the bust and mirror them with increases at the hip, keeping the side markers as your guide.