Ballet-Core Chiffon Illusion Overskirt Dress Free Knitting Pattern
Ballet-Core Chiffon Illusion Overskirt Dress — Free Knitting Pattern
Introduction
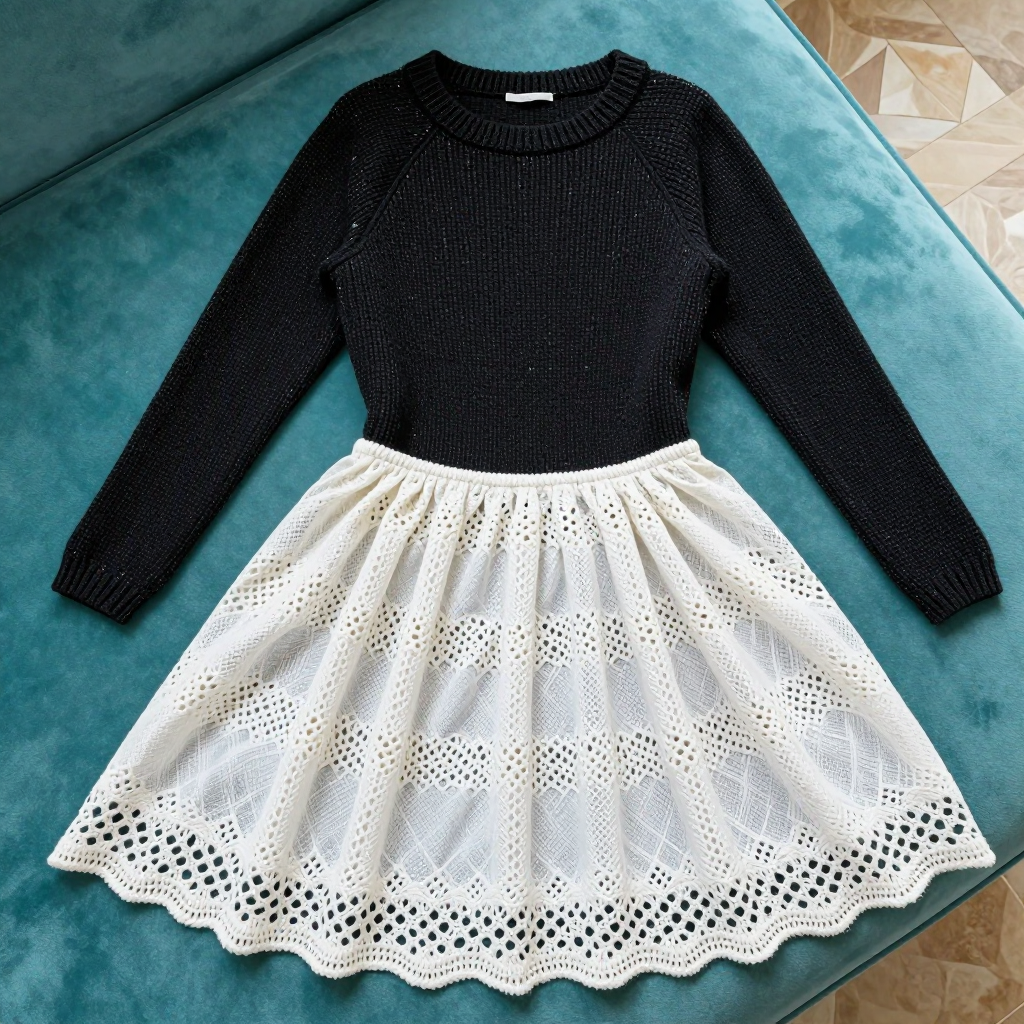
This is the project that makes people stop you in the street and ask, "Wait — you made that?" The Ballet-Core Chiffon Illusion Overskirt Dress is a slim, straight black tweed raglan dress knit seamlessly from the top down, then finished with a floaty white mohair openwork overskirt sewn on at the waist so it drifts around you like a chiffon ballet skirt. It is perfect for an advanced beginner who has knit a hat or a scarf and is ready for their first garment — there is no waist shaping, no complicated construction, and no seaming on the dress itself. The finished piece looks like a designer ballet rehearsal dress: dense, flecked black tweed against a sheer, airy white lace that catches the light. It feels structured and warm on the body, with a soft, weightless layer floating over the hips.
Materials Needed
- Main dress yarn: DK-weight tweed wool (approx. 250 m / 273 yds per 100 g skein), black — approx. 900 (1000, 1100, 1200) g.
- Overskirt yarn: Lace-weight mohair-silk blend (approx. 420 m / 460 yds per 50 g skein), white — approx. 100 (110, 120, 130) g, held single (one strand only).
- Main dress needles: 4.0 mm (US 6) circular needle, 80 cm (32 in) cable, plus a set of 4.0 mm (US 6) double-pointed needles for the sleeves.
- Overskirt needles: 5.0 mm (US 8) circular needle, 80 cm (32 in) cable.
- Stitch markers: at least 5 (one distinct colour for the beginning of round).
- Stitch holders or waste yarn for the sleeve stitches.
- Tapestry needle (blunt tip, large eye) for seaming and weaving in ends.
- Scissors and a tape measure.
- Finished sizes: XS (S, M, L). Finished chest circumference: 90 (98, 106, 114) cm / 35.5 (38.5, 41.75, 45) in. Finished dress length from shoulder: 90 (92, 94, 96) cm / 35.5 (36.25, 37, 37.75) in. Overskirt length from waist seam: 40 cm / 15.75 in. The dress is designed with 5–8 cm / 2–3 in of positive ease at the chest (meaning it measures a little bigger than your body) and a slim, straight body.
Abbreviations and Beginner Glossary
- k — knit: insert the right needle into the front of the stitch from left to right, wrap the yarn around, and pull the loop through.
- p — purl: insert the right needle into the front of the stitch from right to left, wrap the yarn around the front, and pull the loop through.
- k2tog — knit 2 together: insert the needle into two stitches at once and knit them as one. This decreases your stitch count by one and leans to the right.
- yo — yarn over: bring the yarn over the top of the right needle to make an extra loop. On the next row this loop is worked and leaves a small hole (an eyelet).
- kfb — knit into front and back: knit into the front of the stitch as normal, then, without removing it, knit into the back of the same stitch. This makes two stitches from one (an increase).
- pm — place marker: slide a marker onto the needle to mark a spot.
- sm — slip marker: move the marker from the left needle to the right needle without working it.
- BOR — beginning of round: the point where each new round starts.
- RS — right side: the outside of the fabric that people will see.
- WS — wrong side: the inside of the fabric.
- sts — stitches.
- stockinette stitch — in the round, knit every stitch of every round; worked flat, knit on RS rows and purl on WS rows. It makes a smooth, flat fabric.
- garter stitch — knit every stitch of every row. It makes a bumpy, ridged fabric that does not curl.
- k1, p1 ribbing — alternate one knit and one purl stitch; on the next round, knit the knits and purl the purls. It makes a stretchy, ridged band.
- long-tail cast-on — a stretchy, tidy way to get the first stitches onto the needle; search "long-tail cast-on" for a 30-second video if it is new to you.
- backward-loop cast-on — make a loop of yarn and twist it onto the needle; used here to add underarm stitches.
- wrap and turn (short rows) — knit the stated number of stitches, then bring the yarn to the front, slip the next stitch, take the yarn to the back, and turn your work to go the other way. This shapes the neckline.
- bind off — the way to finish an edge so stitches do not unravel. A "stretchy bind-off" (such as Jeny's Surprisingly Stretchy Bind-Off) keeps edges loose enough to wear.
Gauge
Main dress (4.0 mm needles, black tweed, stockinette, blocked): 22 sts x 30 rows = 10 x 10 cm / 4 x 4 in.
Overskirt (5.0 mm needles, white mohair, eyelet lace pattern, blocked): 16 sts x 22 rows = 10 x 10 cm / 4 x 4 in.
Gauge matters because it is the only way to know your finished dress will actually fit. If you have more stitches per 10 cm than stated, your dress will come out smaller than planned; fewer stitches, and it will come out bigger. To swatch: cast on about 30 stitches with the dress yarn and 4.0 mm needles, work in stockinette for about 12 cm, bind off, wash and lay flat to dry, then measure a 10 cm section in the middle and count the stitches and rows. Repeat with the mohair and 5.0 mm needles in the eyelet lace pattern. If your numbers differ, change needle size until they match.
Beginner Tips Before You Start
- Use stitch markers to track everything. Keep the four raglan markers in place at all times, and use a different-coloured marker at the BOR so you always know where a round begins.
- Do not pull your yarn too tight. Tension creeps up when you concentrate. Relaxed stitches make a softer dress and a stretchier neckline.
- Try the dress on as you go. Slide the body stitches onto a long scrap of yarn to check the fit at the chest and underarm before you commit.
- Count your stitches after every increase round. Raglan mistakes are easy to fix now and painful to fix later.
- Knit the overskirt second. Finish and block the dress first so you can measure exactly where the waist seam should sit on your body.
- Swatch the mohair. Fuzzy yarn hides mistakes but also hides your stitch count — count carefully on the lace rows.
Step-by-Step Instructions
Part 1: Black Tweed Raglan Dress (worked top-down, seamless)
Neckline cast-on: With the 4.0 mm circular needle and black tweed, cast on 96 (100, 104, 108) sts using the long-tail cast-on. Join to work in the round, being careful not to twist the stitches. Place a distinct marker at the join (this is the BOR, at centre back).
Set up raglan markers: Place markers as follows: pm (BOR at centre back), k32 (34, 36, 38) back sts, pm (raglan marker A), k12 right sleeve sts, pm (raglan marker B), k32 (34, 36, 38) front sts, pm (raglan marker C), k12 left sleeve sts, pm (raglan marker D). You now have 4 raglan markers, 12 sleeve sts on each side, and 32 (34, 36, 38) front and back sts. (96, 100, 104, 108 sts)
Short-row neck shaping (optional — skip for a simple straight neckline): Work short rows to raise the back neck. Row 1 (RS): k to marker A, sm, k1, wrap and turn. Row 2 (WS): p to marker D, sm, p1, wrap and turn. Continue working short rows, each time working 2 sts past the previous turn, until you have worked 6 short rows on each side. Resume working in the round, picking up the wraps as you go.
Raglan increases: You will increase 8 sts every other round — one stitch on each side of each of the four raglan markers.
Round 1 (increase round): *K to 1 st before the raglan marker, kfb, sm, kfb; repeat from * 4 times total (once at each raglan marker), k to end. (8 sts increased)
Round 2: Knit all sts. (no change)
Repeat Rounds 1–2 a total of 22 (24, 26, 28) times. You will have increased 176 (192, 208, 224) sts in total.
After the final increase round you should have: back 76 (82, 88, 94) sts, front 76 (82, 88, 94) sts, each sleeve 56 (60, 64, 68) sts. Total: 264 (284, 304, 324) sts.
Divide for body and sleeves: Knit to raglan marker A and remove it. Place the next 56 (60, 64, 68) sleeve sts on waste yarn or a stitch holder. Using the backward-loop cast-on, cast on 6 (6, 8, 8) sts for the first underarm. Knit to raglan marker C and remove it. Place the next 56 (60, 64, 68) sleeve sts on waste yarn. Cast on 6 (6, 8, 8) sts for the second underarm. Knit to the BOR. You now have 164 (176, 192, 204) sts on the needle for the body (front + back + both underarms).
Body: Work in stockinette stitch (knit every round) in the round until the body measures 60 (61, 62, 63) cm / 23.5 (24, 24.5, 25) in from the underarm, or until the dress measures 90 (92, 94, 96) cm / 35.5 (36.25, 37, 37.75) in from the shoulder. The body is a straight tube with no waist shaping. (164, 176, 192, 204 sts)
Hem: Work 6 rounds of k1, p1 ribbing. Bind off all sts loosely in rib pattern using a stretchy bind-off. (164, 176, 192, 204 sts bound off)
Sleeves (worked in the round from the held sts — make 2): Slip the 56 (60, 64, 68) held sleeve sts onto the 4.0 mm double-pointed needles. Pick up and knit 6 (6, 8, 8) sts from the underarm cast-on edge. Place a marker at the centre of the underarm. You now have 62 (66, 72, 76) sts. Work in stockinette stitch in the round for 40 cm / 15.75 in from the underarm, or to your desired sleeve length. Work 6 rounds of k1, p1 ribbing. Bind off loosely in rib pattern. (62, 66, 72, 76 sts bound off) Repeat for the second sleeve.
Neckband: With the 4.0 mm circular needle and black tweed, pick up and knit 1 st for every cast-on st around the neckline — approx. 96 (100, 104, 108) sts. Work 4 rounds of k1, p1 ribbing. Bind off loosely in rib pattern. (96, 100, 104, 108 sts bound off)
Part 2: White Mohair Openwork Overskirt (worked flat, then sewn on)
The overskirt is worked flat from the waist down as a rectangular panel with a gentle A-line flare created by increasing in the lace pattern, then sewn to the dress at the waistline. It is worked in white mohair-silk lace-weight yarn held single (one strand) on 5.0 mm needles.
Overskirt panel (make 1): With the 5.0 mm circular needle and white mohair, cast on 144 (156, 168, 180) sts. Work in the Eyelet Lace Pattern below.
Eyelet Lace Pattern (multiple of 12 sts + 4):
Row 1 (RS): K2, *yo, k2tog, k8, yo, k2tog; repeat from * to last 2 sts, k2.
Row 2 (WS): Purl all sts.
Row 3: K2, *k1, yo, k2tog, k6, yo, k2tog, k1; repeat from * to last 2 sts, k2.
Row 4: Purl all sts.
Row 5: K2, *k2, yo, k2tog, k4, yo, k2tog, k2; repeat from * to last 2 sts, k2.
Row 6: Purl all sts.
Row 7: K2, *k3, yo, k2tog, k2, yo, k2tog, k3; repeat from * to last 2 sts, k2.
Row 8: Purl all sts.
Row 9: K2, *k4, yo, k2tog, yo, k2tog, k4; repeat from * to last 2 sts, k2.
Row 10: Purl all sts.
Row 11: K2, *k5, yo, k2tog, k5; repeat from * to last 2 sts, k2.
Row 12: Purl all sts.
Repeat Rows 1–12 for the lace pattern. (144, 156, 168, 180 sts throughout)
Shaping (A-line flare): Work in the Eyelet Lace Pattern for 8 rows. On the next RS row, increase 1 st in each repeat by working kfb in the first stitch of each 12-st repeat. (12 sts increased — 156, 168, 180, 192 sts) Work 8 rows even. Increase again in the same manner. (12 sts increased — 168, 180, 192, 204 sts) Work 8 rows even. Increase again in the same manner. (12 sts increased — 180, 192, 204, 216 sts) Work even in the Eyelet Lace Pattern until the overskirt measures 38 cm / 15 in from the cast-on edge, ending with a WS row. (180, 192, 204, 216 sts)
Overskirt hem: Work 4 rows of garter stitch (knit every row). Bind off all sts loosely knitwise. (180, 192, 204, 216 sts bound off)
Assembly and Finishing
Blocking: Soak the black dress in cool water with a little wool wash, squeeze gently (never wring), roll in a towel to remove water, then lay flat and pin to the finished measurements. Block the white overskirt panel to measure approx. 90 (98, 106, 114) cm / 35.5 (38.5, 41.75, 45) in wide at the top edge and 40 cm / 15.75 in long. Allow both to dry completely — mohair can take a full day.
Sewing the overskirt: Turn the dress inside out. Pin the top edge of the white overskirt panel to the dress at the waistline — approx. 30–32 cm / 12–12.5 in below the underarm, or at your natural waist. The overskirt should wrap around the dress with a slight overlap at the centre back. Thread a tapestry needle with white mohair and sew the top edge of the overskirt to the dress with a whipstitch (a simple over-and-over stitch), working through the back loops of the dress stitches only so the seam does not show on the right side. Then sew the short ends of the overskirt together at the centre back with mattress stitch (a ladder-like stitch that joins two edges invisibly).
Weave in ends: Thread each tail onto the tapestry needle and run it through the back of several stitches, then back through a few more in the opposite direction to lock it. Trim close to the fabric. Gently steam the seams with an iron held a few centimetres above the fabric — never press directly onto mohair.
Pro Tips and Variations
- Colour play: Swap the black tweed for deep navy, forest green, or oxblood, and try a blush or ivory mohair for the overskirt. Keep the contrast strong so the ballet-skirt illusion reads clearly.
- Length adjustments: The straight body makes length easy — simply knit more or fewer rounds before the hem. Every extra 30 rounds adds about 10 cm / 4 in at this gauge. Adjust the overskirt's waist seam position to match.
- Yarn substitutions: Any DK-weight wool or wool-blend that meets gauge will work for the dress; a smooth alpaca-silk lace yarn can replace the mohair for a less fuzzy, more fluid overskirt (swatch first, as drape will change).
- Make it a top: For a shorter, more wearable version, stop the body at hip length (about 40 cm / 15.75 in from the underarm) and sew the overskirt on as a peplum — the same instructions work, just repositioned.