Twilight Acorn Cap Baby Beanie Free Crochet Pattern
Twilight Acorn Cap Baby Beanie: A Free Beginner-Friendly Crochet Pattern
Introduction
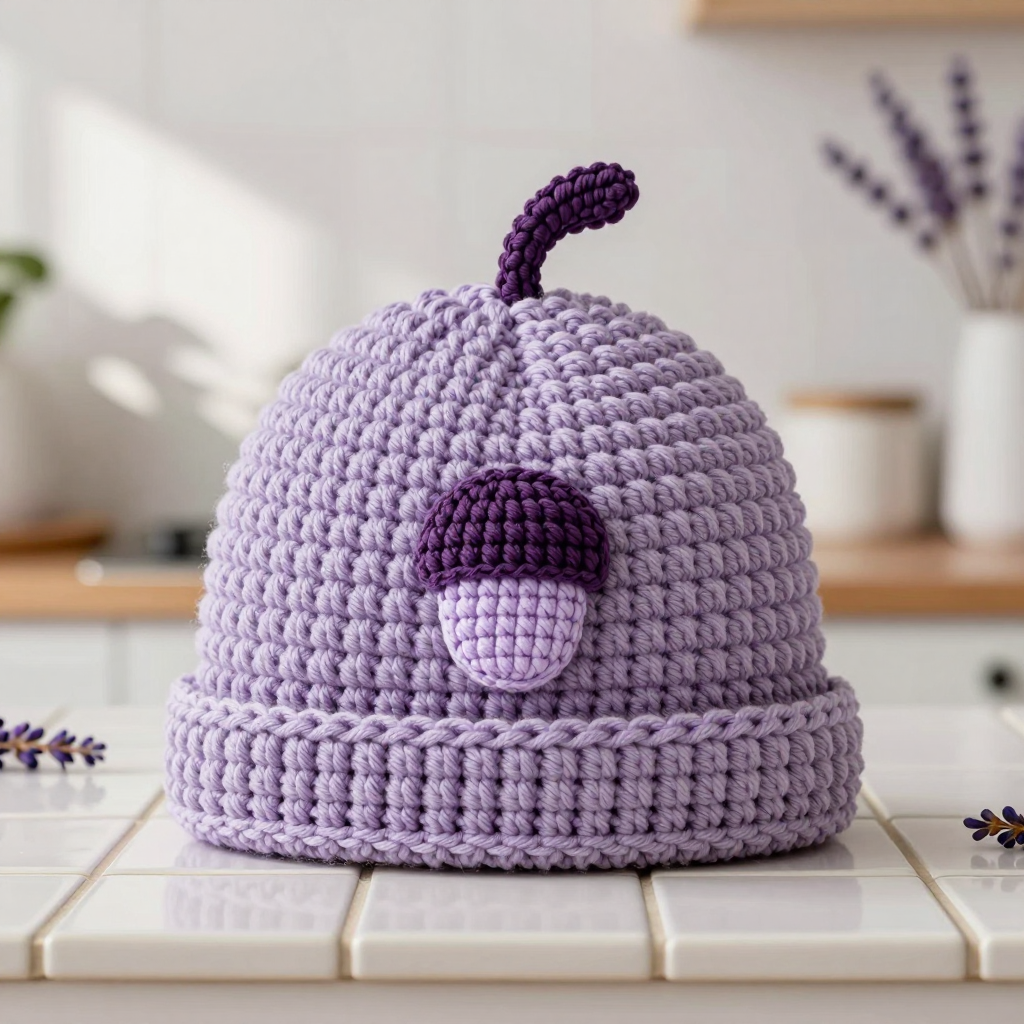
Welcome to the Twilight Acorn Cap, a sweet little woodland beanie that is perfect for anyone who has just learned the basics of crochet and wants to make something truly gift-worthy. This project is ideal for complete beginners because it uses only the simplest stitches, worked in a smooth, continuous spiral, so there is no confusing joining or turning. The finished hat is a soft, dusky lilac dome with a gently rolled brim, and it is topped with a tiny pale lavender acorn and a curved plum stem that give it a whimsical fairycore charm. It feels squishy and cozy in worsted weight yarn, stretches comfortably to fit a little head, and works up in just a few relaxed evenings. If you can make a single crochet, you can make this cap.
Materials Needed
- Yarn: Worsted weight (Category 4) acrylic or cotton blend. You will need approximately 90–110 yards of dusty lilac (Color A) for the hat, 8–10 yards of pale lavender (Color B) for the acorn body, and 3–4 yards of deep muted plum (Color C) for the acorn cap and stem.
- Crochet hook: US H/8 (5.0 mm) for the hat, and US G/6 (4.0 mm) for the acorn appliqué.
- Stitch marker (one is enough, but a few are handy).
- Tapestry needle (a blunt, large-eyed needle for sewing in ends).
- Scissors.
- Optional: a tiny scrap of yarn or fiberfill to lightly stuff the acorn.
- Finished size: 0–6 months, approximately 6.5 inches (16.5 cm) tall and 14 inches (35.5 cm) in circumference, stretching to fit a 13–16 inch (33–41 cm) head.
Abbreviations and Beginner Glossary
- ch – chain: yarn over the hook and pull it through the loop on your hook to make one chain.
- sl st – slip stitch: insert your hook into the stitch, yarn over, and pull the loop straight through both the stitch and the loop on your hook. It makes a flat, tight stitch.
- sc – single crochet: insert your hook into the stitch, yarn over, pull up a loop (two loops on hook), yarn over again, and pull through both loops. This is the main stitch of the whole pattern.
- hdc – half double crochet: yarn over, insert hook into stitch, yarn over, pull up a loop (three loops on hook), yarn over, pull through all three loops at once.
- dc – double crochet: yarn over, insert hook into stitch, yarn over, pull up a loop (three loops on hook), yarn over and pull through two loops, yarn over and pull through the last two loops.
- sc2tog – single crochet 2 together (a decrease): insert your hook into the first stitch, pull up a loop, insert your hook into the next stitch, pull up a loop (three loops on hook), yarn over and pull through all three loops. This turns two stitches into one.
- BLO – back loop only: each stitch has two top loops (a front loop and a back loop). Working in the back loop only means you insert your hook under just the loop farthest from you, which creates a ridge and a rolled edge.
- MR – magic ring: an adjustable loop you crochet into and then pull closed, so there is no hole in the center. If you prefer, you can chain 2 and work your first stitches into the second chain instead.
- st(s) – stitch(es).
- 2 sc in next st – an increase: work two single crochets into the same stitch to add one stitch.
- Fasten off – cut the yarn, pull the tail all the way through the last loop, and tighten.
Gauge
Gauge: 14 single crochet stitches x 16 rounds = 4 inches (10 cm) in single crochet worked in the round with the 5.0 mm hook.
Gauge matters because it tells you whether your hat will come out the right size. If your stitches are bigger than the gauge, the hat will be too large; if they are smaller, it will be too small. To check, crochet a small flat swatch about 4 inches square in single crochet, then lay a ruler across the middle and count how many stitches fit in 4 inches and how many rows fit in 4 inches. If you have more stitches than 14, switch to a larger hook; if you have fewer, switch to a smaller hook. Always check gauge before you begin the hat.
Beginner Tips Before You Start
- Use a stitch marker. Because the hat is worked in a continuous spiral, place a marker in the first stitch of each round so you always know where the round begins and ends.
- Do not pull your yarn too tight. Keep an even, relaxed tension. Tight stitches make the hat stiff and too small, and they are hard to work into.
- Count your stitches at the end of every increase round. The numbers in parentheses tell you exactly how many stitches you should have. If you are off, fix it before moving on.
- Work the crown flat on a table now and then. A flat, round circle means your increases are even. If it cups upward, you have too few stitches; if it ripples, you have too many.
- Keep your magic ring tail handy. Give the starting tail a gentle tug after Round 1 to close the center hole snugly.
- Make the acorn last. Finish and fasten off the hat completely before starting the small appliqué so you can focus on the tiny stitches.
Step-by-Step Instructions
Hat Body (Color A, 5.0 mm hook)
Work in continuous rounds. Do not join or turn unless stated. Place a marker in the first stitch of each round.
Round 1: Make a magic ring, ch 1, work 6 sc into the ring. Pull the ring closed. (6 sc)
Round 2: 2 sc in each st around. (12 sc)
Round 3: [2 sc in next st, sc in next st] around. (18 sc)
Round 4: [2 sc in next st, sc in next 2 sts] around. (24 sc)
Round 5: [2 sc in next st, sc in next 3 sts] around. (30 sc)
Round 6: [2 sc in next st, sc in next 4 sts] around. (36 sc)
Round 7: [2 sc in next st, sc in next 5 sts] around. (42 sc)
Round 8: [2 sc in next st, sc in next 6 sts] around. (48 sc)
Round 9: [2 sc in next st, sc in next 7 sts] around. (54 sc)
Round 10: [2 sc in next st, sc in next 8 sts] around. (60 sc)
Round 11: [2 sc in next st, sc in next 9 sts] around. (66 sc)
Round 12: [2 sc in next st, sc in next 10 sts] around. (72 sc)
The crown should now measure about 5 inches (12.5 cm) across.
Rounds 13–30: Sc in each st around. (72 sc) Do not increase. The hat body should measure about 6.5 inches (16.5 cm) from crown to edge.
Brim
Round 31: Working in the back loop only (BLO), sc in each st around. (72 sc)
Round 32: Sc in each st around. (72 sc)
Round 33: Sl st in each st around for a neat rolled edge. Fasten off and weave in ends. (72 sts)
Acorn Body (Color B, 4.0 mm hook)
Round 1: Make a magic ring, ch 1, work 6 sc into the ring. (6 sc)
Round 2: 2 sc in each st around. (12 sc)
Round 3: Sc in each st around. (12 sc)
Round 4: [Sc2tog, sc in next 4 sts] around. (10 sc)
Round 5: [Sc2tog, sc in next 3 sts] around. (8 sc)
Stuff lightly with a tiny scrap of yarn, or leave flat. Fasten off, leaving a 6-inch tail for sewing.
Acorn Cap (Color C, 4.0 mm hook)
Round 1: Make a magic ring, ch 1, work 6 sc into the ring. (6 sc)
Round 2: 2 sc in each st around. (12 sc)
Round 3: [2 sc in next st, sc in next st] around. (18 sc)
Round 4: Sc in each st around. (18 sc)
Round 5: [Sc2tog, sc in next st] around. (12 sc)
Fasten off, leaving a 6-inch tail. The cap should form a shallow dome that fits over the top of the acorn body.
Stem (Color C, 4.0 mm hook)
Row 1: Ch 7. Sl st in the 2nd ch from hook and in each ch across. (6 sl sts) Fasten off, leaving a short tail. The stem will curve slightly; shape it into a gentle arc.
Assembly and Finishing
Step 1 – Join the acorn cap to the body. Thread the Color C tail from the cap onto your tapestry needle. Place the cap over the top third of the acorn body, matching the cap edge to the widest part of the body. Sew around the edge with small, even stitches, going through both layers, then secure the tail inside.
Step 2 – Attach the stem. Thread the stem tail onto the needle and sew the flat end of the stem to the center top of the acorn cap with a few small stitches. Curve the stem gently toward one side as you sew so it holds its arc.
Step 3 – Place the acorn on the hat. Position the finished acorn on the front of the hat, about 1.5 inches (4 cm) above the brim. Pin it in place. Thread the Color B tail from the acorn body onto your needle and sew securely all the way around the base of the acorn, going through the hat fabric only (not through to the inside front).
Step 4 – Weave in ends. Turn the hat inside out and weave each remaining tail back and forth through several stitches, then trim close to the fabric so it will not work loose.
Step 5 – Block. Lightly steam the hat and acorn to settle the stitches, holding the iron an inch or two above the fabric and never pressing down. Take care not to flatten the acorn. Let the hat dry completely. It should measure approximately 6.5 inches tall and 14 inches in circumference, fitting a 0–6 month baby.
Pro Tips and Variations
- Change the colors: Try a soft sage green hat with a cream acorn, or a warm oatmeal hat with a rust acorn, for different woodland moods. Simply swap Colors A, B, and C.
- Adjust the size: To make a larger hat, add one more increase round (for example, Round 13: [2 sc in next st, sc in next 11 sts] around for 78 sc) and then work the body rounds until the hat measures your desired height. To make a smaller hat, stop the crown increases one round earlier.
- Substitute yarn: A cotton blend gives crisp stitch definition, while acrylic is softer and stretchier. Just check your gauge again with any new yarn, since the hat size depends on it.
- Add a little texture: Work the brim rounds in half double crochet (hdc) instead of single crochet for a slightly taller, softer rolled edge.