Tide Line Mosaic Crochet Coaster Free Pattern

Tide Line Mosaic Crochet Coaster: A Beginner-Friendly First Project
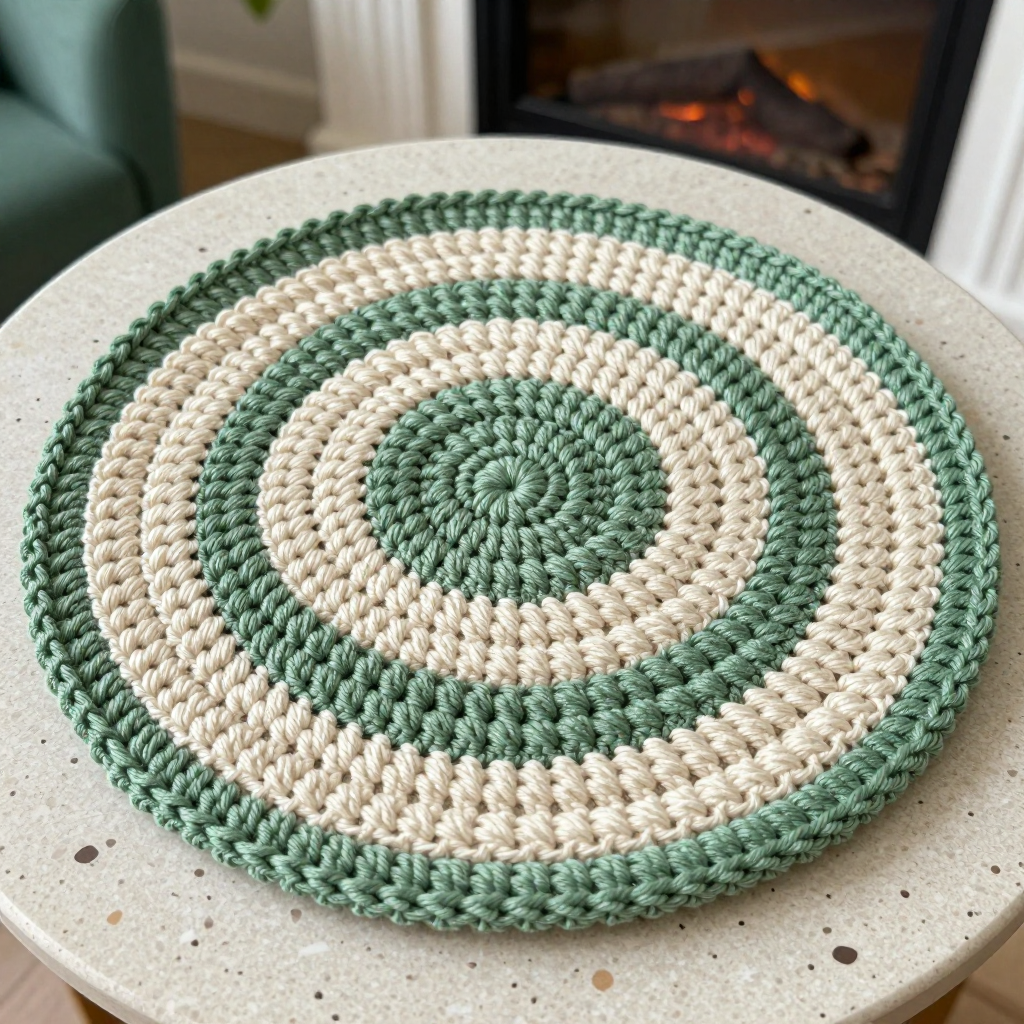
Welcome! If you have never held a crochet hook before, this is the perfect place to start. The Tide Line Mosaic Crochet Coaster is a small, flat, round mat worked in two colors of cotton yarn, and it looks like gentle navy and white waves rippling out from the center. It is worked entirely in single crochet, the simplest stitch there is, so you only need to learn one motion to make the whole thing. The finished coaster is about 4.5 inches (11.5 cm) across, sturdy and absorbent, with a tidy white edge and raised white rings that sit slightly forward of the navy for a lovely rippled texture. Because it is small, you can finish it in an evening, and you will end up with something genuinely useful for your table.
Materials Needed
- Yarn: Worsted weight (category 4) cotton yarn. You need approximately 15 yd (14 m) of navy (Color A) and 10 yd (9 m) of white (Color B) per coaster. Cotton is recommended because it is absorbent and holds its shape; a cotton-blend also works.
- Crochet hook: Size G/6 (4.0 mm), or whatever size gives you the gauge below.
- Stitch marker: One removable marker (or a safety pin, or a short scrap of contrasting yarn) to mark the first stitch of each round.
- Tapestry needle: A blunt-tipped needle with a large eye for weaving in ends.
- Scissors: Any small sharp pair.
- Finished size: Approximately 4.5 in (11.5 cm) in diameter, flat like a small mat.
Abbreviations and Beginner Glossary
Every abbreviation used in this pattern is listed here. Read through it once before you begin; you do not need to memorize it.
- ch – chain. Make a loop of yarn on the hook, wrap yarn over the hook, and pull it through the loop already on the hook. That is one chain.
- sc – single crochet. Insert the hook into the stitch, wrap yarn over the hook, pull up a loop (you now have two loops on the hook), wrap yarn over again, and pull through both loops. One single crochet made.
- dc – double crochet. (Listed for reference; this pattern does not use it.) Wrap yarn over the hook first, insert into the stitch, pull up a loop, wrap and pull through two loops, wrap and pull through the last two loops.
- sl st – slip stitch. Insert the hook into the stitch, wrap yarn over, and pull that loop straight through the loop on your hook. It joins without adding height.
- st / sts – stitch / stitches. One completed stitch, or several.
- sp – space. A small gap between stitches.
- beg – beginning. The start of a round.
- FLO – front loop only. Every single crochet stitch has two loops at its top, one nearer you (front) and one farther away (back). Working in the FLO means you insert your hook under only the loop nearer you.
- BLO – back loop only. Insert your hook under only the loop farther away from you.
- RS – right side. The side of the fabric that faces out and will be seen.
- WS – wrong side. The back of the fabric, which faces down.
- magic ring – an adjustable loop of yarn used to start a circle so the center hole can be pulled tight. Make a loop that overlaps itself, work your stitches into the loop, then pull the short tail to close it.
- 2 sc in next st – work two single crochets into the same stitch. This is an increase and makes the circle grow.
- [ ] – brackets. Repeat everything inside the brackets the number of times stated after them.
- Fasten off – cut the yarn a few inches from the work and pull the tail all the way through the last loop to lock it.
Gauge
Gauge: 4 rounds of the coaster = 1 in (2.5 cm) in diameter. In other words, after you have worked 4 rounds, your circle should measure about 1 inch across.
Gauge matters because it is how we make sure your coaster comes out the same size as the one described. If your stitches are too tight, the coaster will be small and stiff; if too loose, it will be floppy and oversized. To check, simply work Rounds 1 through 4 of the pattern and measure straight across the circle. If it is smaller than 1 inch, try a larger hook; if larger, try a smaller hook. Because this is a small project, this quick check is all the swatching you need.
Beginner Tips Before You Start
- Use the stitch marker every single round. Because this coaster is worked in a continuous spiral with no join at the end of each round, the marker tells you where each new round begins. Move it up as you go.
- Do not pull the yarn too tight. Beginners tend to choke the hook. Keep your loops relaxed so the hook slides in easily; tight stitches make the circle cup upward.
- Count after every round. The stitch count in parentheses at the end of each round is your safety net. If it does not match, fix it before moving on.
- Carry the unused color loosely. When you change colors, do not cut the old yarn. Leave it hanging on the inside and pick it up again later, keeping the strand relaxed so it does not pucker.
- Change color on the last stitch. Work the final single crochet of a round until two loops remain on the hook, then pull the new color through those two loops. This makes a clean transition.
- Keep the front loops free on purpose. In the mosaic rounds you deliberately skip the front loop and work into the back loop. Those free loops are what create the raised rings, so do not worry that they look unfinished.
Step-by-Step Instructions
Mosaic note: This coaster is worked in the round in continuous spirals (no joining between rounds), alternating two rounds of navy (A) with one round of white (B). The mosaic texture comes from working some stitches into the front loop only of the round below and some into the back loop only, so the unused loop sits forward and forms a raised ring. Always change color on the last stitch of a round by pulling the new color through the final two loops. Do not cut the old color; carry it loosely up the inside.
Body
Round 1 (A, navy): Make a magic ring. Ch 1. Work 8 sc into the ring. Do not join. Place a marker in the first st. (8 sc)
Round 2 (A): 2 sc in each st around. (16 sc)
Round 3 (A): [Sc in next st, 2 sc in next st] around. (24 sc)
Round 4 (B, white): Change to B on the last st of Round 3. Sc in the FLO of each st around. (24 sc)
Round 5 (A): Change to A. Working into the BLO of Round 3 (the loops left free behind Round 4), [sc in next 2 sts, 2 sc in next st] around. (32 sc)
Round 6 (A): Sc in each st around. (32 sc)
Round 7 (B): Change to B. Sc in the FLO of each st around. (32 sc)
Round 8 (A): Change to A. Working into the BLO of Round 6, [sc in next 3 sts, 2 sc in next st] around. (40 sc)
Round 9 (A): Sc in each st around. (40 sc)
Round 10 (B): Change to B. Sc in the FLO of each st around. (40 sc)
Round 11 (A): Change to A. Working into the BLO of Round 9, [sc in next 4 sts, 2 sc in next st] around. (48 sc)
Round 12 (A): Sc in each st around. (48 sc)
Round 13 (B): Change to B. Sc in the FLO of each st around. (48 sc)
Round 14 (A): Change to A. Working into the BLO of Round 12, sc in each st around. (48 sc)
Round 15 (A): Sc in each st around. Sl st in next st to join. Fasten off A. (48 sc)
Edging
Edging (B, white): Join B with a sl st in any st of Round 15. Ch 1. Sc evenly around the outer edge, working 1 sc in each st and 1 sc in each color-change gap so the edge lies flat. Sl st to first sc. Fasten off. (48 sc plus 1 sc in each color-change gap)
Assembly and Finishing
Weaving in ends: Thread each yarn tail onto the tapestry needle. Turn the coaster to the wrong side (the side with the carried strands) and run the needle through the backs of several stitches, about 1 inch of travel, then reverse direction and run back through a few more stitches. This locks the tail without a knot. Trim the yarn close to the fabric. Weave in every tail from both colors.
Shaping: Lay the coaster flat on a table and gently press the edge into a smooth circle with your fingertips. If the center hole from the magic ring is still open, pull the starting tail firmly to close it, then weave that tail in as above.
Blocking: Dampen the coaster lightly with clean water (a spray bottle is ideal) and pin it flat to a towel or blocking mat, stretching it gently to a 4.5 in (11.5 cm) circle. Let it dry completely, then unpin. Cotton blocks beautifully and this step makes the edge lie perfectly flat.
Pro Tips and Variations
- Change the colors: Swap navy and white for any two contrasting shades, such as teal and cream or charcoal and pale gray. Keep one color light and one dark so the raised rings stand out.
- Make a set: Work the pattern exactly as written in several color pairs to build a matching coaster set. Each one uses only about 25 yd (23 m) of yarn total, so a single skein goes a long way.
- Adjust the size: To make a larger mat, continue the established pattern: work one white FLO round, then one navy round into the BLO of the round two below with an increase of 8 stitches, then one plain navy round. Add rounds in this sequence until the coaster is the size you want, then work the edging.
- Substitute yarn: A cotton-blend or a smooth acrylic works if you prefer, but keep it worsted weight (category 4) and check your gauge after Round 4 so the finished size stays true.