Sage & Cream Round Granny Square Crochet Coasters Free Pattern
Sage & Cream Round Granny Square Crochet Coasters
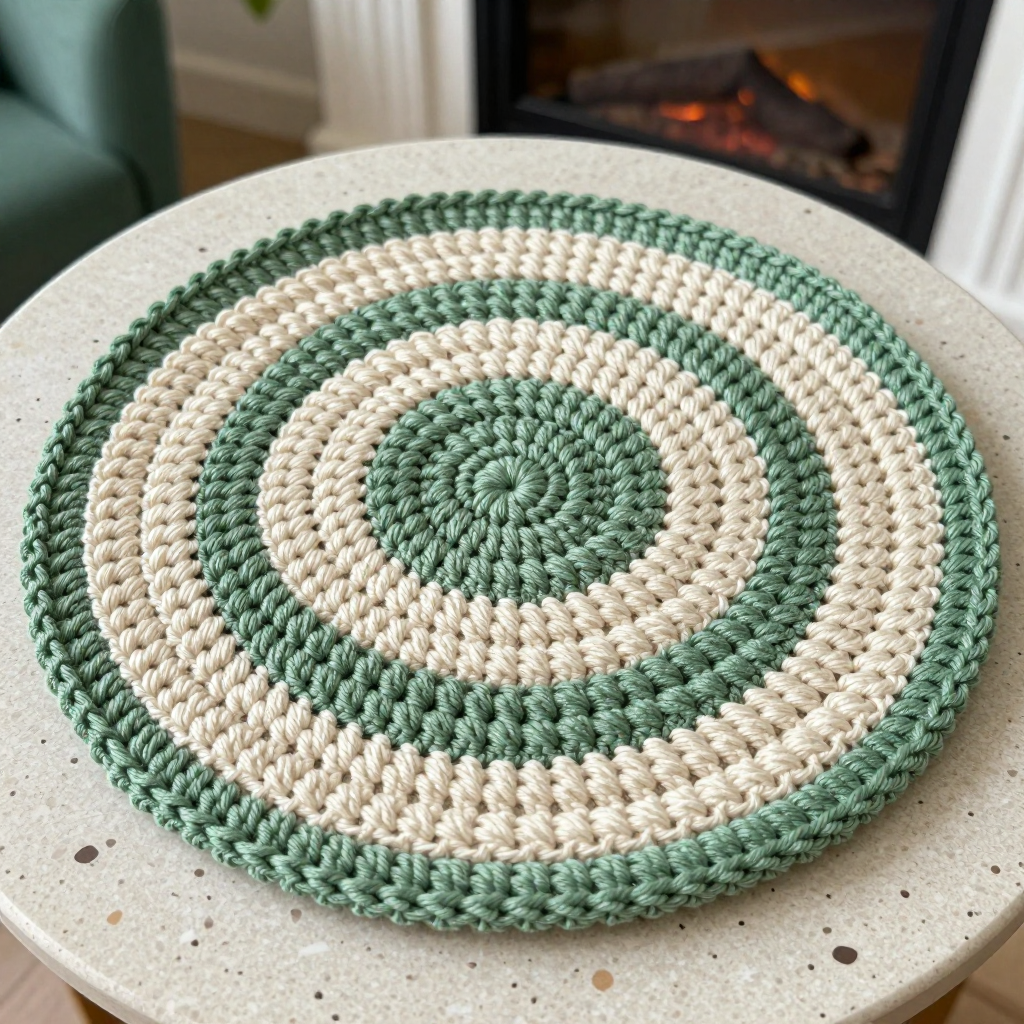
If you have ever wanted to make something pretty, useful, and finished in a single evening, these round granny-style coasters are for you. They are perfect for the brand-new crocheter who has just learned a double crochet and wants a real project to practice on, and just as lovely for anyone who loves a little hygge on the table. Worked in soft worsted-weight cotton in alternating sage green and warm cream, each coaster is a flat 4.5-inch circle with concentric color rings and a neat single-crochet border. The finished set feels smooth, sturdy, and absorbent under a mug of tea, and the calm sage-and-cream palette looks beautiful in any home. Make four, stack them up, and enjoy the quiet satisfaction of handmade.
Materials Needed
- Yarn: Worsted weight (category 4) cotton yarn. Approximately 30 yards total per coaster (about 15 yards sage green and 15 yards warm cream). For a set of four, plan on roughly 120 yards total, or about 60 yards of each color.
- Hook: US size H-8 (5.0 mm) crochet hook.
- Stitch markers: At least 2, to mark the first stitch of each round.
- Tapestry needle: A blunt-tipped needle with a large eye, for weaving in ends.
- Scissors: Any sharp pair for cutting yarn.
- Optional: A spray bottle of water and rustproof pins for blocking.
- Finished size: Each coaster measures approximately 4.5 inches (11.5 cm) in diameter. The set of four is the finished project.
Abbreviations and Beginner Glossary
- ch – chain: wrap the yarn over your hook and pull it through the loop already on your hook. This makes one chain stitch.
- sl st – slip stitch: insert your hook into the stitch, wrap the yarn over, and pull it through both the stitch and the loop on your hook at the same time. It joins rounds without adding height.
- dc – double crochet: wrap the yarn over your hook, insert the hook into the stitch, wrap the yarn over and pull up a loop (3 loops on hook), wrap and pull through 2 loops, wrap and pull through the last 2 loops.
- sc – single crochet: insert your hook into the stitch, wrap the yarn over and pull up a loop (2 loops on hook), wrap the yarn over and pull through both loops.
- st / sts – stitch / stitches: one completed stitch, or several of them.
- sp – space: the gap between stitches (not used as a separate instruction in this pattern, but you will see it in other patterns).
- beg – beginning: the start of a round.
- rnd – round: one complete circle of stitches worked around the center.
- magic ring – an adjustable loop of yarn that you crochet into, then pull tight to close the center hole. If you have never made one, you can substitute: ch 4 and join with a sl st into a ring, then work Round 1 into that ring.
- 2 dc in next st – work two double crochet stitches into the same stitch. This is an increase, and it makes the circle grow.
- join with sl st – close the round by making a slip stitch into the top of the first stitch of that round.
- fasten off – cut the yarn a few inches from your work and pull the tail through the last loop to secure it.
- weave in ends – thread a yarn tail onto a tapestry needle and run it back and forth through the back of the work so it disappears.
Gauge
Gauge: the first 3 rounds = 2.5 inches (6.5 cm) in diameter. The finished coaster after Round 5 should measure 4.5 inches (11.5 cm) across.
Why gauge matters: Gauge simply means how big your stitches turn out. If your stitches are looser than the pattern's, your coaster will be bigger than 4.5 inches; if tighter, it will be smaller. For coasters this is not a disaster, but a coaster that is too small lets the mug hang over the edge, and one that is too big looks floppy. Checking gauge keeps your set even and matching.
How to make a gauge swatch: Using sage green, work Rounds 1–3 exactly as written below. Lay the circle flat on a table and measure straight across the middle with a ruler. If it measures about 2.5 inches, you are spot on. If it is bigger, try a smaller hook (US G-6 / 4.0 mm). If it is smaller, try a larger hook (US I-9 / 5.5 mm). You can unravel the swatch and use the yarn for your coasters.
Beginner Tips Before You Start
- Use a stitch marker. Place a marker in the first stitch of each round. It is very easy to lose your place in a circle, and the marker shows you exactly where to join.
- Do not pull your yarn too tight. Tension is the number one beginner struggle. Hold the yarn gently; tight stitches make a stiff, cupped coaster that will not lie flat.
- Count every round. The stitch counts in parentheses are your safety net. If you do not have the right number, fix it before moving on, because mistakes grow in a circle.
- Change colors at the join. Finish the last slip stitch of a round with the new color. This hides the color change neatly at the join line.
- Keep the magic ring loose until you close it. Do not pull the ring tight until all 12 stitches of Round 1 are worked, or you will not be able to get your hook in.
- Work a practice coaster first. Your first one may be a little wobbly. By the second, your hands will remember the rhythm, and your set will look beautifully even.
Step-by-Step Instructions
Notes: The coaster is worked in joined rounds; you do not turn your work. Each round begins with a ch-3, which counts as the first double crochet. Change colors by completing the final slip stitch of the round with the new color. Make 4 coasters in total, alternating the color placement as described in the finishing section.
Body of the Coaster (make 4)
Setup: With color A (sage green), make a magic ring.
Round 1: Ch 3 (counts as first dc), work 11 dc into the ring. Join with sl st to the top of the beg ch-3. (12 dc) Fasten off A.
Round 2: Join color B (warm cream) with a sl st in any dc. Ch 3, dc in the same st. *2 dc in the next st; repeat from * around. Join with sl st to the top of the beg ch-3. (24 dc) Fasten off B.
Round 3: Join color A with a sl st in any dc. Ch 3, dc in the same st, dc in the next st. *2 dc in the next st, dc in the next st; repeat from * around. Join with sl st to the top of the beg ch-3. (36 dc) Fasten off A.
Round 4: Join color B with a sl st in any dc. Ch 3, dc in the same st, dc in the next 2 sts. *2 dc in the next st, dc in the next 2 sts; repeat from * around. Join with sl st to the top of the beg ch-3. (48 dc) Fasten off B.
Round 5 (border): Join color A with a sl st in any dc. Ch 1 (does not count as a stitch), sc in the same st. Sc in each st around. Join with sl st to the first sc. (48 sc) Fasten off A.
Repeat the entire coaster four times to make your set of four. Each coaster uses 5 rounds total.
Color Placement for the Set
To create the alternating look shown in the photos, work two coasters exactly as written above (sage center, cream, sage, cream, sage border). Then work two more coasters with the colors swapped: begin with color B (cream) for Round 1, use color A (sage) for Round 2, color B for Round 3, color A for Round 4, and finish with a cream border in Round 5. This gives you two sage-bordered and two cream-bordered coasters that look lovely stacked together.
Assembly and Finishing
Weaving in ends: Each coaster has several yarn tails. Thread one tail onto your tapestry needle, turn the coaster to the wrong side (the side with the little bumps and joins), and run the needle back and forth through the backs of about 6 stitches. Change direction once so the tail cannot work loose, then trim the yarn close to the fabric. Repeat for every tail.
Blocking: Blocking means shaping the coaster while damp so it dries perfectly flat and round. Lightly mist the coaster with water until it is damp but not soaking. Pin it flat to a towel or blocking mat, stretching it gently into a 4.5-inch circle. Use several pins around the edge so the circle is even. Let it dry completely, usually several hours or overnight, then remove the pins. This step is what makes a handmade coaster look crisp and professional.
Final check: Lay all four coasters side by side and make sure they are the same size. If one is slightly larger, mist and block it again, easing it to match the others.
Pro Tips and Variations
- Change the palette: Swap sage and cream for any two colors you love, such as terracotta and oatmeal, dusty blue and white, or charcoal and mustard. Keep one color light and one darker so the rings stand out.
- Adjust the size: For a larger coaster or a small trivet, add a Round 6: join a color, ch 3, dc in the same st, dc in the next 3 sts, *2 dc in the next st, dc in the next 3 sts; repeat from * around, join. (60 dc) Then work a single-crochet border round as in Round 5. (60 sc) For a smaller coaster, stop after Round 4 and work the sc border. (48 sc)
- Try a different yarn: Cotton is ideal because it is absorbent and washable, but a cotton-blend or a smooth acrylic also works. Avoid fuzzy or hairy yarns, which hide the neat stitch definition.
- Make a matching set of six or eight: The pattern uses very little yarn, so one skein of each color makes several coasters. Tie the set with a ribbon for a handmade gift.