The Cozy Cloud Burrow: A Free Crochet Pattern for a Textured, Donut-Shaped Small Dog Bed
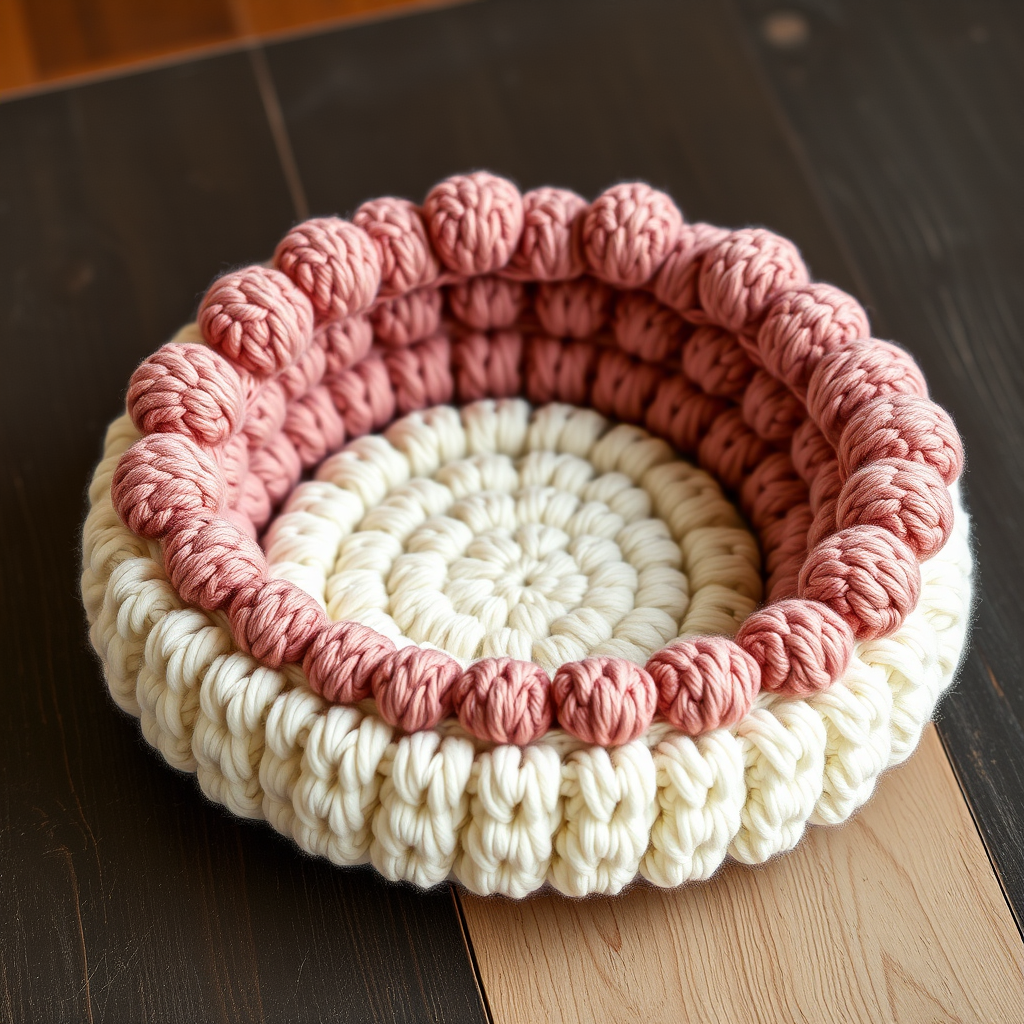
Introducing the Cozy Cloud Burrow: A Textured Donut Dog Bed
Wrap your small pup in a cloud of comfort with this uniquely textured, donut-shaped crochet bed. The raised, bobble-like stitches create a soothing, nest-like surface that's as beautiful as it is cozy. This free pattern is designed for confident beginners and intermediate crocheters, and the result is a stunning, modern pet bed that your furry friend will adore. The combination of a soft cream base and a dusty rose, cloud-like rim makes this a stylish addition to any home.
Materials Needed
To create your own Cozy Cloud Burrow, you will need the following materials. All specifications are based on the pattern's technical details.
- Yarn: Super Bulky weight (size 6) yarn.
- Main Color (Cream): Approximately 500-600 yards. Suggested: Lion Brand Wool-Ease Thick & Quick or similar.
- Contrast Color (Dusty Rose): Approximately 100 yards. Suggested: Lion Brand Wool-Ease Thick & Quick or similar.
- Hook: US Size N/P (10 mm) crochet hook.
- Other: Yarn needle for weaving in ends, scissors, stitch markers (optional).
- Optional: Fleece or suede fabric for a non-slip bottom, matching thread and needle.
Gauge & Abbreviations
Gauge: 8 single crochet stitches and 9 rows = 4 inches in single crochet. Always check your gauge to ensure the correct size.
Abbreviations:
- ch = chain
- sc = single crochet
- dc = double crochet
- fpdc = front post double crochet
- bpdc = back post double crochet
- bobble = (yo, insert hook, yo, pull through, yo, pull through 2 loops) 4 times in same st, yo, pull through all 5 loops on hook
- sl st = slip stitch
- st(s) = stitch(es)
- rnd = round
Step-by-Step Instructions
The bed is worked in two parts: a flat base and a raised, textured rim. The rim uses a combination of front post stitches and bobbles to create a plush, cloud-like edge.
Part 1: The Base (Worked in continuous rounds with cream yarn)
Note: Do not join at the end of each round; work in a spiral. Use a stitch marker to keep track of the first stitch of each round.
- Rnd 1: Make a magic ring, ch 1, work 6 sc into the ring. (6 sts)
- Rnd 2: 2 sc in each st around. (12 sts)
- Rnd 3: (Sc in next st, 2 sc in next st) repeat around. (18 sts)
- Rnd 4: (Sc in next 2 sts, 2 sc in next st) repeat around. (24 sts)
- Rnd 5: (Sc in next 3 sts, 2 sc in next st) repeat around. (30 sts)
- Rnd 6: (Sc in next 4 sts, 2 sc in next st) repeat around. (36 sts)
- Rnd 7: (Sc in next 5 sts, 2 sc in next st) repeat around. (42 sts)
- Rnd 8: (Sc in next 6 sts, 2 sc in next st) repeat around. (48 sts)
- Rnd 9: (Sc in next 7 sts, 2 sc in next st) repeat around. (54 sts)
- Rnd 10: (Sc in next 8 sts, 2 sc in next st) repeat around. (60 sts)
- Rnd 11: (Sc in next 9 sts, 2 sc in next st) repeat around. (66 sts)
- Rnd 12: (Sc in next 10 sts, 2 sc in next st) repeat around. (72 sts)
- Rnd 13: Sc in each st around. (72 sts) - This creates a flat edge.
- Fasten off and weave in ends.
Part 2: The Textured Rim (Worked in joined rounds with dusty rose yarn)
Note: Each round is joined with a slip stitch to the top of the beginning chain. The ch 2 at the start of each round counts as the first double crochet.
- Rnd 1: Attach dusty rose yarn to any stitch on the outer edge of the base. Ch 2 (counts as first dc), work 1 dc in each st around, sl st to top of ch 2 to join. (72 dc)
- Rnd 2: Ch 2, *fpdc around next st, bpdc around next st* repeat from * to * around, sl st to top of ch 2. (72 sts)
- Rnd 3: Ch 2, *bpdc around next st, fpdc around next st* repeat from * to * around, sl st to top of ch 2. (72 sts)
- Rnd 4: Ch 2, *fpdc around next st, bobble in next st, fpdc around next st, bpdc around next st* repeat from * to * around, ending with a bobble, sl st to top of ch 2. (72 sts, including 18 bobbles)
- Rnd 5: Ch 2, *bpdc around next st, fpdc around next st, bpdc around next st, fpdc around next st* repeat from * to * around, sl st to top of ch 2. (72 sts)
- Rnd 6: Ch 2, *fpdc around next st, bpdc around next st* repeat from * to * around, sl st to top of ch 2. (72 sts)
- Rnd 7: Ch 2, *bpdc around next st, fpdc around next st* repeat from * to * around, sl st to top of ch 2. (72 sts)
- Rnd 8: Ch 2, *fpdc around next st, bobble in next st, fpdc around next st, bpdc around next st* repeat from * to * around, ending with a bobble, sl st to top of ch 2. (72 sts, including 18 bobbles)
- Rnd 9: Ch 2, *bpdc around next st, fpdc around next st, bpdc around next st, fpdc around next st* repeat from * to * around, sl st to top of ch 2. (72 sts)
- Rnd 10: Ch 2, *fpdc around next st, bpdc around next st* repeat from * to * around, sl st to top of ch 2. (72 sts)
- Rnd 11: Ch 2, *bpdc around next st, fpdc around next st* repeat from * to * around, sl st to top of ch 2. (72 sts)
- Rnd 12: Ch 2, *fpdc around next st, bobble in next st, fpdc around next st, bpdc around next st* repeat from * to * around, ending with a bobble, sl st to top of ch 2. (72 sts, including 18 bobbles)
- Rnd 13: Ch 2, *bpdc around next st, fpdc around next st, bpdc around next st, fpdc around next st* repeat from * to * around, sl st to top of ch 2. (72 sts)
- Rnd 14: Ch 2, *fpdc around next st, bpdc around next st* repeat from * to * around, sl st to top of ch 2. (72 sts)
- Rnd 15: Ch 2, *bpdc around next st, fpdc around next st* repeat from * to * around, sl st to top of ch 2. (72 sts)
- Fasten off and weave in ends. Gently shape the rim to stand up around the base, creating a donut shape.
Finishing Touches
Optionally, add a non-slip fabric bottom by cutting a circle of fleece or suede slightly larger than the base and sewing it on with a whip stitch. This is optional but helps the bed stay in place on slippery floors. Your Cozy Cloud Burrow is now ready for your furry friend to enjoy!


