Lichen Deco Sunrise Mat: Free Crochet Waffle Stitch Pet Bed Pattern
Lichen Deco Sunrise Mat: A Cozy Waffle Stitch Pet Bed for Beginners
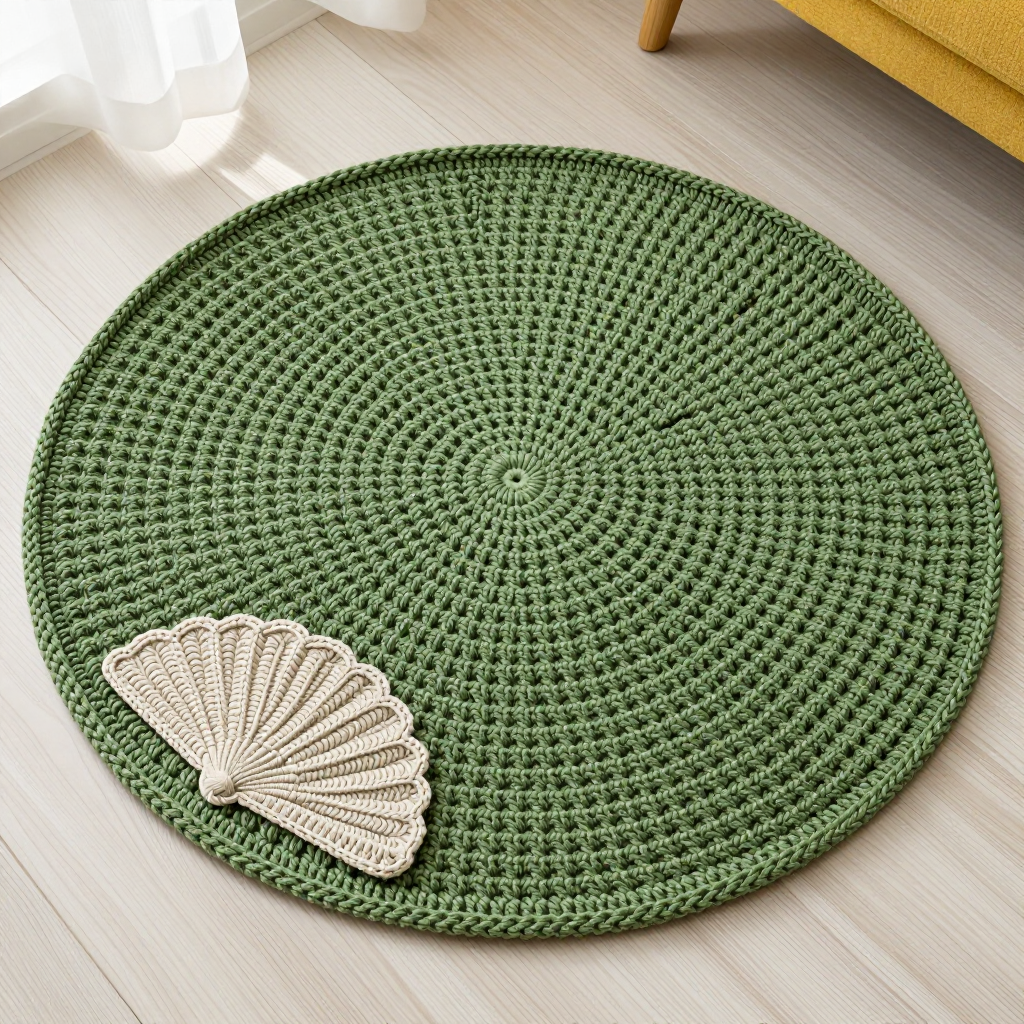
If you have ever wanted to make something soft, useful, and genuinely beautiful for the small dog in your life, this is the project for you. The Lichen Deco Sunrise Mat is a flat, circular crochet mat worked from the center outward in a squishy waffle stitch, so it looks like a little textured rug and feels like a cloud under tiny paws. It is perfect for complete beginners because it uses only a handful of basic stitches, and every round builds on the one before it in a calm, predictable rhythm. The finished mat is about 22 inches across, worked in a deep moss green with a single pale lichen art deco fan sewn at one edge, giving it a quiet vintage-modern look that suits any corner of your home. By the end, you will have a thick, springy bed that your small dog (up to about 15 pounds) will happily curl up on.
Materials Needed
- Yarn: Aran weight wool blend (approximately 20% wool, 80% acrylic). Total: about 420–450 yd / 385–410 m. Main color (MC) moss green: about 360 yd / 330 m. Contrast color (CC) pale lichen: about 60–80 yd / 55–75 m.
- Hook: 5.0 mm (US H-8) crochet hook.
- Stitch markers: At least 4, to mark the beginning of each round and your increase points.
- Tapestry needle (yarn needle): A large-eyed blunt needle for weaving in ends and sewing on the fan.
- Scissors: Sharp craft scissors for cutting yarn.
- Measuring tape: For checking gauge and the finished diameter.
- Finished size: Approximately 22 in / 56 cm in diameter and about 0.75 in / 2 cm thick. Suitable for small dogs up to about 15 lb / 7 kg.
Abbreviations and Beginner Glossary
Every term below is explained as if you have never held a hook. Read this list once before you begin and keep it nearby.
- ch – chain: yarn over the hook, pull the loop through the loop on your hook. This makes a small link.
- sl st – slip stitch: insert hook into the stitch, yarn over, pull the loop through both the stitch and the loop on your hook at once. Used to join rounds.
- sc – single crochet: insert hook into stitch, yarn over, pull up a loop (2 loops on hook), yarn over, pull through both loops. A short, firm stitch.
- dc – double crochet: yarn over, insert hook into stitch, yarn over, pull up a loop (3 loops on hook), yarn over, pull through 2 loops, yarn over, pull through last 2 loops. A taller stitch.
- FPdc – front post double crochet: work a double crochet around the post (the vertical body) of the indicated stitch from the round below, inserting the hook from front to back to front around that post instead of into the top loops. This is what creates the raised waffle grid.
- st / sts – stitch / stitches.
- sp – space (the gap made by a chain).
- beg – beginning.
- rep – repeat.
- MC – main color (moss green).
- CC – contrast color (pale lichen).
- magic ring – an adjustable loop you pull tight to close the center hole. If you prefer, chain 4 and join with a sl st to form a ring, then work into that ring.
- Waffle stitch round – a round where you alternate plain dc stitches with FPdc stitches, creating the raised grid.
Gauge
Gauge: 14 sts x 8 rounds = 4 in / 10 cm in the waffle stitch pattern (alternating dc and front-post dc rounds), measured flat after light blocking.
Why gauge matters: Gauge is how many stitches and rounds fit into a set measurement. If your stitches are bigger than the pattern's, your mat will come out larger than 22 inches; if smaller, it will be too small for your dog. How to make a swatch: Chain 20, work about 10 rounds of the waffle pattern (alternating a plain dc round and a FPdc round), then lay it flat and measure a 4-inch square in the middle. Count the stitches across and the rounds up. If you have more than 14 stitches, try a larger hook; if fewer, try a smaller hook. Always check gauge before starting the full mat.
Beginner Tips Before You Start
- Use stitch markers. Place one in the first stitch of every round so you never lose your place, and use extra markers at each increase point.
- Do not pull your yarn too tight. Relaxed, even tension keeps the waffle texture soft and the mat flat. Tight stitches make a stiff, cupped mat.
- Count your stitches at the end of every round. The stitch count in parentheses tells you exactly how many you should have. If it is off, fix it before moving on.
- Keep the right side facing you. Do not turn your work between rounds; you always work in the same direction.
- Work the FPdc slowly. The hook goes around the post of the stitch below, not into the top loops. It feels awkward at first, then becomes automatic.
- Block before you sew. Light blocking opens the texture and makes the mat lie perfectly flat before you attach the fan.
Step-by-Step Instructions
All instructions use US terms. The mat is worked in joined rounds from the center out. Each round begins with a ch-3 (which counts as your first dc) and ends with a sl st into the top of that beginning ch-3. Do not turn after each round.
Mat Body (MC)
Set-up: Make a magic ring.
Round 1: Ch 3 (counts as first dc), work 11 dc into the ring, join with sl st to top of beg ch-3. (12 dc)
Round 2: Ch 3, dc in same st, 2 dc in each st around, join with sl st to top of beg ch-3. (24 dc)
Round 3 (first waffle round): Ch 3, FPdc around the post of the next st, *dc in next st, FPdc around post of next st; rep from * around, join with sl st to top of beg ch-3. (12 dc, 12 FPdc)
Round 4: Ch 3, dc in each st around, join with sl st to top of beg ch-3. (24 dc)
Round 5 (increase + waffle): Ch 3, dc in same st, FPdc around post of next st, *2 dc in next st, FPdc around post of next st; rep from * around, join with sl st to top of beg ch-3. (36 sts: 24 dc, 12 FPdc)
Round 6: Ch 3, dc in each st around, join with sl st to top of beg ch-3. (36 dc)
Round 7 (waffle): Ch 3, FPdc around post of next st, *dc in next st, FPdc around post of next st; rep from * around, join with sl st to top of beg ch-3. (18 dc, 18 FPdc)
Round 8 (increase): Ch 3, dc in same st, dc in next st, FPdc around post of next st, *2 dc in next st, dc in next st, FPdc around post of next st; rep from * around, join with sl st to top of beg ch-3. (54 sts: 36 dc, 18 FPdc)
Round 9: Ch 3, dc in each st around, join with sl st to top of beg ch-3. (54 dc)
Round 10 (waffle): Ch 3, FPdc around post of next st, *dc in next st, FPdc around post of next st; rep from * around, join with sl st to top of beg ch-3. (27 dc, 27 FPdc)
Round 11 (increase): Ch 3, dc in same st, dc in next 2 sts, FPdc around post of next st, *2 dc in next st, dc in next 2 sts, FPdc around post of next st; rep from * around, join with sl st to top of beg ch-3. (72 sts: 54 dc, 18 FPdc)
Round 12: Ch 3, dc in each st around, join with sl st to top of beg ch-3. (72 dc)
Round 13 (waffle): Ch 3, FPdc around post of next st, *dc in next st, FPdc around post of next st; rep from * around, join with sl st to top of beg ch-3. (36 dc, 36 FPdc)
Round 14 (increase): Ch 3, dc in same st, dc in next 3 sts, FPdc around post of next st, *2 dc in next st, dc in next 3 sts, FPdc around post of next st; rep from * around, join with sl st to top of beg ch-3. (90 sts: 72 dc, 18 FPdc)
Round 15: Ch 3, dc in each st around, join with sl st to top of beg ch-3. (90 dc)
Round 16 (waffle): Ch 3, FPdc around post of next st, *dc in next st, FPdc around post of next st; rep from * around, join with sl st to top of beg ch-3. (45 dc, 45 FPdc)
Round 17 (increase): Ch 3, dc in same st, dc in next 4 sts, FPdc around post of next st, *2 dc in next st, dc in next 4 sts, FPdc around post of next st; rep from * around, join with sl st to top of beg ch-3. (108 sts: 90 dc, 18 FPdc)
Round 18: Ch 3, dc in each st around, join with sl st to top of beg ch-3. (108 dc)
Round 19 (waffle): Ch 3, FPdc around post of next st, *dc in next st, FPdc around post of next st; rep from * around, join with sl st to top of beg ch-3. (54 dc, 54 FPdc)
Round 20 (increase): Ch 3, dc in same st, dc in next 5 sts, FPdc around post of next st, *2 dc in next st, dc in next 5 sts, FPdc around post of next st; rep from * around, join with sl st to top of beg ch-3. (126 sts: 108 dc, 18 FPdc)
Round 21: Ch 3, dc in each st around, join with sl st to top of beg ch-3. (126 dc)
Round 22 (waffle): Ch 3, FPdc around post of next st, *dc in next st, FPdc around post of next st; rep from * around, join with sl st to top of beg ch-3. (63 dc, 63 FPdc)
Round 23 (increase): Ch 3, dc in same st, dc in next 6 sts, FPdc around post of next st, *2 dc in next st, dc in next 6 sts, FPdc around post of next st; rep from * around, join with sl st to top of beg ch-3. (144 sts: 126 dc, 18 FPdc)
Round 24: Ch 3, dc in each st around, join with sl st to top of beg ch-3. (144 dc)
Round 25 (waffle): Ch 3, FPdc around post of next st, *dc in next st, FPdc around post of next st; rep from * around, join with sl st to top of beg ch-3. (72 dc, 72 FPdc)
Round 26 (increase): Ch 3, dc in same st, dc in next 7 sts, FPdc around post of next st, *2 dc in next st, dc in next 7 sts, FPdc around post of next st; rep from * around, join with sl st to top of beg ch-3. (162 sts: 144 dc, 18 FPdc)
Round 27: Ch 3, dc in each st around, join with sl st to top of beg ch-3. (162 dc)
Round 28 (waffle): Ch 3, FPdc around post of next st, *dc in next st, FPdc around post of next st; rep from * around, join with sl st to top of beg ch-3. (81 dc, 81 FPdc)
Round 29 (increase): Ch 3, dc in same st, dc in next 8 sts, FPdc around post of next st, *2 dc in next st, dc in next 8 sts, FPdc around post of next st; rep from * around, join with sl st to top of beg ch-3. (180 sts: 162 dc, 18 FPdc)
Round 30: Ch 3, dc in each st around, join with sl st to top of beg ch-3. (180 dc)
Round 31 (waffle): Ch 3, FPdc around post of next st, *dc in next st, FPdc around post of next st; rep from * around, join with sl st to top of beg ch-3. (90 dc, 90 FPdc)
Round 32 (increase): Ch 3, dc in same st, dc in next 9 sts, FPdc around post of next st, *2 dc in next st, dc in next 9 sts, FPdc around post of next st; rep from * around, join with sl st to top of beg ch-3. (198 sts: 180 dc, 18 FPdc)
Round 33: Ch 3, dc in each st around, join with sl st to top of beg ch-3. (198 dc)
Round 34 (waffle): Ch 3, FPdc around post of next st, *dc in next st, FPdc around post of next st; rep from * around, join with sl st to top of beg ch-3. (99 dc, 99 FPdc)
Round 35 (final increase): Ch 3, dc in same st, dc in next 10 sts, FPdc around post of next st, *2 dc in next st, dc in next 10 sts, FPdc around post of next st; rep from * around, join with sl st to top of beg ch-3. (216 sts: 198 dc, 18 FPdc)
Round 36: Ch 3, dc in each st around, join with sl st to top of beg ch-3. (216 dc)
Round 37 (waffle): Ch 3, FPdc around post of next st, *dc in next st, FPdc around post of next st; rep from * around, join with sl st to top of beg ch-3. (108 dc, 108 FPdc)
Round 38 (final round): Ch 1, sc in each st around, join with sl st to first sc. (216 sc) Fasten off MC and weave in ends.
Art Deco Fan Appliqué (CC) — make 1
Worked flat in rows.
Row 1: Ch 12, dc in 4th ch from hook and in each ch across. (9 dc) Turn.
Row 2: Ch 3, dc in next 2 sts, *ch 2, skip 1 st, dc in next 2 sts; rep from * once more, dc in last st. (7 dc, 2 ch-2 sps) Turn.
Row 3: Ch 3, dc in next 2 sts, *2 dc in ch-2 sp, dc in next 2 sts; rep from * once more, dc in last st. (11 dc) Turn.
Row 4: Ch 3, dc in next 3 sts, *ch 2, skip 1 st, dc in next 3 sts; rep from * once more, dc in last st. (9 dc, 2 ch-2 sps) Turn.
Row 5: Ch 3, dc in next 3 sts, *2 dc in ch-2 sp, dc in next 3 sts; rep from * once more, dc in last st. (13 dc) Turn.
Row 6: Ch 3, dc in next 4 sts, *ch 2, skip 1 st, dc in next 4 sts; rep from * once more, dc in last st. (11 dc, 2 ch-2 sps) Turn.
Row 7: Ch 3, dc in next 4 sts, *2 dc in ch-2 sp, dc in next 4 sts; rep from * once more, dc in last st. (15 dc) Turn.
Row 8 (fan edge): Ch 1, sc in first st, *skip 1 st, 5 dc in next st, skip 1 st, sc in next st; rep from * across to last st, sc in last st. Fasten off CC, leaving a 20 in / 50 cm tail for sewing.
Assembly and Finishing
1. Block the mat. Mist the mat lightly with water, then shape it into a flat circle about 22 in / 56 cm across on a towel. Let it dry completely. This opens the waffle texture and makes the mat lie flat.
2. Block the fan. Pin the fan appliqué flat and let it dry so the fan edge holds its shape.
3. Position the fan. Place the fan at one edge of the mat, with the fan edge pointing outward and the straight base toward the center, centered on the outer rounds. Pin it in place.
4. Sew it down. Thread the CC tail onto a yarn needle. Sew the appliqué to the mat with small, even stitches along the base and lower sides, leaving the fan edge free and slightly raised.
5. Weave in ends. Thread each remaining yarn end onto the needle and weave it back and forth through the back of the stitches for about 2 inches, then trim close. Gently steam the appliqué so it stands slightly proud of the mat surface.
Pro Tips and Variations
- Change the colors. Swap the moss green for a deep teal or charcoal, and the pale lichen for cream or blush, to match your home. You can also work the final sc round in CC for a contrasting border.
- Adjust the size. For a larger bed, continue the increase pattern (adding one more dc between increases each increase round) until the mat reaches your desired diameter, then finish with a plain dc round and the sc border. For a smaller mat, stop after Round 30 and add the sc border.
- Substitute yarn. A smooth worsted or aran acrylic works well and is easy to wash. Avoid fluffy or fuzzy yarns for your first attempt, as they hide the waffle texture.
- Add a non-slip base. Sew a circle of shelf liner or fabric to the underside to keep the mat from sliding on smooth floors.