Rosewater Bobble Dot Napkins Free Pattern
Rosewater Bobble Dot Napkins Free Pattern
Introduction
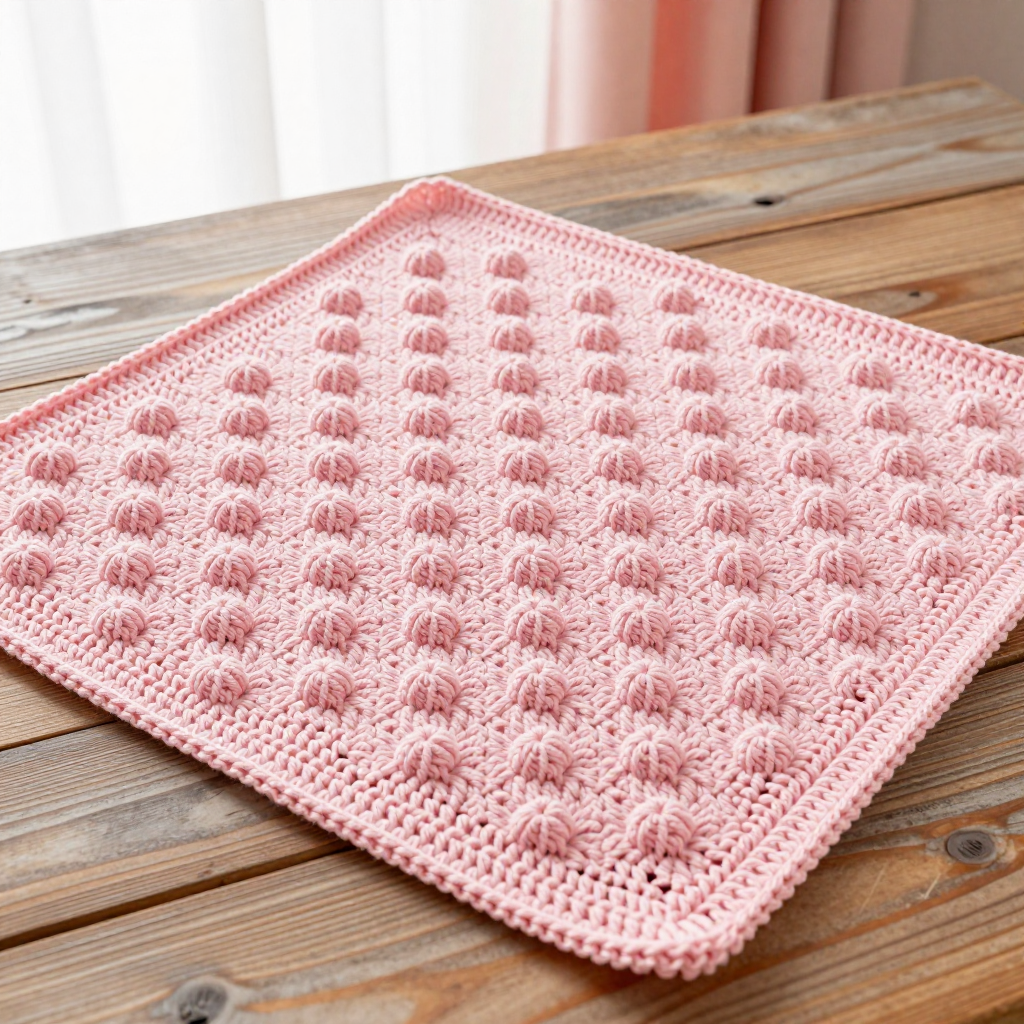
If you have ever wanted to make something pretty, useful, and quick, these Rosewater Bobble Dot Napkins are the perfect first project for you. Each one is a small five-inch square worked in soft rosewater pink cotton, so you can finish a whole napkin in an afternoon and feel that wonderful "I made this" glow. The smooth single crochet body is dotted with raised bobbles that look like tiny beads sitting proudly on the fabric, and a tidy two-round border frames every edge. The finished napkin feels matte and gently textured, with a soft cotton halo that gets softer every time you wash it. Set them on a table, tuck one under a teacup, or tie a stack with ribbon as a gift — these little squares are pure pastel joy.
Materials Needed
- Yarn: DK weight (category 3) cotton yarn in rosewater pink — approximately 40–45 yards per napkin. Cotton is best because it is absorbent, machine washable, and holds the bobbles crisply.
- Hook: 4 mm (US G/6) crochet hook.
- Stitch markers: 4 or more, to mark corners and count rows.
- Tapestry needle: a blunt-tipped needle with a large eye for weaving in ends.
- Scissors: small sharp craft scissors.
- Blocking supplies: rust-proof pins and a flat blocking mat (or a towel).
- Finished size: each napkin measures approximately 5 inches (12.7 cm) square.
Abbreviations and Beginner Glossary
Every term below is explained as if you have never held a hook. Read this list once before you begin — you will be surprised how quickly it all makes sense.
- ch — chain: yarn over the hook (wrap the yarn from back to front over the hook), pull that loop through the loop already on your hook. That makes one chain stitch. Chains look like tiny braids.
- sc — single crochet: insert your hook into the next stitch, yarn over, pull up a loop (you now have 2 loops on the hook), yarn over again, and pull through both loops. One single crochet made.
- dc — double crochet: yarn over first, insert hook into the stitch, yarn over, pull up a loop (3 loops on hook), yarn over and pull through 2 loops (2 loops left), yarn over and pull through the last 2 loops. One double crochet made.
- bobble — 5-dc bobble: work 5 double crochet stitches all into the same stitch, but after each dc, drop the loop off your hook and hold it with your finger so it does not unravel. When all 5 are made, insert your hook through all 6 loops on the hook (the 5 dropped loops plus the working loop) and pull the yarn through them all to close. The result is one puffy bump.
- st — stitch: one completed stitch in your fabric.
- sp — space: the gap between stitches, usually where a corner is worked.
- turn: flip your work over so you can crochet back along the row you just finished.
- right side: the front, prettier face of the fabric that you want to show.
- wrong side: the back face of the fabric.
- slip stitch (sl st): insert hook into the stitch, yarn over, and pull the loop straight through both the stitch and the loop on your hook in one motion. Used to join rounds.
- fasten off: cut the yarn a few inches from the work, pull the tail all the way through the last loop, and tug gently to lock it.
- weave in ends: thread a yarn tail onto the tapestry needle and sew it back and forth through the fabric so it disappears.
Gauge
Gauge: 16 single crochet stitches x 18 rows = 4 inches (10 cm) in single crochet.
Gauge simply means how big your stitches come out. If your stitches are bigger than this, your napkin will be larger than 5 inches; if smaller, it will shrink. Gauge is not critical for a napkin, but matching it gives you the 5-inch square shown here.
How to make a gauge swatch: chain 22, then work single crochet in every stitch for about 20 rows. Lay the swatch flat and measure a 4-inch section in the middle with a ruler. Count how many stitches fit across 4 inches and how many rows fit in 4 inches. If you have more than 16 stitches, try a larger hook; if fewer, try a smaller hook. Always measure the middle of the swatch, never the edges, because edges curl.
Beginner Tips Before You Start
- Count every row. Single crochet rows are easy to lose track of. Place a stitch marker in the first stitch of each row so you always know where the row begins.
- Do not pull the yarn too tight. Tension is the number one beginner struggle. Hold the yarn gently — the hook should glide, not fight. Tight stitches make bobbles hard to work.
- Keep bobbles on the front. Bobbles are worked on right-side rows only. If your bump ends up on the back, you turned the wrong way — simply undo that row and try again.
- Mark your corners. Before starting the border, place a stitch marker in each of the four corners so your 3-sc corner increases stay even.
- Work the chain loosely. The starting chain of 21 must be loose enough to crochet into. If it feels tight, use a hook one size larger just for the chain.
- Do not fasten off after the body. The border is worked directly onto the finished square, so keep your working loop live at the end of Row 28.
Step-by-Step Instructions
Each napkin is worked flat in rows from the bottom up. Bobbles sit on a regular grid, alternating between two placements so the dots look evenly scattered. Every row is listed below, with the stitch count in parentheses.
Body
Row 1 (right side): Ch 21. Sc in the 2nd ch from hook and in each ch across. (20 sc)
Row 2 (wrong side): Ch 1, turn. Sc in each st across. (20 sc)
Row 3 (right side): Ch 1, turn. Sc in first 3 sts, bobble in next st, *sc in next 4 sts, bobble in next st; repeat from * to last 3 sts, sc in last 3 sts. (4 bobbles, 20 sts total)
Rows 4–6: Ch 1, turn. Sc in each st across. (20 sc)
Row 7 (right side): Ch 1, turn. Sc in first st, bobble in next st, *sc in next 4 sts, bobble in next st; repeat from * to last st, sc in last st. (4 bobbles, offset from Row 3)
Rows 8–10: Ch 1, turn. Sc in each st across. (20 sc)
Row 11 (right side): Ch 1, turn. Sc in first 3 sts, bobble in next st, *sc in next 4 sts, bobble in next st; repeat from * to last 3 sts, sc in last 3 sts. (4 bobbles)
Rows 12–14: Ch 1, turn. Sc in each st across. (20 sc)
Row 15 (right side): Ch 1, turn. Sc in first st, bobble in next st, *sc in next 4 sts, bobble in next st; repeat from * to last st, sc in last st. (4 bobbles)
Rows 16–18: Ch 1, turn. Sc in each st across. (20 sc)
Row 19 (right side): Ch 1, turn. Sc in first 3 sts, bobble in next st, *sc in next 4 sts, bobble in next st; repeat from * to last 3 sts, sc in last 3 sts. (4 bobbles)
Rows 20–22: Ch 1, turn. Sc in each st across. (20 sc)
Row 23 (right side): Ch 1, turn. Sc in first st, bobble in next st, *sc in next 4 sts, bobble in next st; repeat from * to last st, sc in last st. (4 bobbles)
Rows 24–26: Ch 1, turn. Sc in each st across. (20 sc)
Row 27 (right side): Ch 1, turn. Sc in first 3 sts, bobble in next st, *sc in next 4 sts, bobble in next st; repeat from * to last 3 sts, sc in last 3 sts. (4 bobbles)
Row 28: Ch 1, turn. Sc in each st across. (20 sc) Do not fasten off.
Pattern summary: Rows 3–28 form the repeating dot grid. In total you will have worked 28 rows: 7 bobble rows (Rows 3, 7, 11, 15, 19, 23, 27) and 21 plain single crochet rows, giving 28 bobbles per napkin.
Border
The border is worked in the round directly around the finished square. Do not turn between rounds.
Round 1: Ch 1. Work sc evenly around the entire napkin: 1 sc in each row end down the right side, 3 sc in the corner, 1 sc in each stitch across the bottom edge, 3 sc in the corner, 1 sc in each row end up the left side, 3 sc in the corner, 1 sc in each stitch across the top edge, 3 sc in the final corner. Join with a slip stitch to the first sc. (Approximately 96 sc — 28 + 3 + 20 + 3 + 28 + 3 + 20 + 3.)
Round 2: Ch 1. Sc in each sc around, working 3 sc in each corner space. Join with a slip stitch to the first sc. (Approximately 104 sc.) Fasten off.
Assembly and Finishing
Weaving in ends: Thread each yarn tail onto the tapestry needle. Sew the tail back and forth through the back of the fabric for about an inch, changing direction once so it cannot work loose, then trim close to the fabric. Never knot your ends — knots create lumps that show through the cotton.
Blocking: Soak each napkin in cool water for a few minutes, then gently squeeze (never wring) out the excess water in a towel. Lay the napkin flat on a blocking mat and pin each corner and edge straight to a 5-inch square, using a ruler to check the measurement. Pin the corners first, then the middle of each side. Allow to dry completely — usually overnight — before removing the pins. Blocking opens up the stitches, straightens the border, and makes the bobbles pop.
Final check: Give each napkin a gentle press with a warm iron on the wrong side (or through a cloth) if you like a crisper finish. Your napkins are now ready to use or gift.
Pro Tips and Variations
- Change colors for a set: Work each napkin in a different pastel — rosewater, sage, butter yellow, or powder blue — for a coordinated table set. Use one color per napkin so the bobble grid stays crisp.
- Make a larger napkin or placemat: Add more plain rows between bobble rows, or chain a longer starting chain in multiples of 4 plus 1. Keep the same 4-stitch spacing so the dots stay centered, and add extra border rounds to match.
- Substitute yarn: Any DK weight cotton works beautifully. Avoid acrylic if you want absorbency, and always check your gauge swatch so the finished square stays close to 5 inches.
- Try a striped border: Work Round 1 in your main color and Round 2 in a contrast color for a crisp framed look — a lovely way to use up leftover cotton.