Marina Chevron Crochet Table Runner Free Pattern: An Art Deco Ocean Blues Design
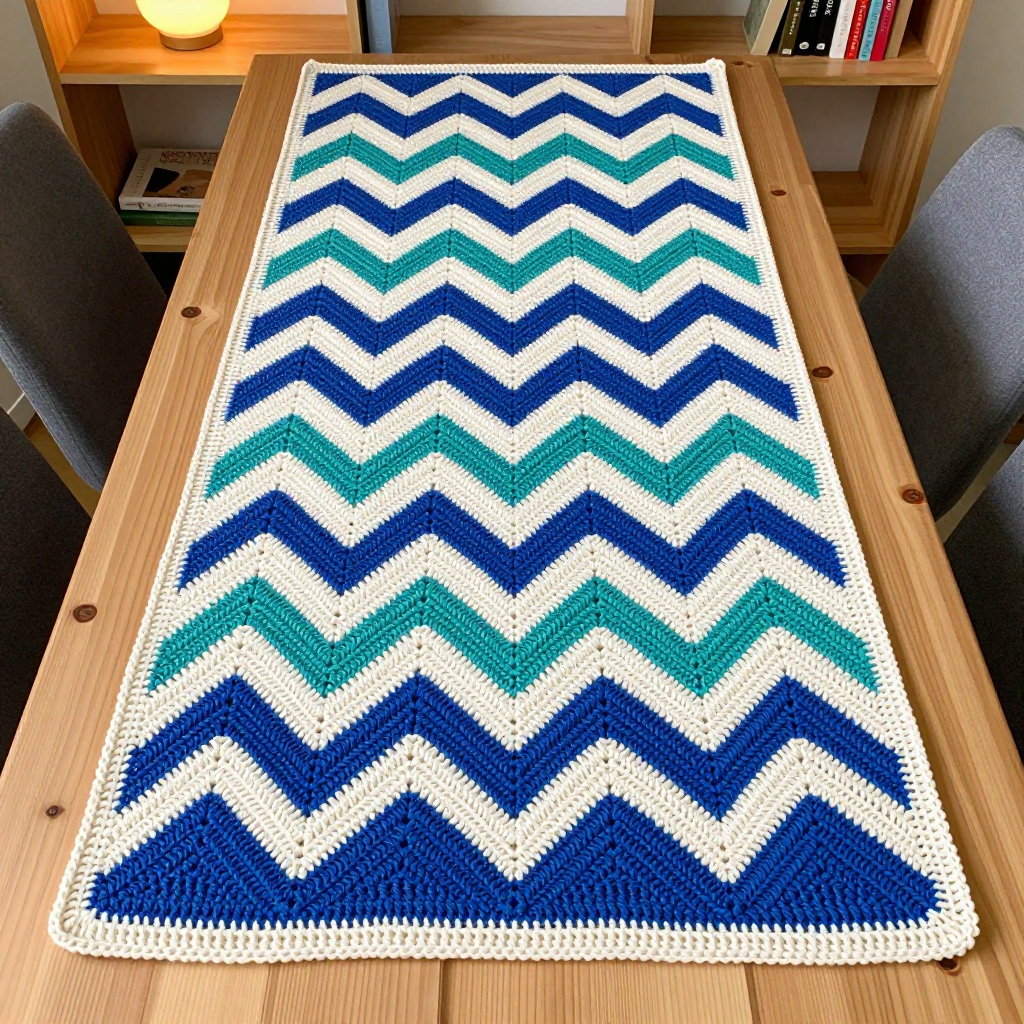
Marina Chevron Crochet Table Runner
If you have never held a crochet hook before, this is the project to start with. The Marina Chevron Table Runner is a long, narrow strip of easy zigzag rows worked in deep blue, teal, and seafoam, separated by crisp cream stripes that make the whole thing look like a piece of Art Deco tilework. It is perfect for a total beginner because every row is the same simple rhythm of stitches, so you learn one motion and repeat it until it feels natural. When you finish, you will have a flat, smooth, beautifully blocked runner about 14 inches wide and 48 inches long that drapes across a dining table, a dresser, or a sideboard and instantly makes a room look styled. The finished fabric feels soft but structured, with crisp peaks and valleys that hold their shape because we block it at the end.
Materials Needed
- Yarn: Worsted weight (category 4) acrylic or cotton-blend yarn, approximately 16–20 stitches per 4 inches. Total about 750 yards:
- Deep Blue (A): 220 yd
- Teal (B): 180 yd
- Seafoam (C): 150 yd
- Cream (D): 200 yd
- Hook: H/8 (5.0 mm) crochet hook, or whatever size gets you the gauge below.
- Stitch markers: At least 4, to mark the peaks and the first/last stitch of each row.
- Tapestry needle: A blunt, large-eye needle for weaving in ends.
- Scissors: Any sharp pair for cutting yarn.
- Blocking supplies: Rust-proof pins and a spray bottle of water (or a steam iron held just above the fabric).
- Finished size: Approx. 14 in (35.5 cm) wide x 48 in (122 cm) long after blocking.
Abbreviations and Beginner Glossary
- ch – chain. Make a loop with the yarn, pull the working yarn through it. Each loop is one chain. Chains are the foundation you build on.
- st(s) – stitch(es). One completed loop on your hook or in your fabric.
- sc – single crochet. Insert hook into stitch, pull up a loop (2 loops on hook), yarn over, pull through both loops. One loop remains.
- dc – double crochet. Yarn over, insert hook into stitch, pull up a loop (3 loops on hook), yarn over, pull through 2 loops, yarn over, pull through last 2 loops. One loop remains.
- dc2tog – double crochet 2 together (a decrease). Yarn over, insert hook into first stitch, pull up a loop (3 loops), yarn over, pull through 2 loops (2 loops left), yarn over, insert hook into next stitch, pull up a loop (4 loops), yarn over, pull through 2 loops, yarn over, pull through last 3 loops. Two stitches become one.
- sk – skip. Do not work into that stitch; move past it.
- RS – right side. The side of the fabric that faces out when finished.
- rep – repeat. Do the section again as many times as stated.
- sl st – slip stitch. Insert hook, yarn over, pull through everything on the hook at once. Used to join rounds.
- turning ch – the chain(s) made at the start of a row to bring your yarn up to the right height. A ch 3 counts as the first dc.
- peak – the top point of the zigzag, made with 3 dc in one stitch.
- valley – the bottom point of the zigzag, made with two dc2tog side by side.
Gauge
16 stitches and 8 rows = 4 inches (10 cm) in the chevron pattern, after blocking. Each 14-stitch chevron repeat measures about 3.5 inches (9 cm) wide.
Gauge matters because it controls the finished size. If your stitches are bigger than mine, your runner will be wider and longer and you may run out of yarn; if they are smaller, it will come out short and stiff. To check: chain 31, work Row 1 and Row 2 of the pattern below a few times, then lay the swatch flat and measure across the middle with a ruler. Count how many stitches fit in 4 inches. If you have more than 16, switch to a larger hook; if fewer, switch to a smaller hook. Always measure after gently stretching the swatch, because this pattern blooms when blocked.
Beginner Tips Before You Start
- Count every row. The chevron only works if every row has exactly 57 stitches. Count before you turn, every single time, until you trust your rhythm.
- Use stitch markers. Place one in the center peak stitch and one in each valley of Row 1. They tell you at a glance whether you are on track.
- Do not pull the yarn tight. Keep your loops relaxed and even. Tight tension makes the valleys pucker and the runner narrow.
- Carry the colors up the side. When you change color, do not cut the old yarn. Drop it and pick up the new one, then carry the unused strand loosely up the edge. The border hides it.
- Change color in the last stitch of the row. Pull the new color through the final loop of the last stitch so the new stripe starts cleanly.
- Work a practice swatch first. Two or three rows of scrap yarn will teach your hands the rhythm before you commit to the real thing.
Step-by-Step Instructions
Setup and Chevron Math
The chevron is worked over a multiple of 14 stitches plus 3. We use 4 repeats: 4 x 14 = 56, plus 3 = 59 stitches per row. Each repeat is: dc in next 6 sts, dc2tog, dc2tog, dc in next 6 sts, with a 3-dc peak between repeats.
With A (Deep Blue), ch 59.
Body
Row 1 (RS): Dc in 4th ch from hook (this counts as the first dc plus a ch-1 space), dc in next 5 ch, dc2tog over next 2 ch, dc2tog over next 2 ch, dc in next 6 ch, *3 dc in next ch (peak), dc in next 6 ch, dc2tog over next 2 ch, dc2tog over next 2 ch, dc in next 6 ch; rep from * to last ch, 2 dc in last ch. Turn. (57 sts)
Row 2: Ch 3 (counts as first dc), dc in same st, dc in next 6 sts, dc2tog, dc2tog, dc in next 6 sts, *3 dc in next st (center peak st), dc in next 6 sts, dc2tog, dc2tog, dc in next 6 sts; rep from * to end, 2 dc in top of turning ch. Turn. (57 sts)
Rows 3–76: Repeat Row 2, changing colors according to the sequence below. Carry colors up the side edge; do not cut unless noted. (57 sts each row)
Color Sequence
Each band is 4 rows unless noted. Follow this list exactly, working Row 2 of the chevron in each row:
- Rows 1–4: A (Deep Blue)
- Rows 5–6: D (Cream) — 2-row stripe
- Rows 7–10: B (Teal)
- Rows 11–12: D (Cream)
- Rows 13–16: C (Seafoam)
- Rows 17–18: D (Cream)
- Rows 19–22: A (Deep Blue)
- Rows 23–24: D (Cream)
- Rows 25–28: B (Teal)
- Rows 29–30: D (Cream)
- Rows 31–34: C (Seafoam)
- Rows 35–36: D (Cream)
- Rows 37–40: A (Deep Blue)
- Rows 41–42: D (Cream)
- Rows 43–46: B (Teal)
- Rows 47–48: D (Cream)
- Rows 49–52: C (Seafoam)
- Rows 53–54: D (Cream)
- Rows 55–58: A (Deep Blue)
- Rows 59–60: D (Cream)
- Rows 61–64: B (Teal)
- Rows 65–66: D (Cream)
- Rows 67–70: C (Seafoam)
- Rows 71–72: D (Cream)
- Rows 73–76: A (Deep Blue)
Total: 76 rows. At 8 rows per 4 inches, that is about 38 inches unblocked, stretching to 48 inches when blocked. Fasten off after Row 76.
Border
Round 1: With D (Cream), join to any corner. Work sc evenly around the entire perimeter, placing 1 sc in each row-end along the sides and 1 sc in each st along the top and bottom, with 3 sc in each corner. Join with sl st to first sc. (Even sc count around; 3 sc per corner)
Round 2: Ch 1, sc in each sc around, working 3 sc in each corner sc. Join with sl st to first sc. (Even sc count around; 3 sc per corner) Fasten off.
Assembly and Finishing
Weave in ends. Thread each yarn tail onto the tapestry needle and run it back and forth through the back of several stitches, changing direction once so it cannot work loose. Trim close to the fabric. Do this before blocking so the ends settle into the fabric.
Block. Lay the runner flat on a towel or blocking mat. Pin each corner first, then pin along the sides, gently stretching to 14 inches wide and 48 inches long. Pin every peak and valley so the zigzag line is crisp and straight. Spritz lightly with water (or hold a steam iron an inch above the fabric and let the steam sink in — never press the iron onto the stitches). Leave it to dry completely flat, at least 24 hours.
Remove pins and enjoy. The runner will hold its shape and lie perfectly flat on your table.
Pro Tips and Variations
- Change the palette. Swap the ocean blues for autumn rust, mustard, and olive, or a soft pink-and-grey scheme. Keep the cream stripes — they are what makes the chevron pop.
- Adjust the length. Add or remove full 4-row bands to fit your table. Each band adds about 2 inches after blocking. Keep the runner starting and ending with Deep Blue.
- Adjust the width. Add or remove one 14-stitch repeat. Remember to add 14 to your starting chain (59 becomes 73) and to recount every row.
- Substitute yarn. A cotton-blend gives a crisper, more matte finish; acrylic is softer and more affordable. Always swatch first, because a different fiber can change your gauge.