Lasso Coil Sunglasses Pouch Free Crochet Pattern: Burgundy Shell Stitch with Gold Flower Appliqué
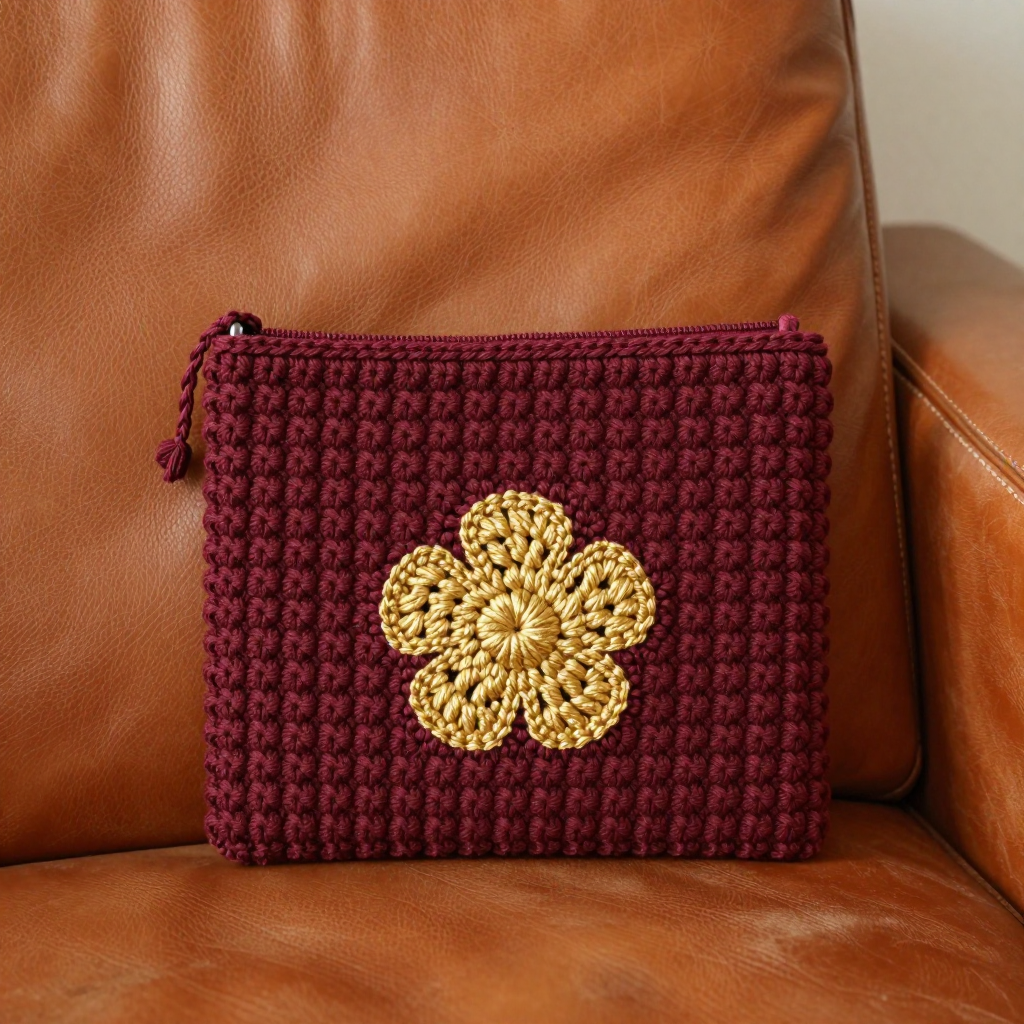
Lasso Coil Sunglasses Pouch: A Beginner-Friendly Crochet Project
If you have never held a crochet hook before, this is the perfect first project for you. The Lasso Coil Sunglasses Pouch is a small, flat rectangle of textured shell stitches that you simply fold in half and sew up the sides — no shaping, no increasing, no complicated counting. It is worked in a rich burgundy worsted-weight acrylic with a little gold flower appliqué on the front, giving it a warm western feel that clips neatly onto your car visor. When finished, it measures about 3.5 inches wide by 3.25 inches tall, with a dense, scalloped surface that feels soft but sturdy enough to protect your sunglasses from scratches. The stacked shell pattern looks impressive, but it is made from just three basic stitches you will learn in minutes.
Materials Needed
- Yarn: Worsted weight acrylic yarn (Category 4, approximately 180–200 yds per 100 g skein). You need about 60 yds of burgundy for the pouch and loop, and about 8 yds of gold for the flower appliqué.
- Crochet hook: US H-8 / 5.0 mm (or the size needed to match gauge).
- Stitch markers: At least 2, to mark your first and last stitches of each row.
- Yarn needle (tapestry needle): A blunt-tipped needle with a large eye, for seaming and weaving in ends.
- Scissors: Sharp small scissors for cutting yarn.
- Pins: A couple of sewing pins to hold the flower in place while you sew it.
- Finished size: Flat rectangle before folding is approximately 3.5 in wide x 6.5 in tall (9 cm x 16.5 cm). Finished folded pouch is approximately 3.5 in wide x 3.25 in tall (9 cm x 8.25 cm) — sized to hold standard sunglasses or reading glasses.
Abbreviations and Beginner Glossary
Every abbreviation used in this pattern is explained below in plain English. Read through this list once before you begin — you do not need to memorize it.
- ch – chain. Make a loop of yarn on your hook (a slip knot), then wrap the yarn over the hook and pull it through the loop on your hook. That is one chain. Chains form the foundation and the turning edges.
- sc – single crochet. Insert your hook into the stitch, wrap yarn over the hook, pull up a loop (you now have 2 loops on the hook), wrap yarn over again, and pull through both loops. One single crochet made.
- dc – double crochet. Wrap yarn over the hook first, insert the hook into the stitch, wrap yarn over and pull up a loop (3 loops on hook), wrap yarn over and pull through the first 2 loops (2 loops left), wrap yarn over and pull through the last 2 loops. One double crochet made.
- hdc – half double crochet. Wrap yarn over the hook, insert into the stitch, pull up a loop (3 loops on hook), wrap yarn over and pull through all 3 loops at once. One half double crochet made.
- sl st – slip stitch. Insert the hook into the stitch, wrap yarn over, and pull it straight through both the stitch and the loop on your hook in one motion. It makes a nearly invisible joining stitch.
- shell – 5 double crochet worked into the same stitch or space, creating a fan shape.
- beg shell – beginning shell: ch 3 (this counts as your first double crochet), then work 2 more double crochet into the same stitch. This makes a half-shell at the edge of the row.
- st(s) – stitch(es).
- magic ring – an adjustable loop of yarn that you crochet into, then pull tight to close the center hole. If you prefer, you can instead ch 4 and join with a sl st to form a ring.
- right side – the front face of the fabric that will show on the finished pouch.
- fasten off – cut the yarn leaving a tail, then pull the tail all the way through the last loop on your hook to lock it.
- whipstitch – a simple seaming stitch: pass the needle over the edge of both pieces and back through, over and over, like a spiral.
Gauge
Gauge: In the shell stitch pattern, 1 shell (5 dc) plus 1 sc measures approximately 1.25 in (3.2 cm) wide, and 4 pattern rows measure approximately 1 in (2.5 cm) tall.
Why gauge matters: Gauge is how big your stitches come out. If your stitches are bigger than the pattern's, your pouch will be too large and your sunglasses will slide around; if they are smaller, the pouch may be too tight. Because this pouch is a fixed rectangle, matching the row height is the most important part.
How to make a gauge swatch: Chain 22 and work Rows 1–4 exactly as written in the pattern below. Measure the width of your shells and the height of your 4 rows. If your 4 rows measure more than 1 in, try a smaller hook (US G-6 / 4.0 mm). If they measure less than 1 in, try a larger hook (US I-9 / 5.5 mm). It is normal to need a different hook size than the one listed.
Beginner Tips Before You Start
- Count your stitches at the end of every row. The pattern tells you the stitch count in parentheses. If the number is off by one or two, fix it before moving on — it is much harder to fix later.
- Use stitch markers. Place one marker in the very first stitch of each row and one in the last stitch. Beginners often miss the last stitch, which makes the rectangle narrower at the top.
- Do not pull your yarn too tight. Hold the yarn with gentle tension. Tight stitches make the hook hard to insert and make the fabric stiff and small.
- Remember the shell rule. Shells go into the center single crochet of the row below, and single crochets go into the center (3rd) double crochet of each shell. This keeps the shells stacked in neat vertical columns.
- Work the turning chain correctly. The ch 3 at the start of a shell row counts as your first double crochet — do not also work a double crochet into that same stitch beyond the 2 extra ones described.
- Keep your work flat. Lay the rectangle on the table every few rows to check that the edges are straight and the width stays about 3.5 inches.
Step-by-Step Instructions
Pouch Panel (make 1 with burgundy)
Row 1 (right side): Ch 22. Sc in the 2nd ch from hook and in each ch across. (21 sc)
Row 2: Ch 3 (counts as first dc), 2 dc in the same st as the ch-3 (this forms the first half-shell at the edge), skip next 2 sts, sc in next st, *skip next 2 sts, 5 dc in next st, skip next 2 sts, sc in next st; repeat from * across, ending with skip next 2 sts, 3 dc in last st. (3 full shells + 2 half-shells at the edges; 21 sts)
Row 3: Ch 1, sc in first st, *skip next 2 dc, 5 dc in next sc, skip next 2 dc, sc in next dc (the center dc of the shell); repeat from * across, ending with sc in the top of the turning ch. (2 full shells + edge scs)
Row 4: Ch 3, 2 dc in same st, skip next 2 sts, sc in next st, *skip next 2 sts, 5 dc in next st, skip next 2 sts, sc in next st; repeat from * across, ending with skip next 2 sts, 3 dc in last st. (3 full shells + 2 half-shells)
Rows 5–26: Repeat Rows 3 and 4 alternately 11 more times, ending on a Row 4 repeat. (26 rows total; approx. 6.5 in / 16.5 cm tall)
Do not fasten off yet; continue to the loop.
Hanging Loop (worked in burgundy, continuing from the top corner)
Row 27: Ch 1, sc evenly across the top edge. (approx. 21 sc)
Row 28: Ch 12, sl st in the same st as the last sc to form a loop, then sl st in each ch of the loop to reinforce it. Fasten off, leaving a 10 in (25 cm) tail.
Gold Shell-Flower Appliqué (make 1 with gold)
Round 1: Make a magic ring. Ch 3 (counts as first dc), work 11 dc into the ring, join with sl st to top of beg ch-3. (12 dc)
Round 2 (petals): *Ch 3, skip next dc, sl st in next dc; repeat from * around, ending with sl st in the base of the first ch-3. (6 ch-3 petal loops)
Round 3: Sl st into the first ch-3 loop, *[sc, hdc, 2 dc, hdc, sc] in the same loop; repeat from * in each ch-3 loop around. Join with sl st to first sc. Fasten off, leaving an 8 in (20 cm) tail. (6 petals)
Assembly and Finishing
- Weave in the ends on the pouch panel except the long starting tail. To weave in, thread the tail onto the yarn needle and pass it in and out through the back of several stitches, then trim close to the fabric.
- Fold the rectangle in half with right sides together so the bottom edge meets the top edge. The hanging loop should sit at the top back of the pouch.
- Seam the two side edges closed. Thread the long starting tail onto the yarn needle. Working from the fold up toward the opening, whipstitch (pass the needle over the edge of both layers and back through, over and over) along one side edge. Repeat on the other side edge. Leave the top opening open. Fasten off and weave in the ends.
- Turn the pouch right side out and gently shape the corners with your fingers so they are crisp and square.
- Attach the flower. Position the gold shell-flower appliqué on the front of the pouch, centered about 1 in (2.5 cm) below the top opening. Pin it in place. With the gold tail on a yarn needle, sew it down securely, catching the center of the flower and a few petal tips so the petals stay flat.
- Weave in the remaining ends. Lightly steam-block the pouch to settle the shell stitches: hold a steam iron an inch or two above the fabric (never press it down) and let the steam relax the stitches, keeping the flower flat. Let it dry completely before use.
Pro Tips and Variations
- Change the colors: Swap the burgundy for deep teal, mustard, or classic black, and change the gold flower to cream or copper for a different look. Any two colors that contrast will make the flower pop.
- Adjust the size: For a larger pouch that fits oversized sunglasses, add 6 chains to the foundation (ch 28) and add 4 more pattern rows. For a smaller reading-glasses case, subtract 6 chains (ch 16) and work 4 fewer rows. Keep the shell rule the same.
- Substitute the yarn: Cotton yarn (Category 4) gives a crisper, more washable pouch that holds its shape well. Avoid fuzzy or novelty yarns for your first attempt, as they make it hard to see your stitches.
- Make the loop longer or shorter: Change the ch 12 in Row 28 to ch 8 for a snug visor clip fit, or ch 16 for a looser loop that slips over a larger clip.