The Amazonian Laurel Headband Free Pattern – A Knitted Cable & Leaf Motif Crown
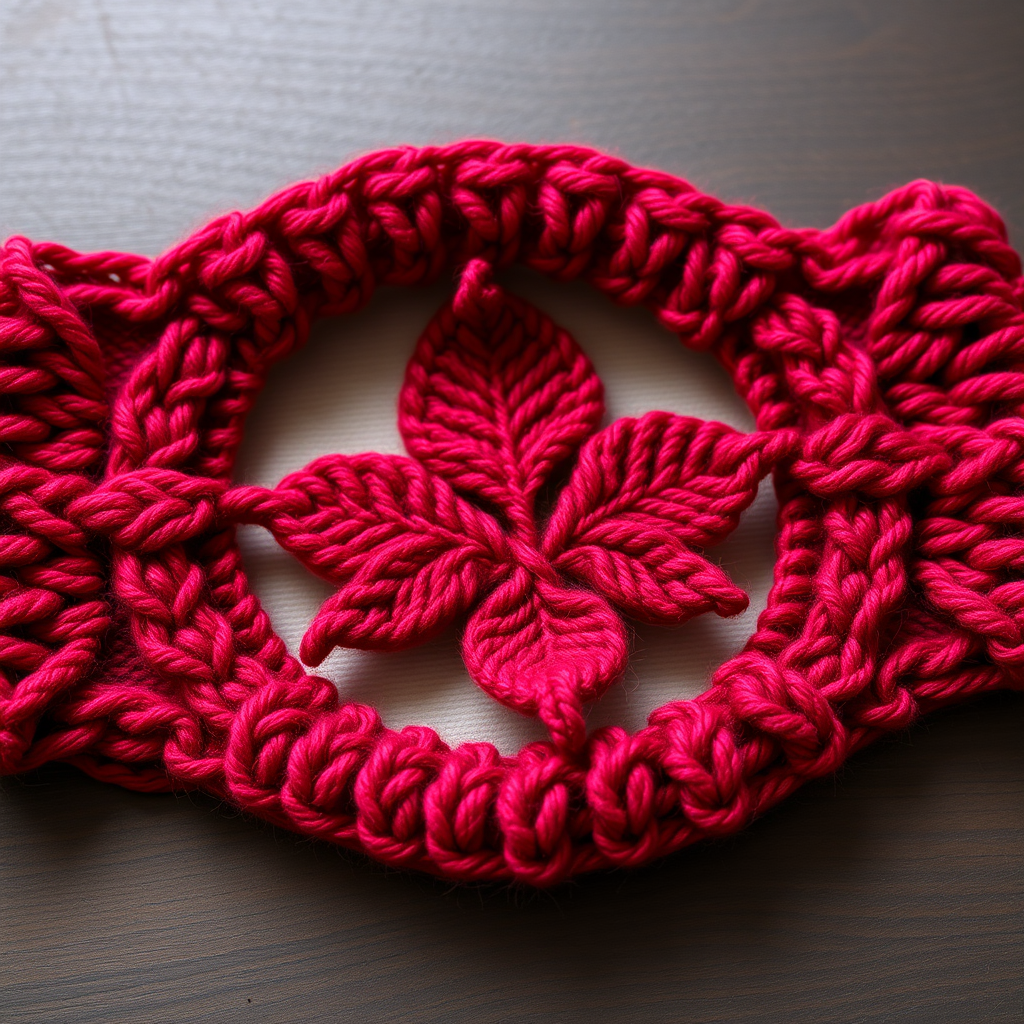
The Amazonian Laurel Headband: A Knitted Cable & Leaf Motif Crown
Channel your inner warrior goddess with this intricately cabled headband, featuring a central leaf motif that evokes strength and grace. Knitted in a rich, deep crimson, it's a cozy yet commanding accessory for any season. This pattern is perfect for intermediate knitters looking to expand their cable skills while creating a stunning, wearable piece. The combination of twisted cables and a sculpted leaf center makes this headband a true statement piece—whether you're channeling Wonder Woman or simply want to add a touch of regal elegance to your winter wardrobe.
This free knitting pattern is designed to be approachable yet rewarding. With clear instructions and detailed explanations, you'll be amazed at how quickly this beautiful accessory comes together. The finished headband measures approximately 18 inches in circumference (unstretched) and 3.5 inches wide, making it a comfortable fit for most adult heads. The stretchy cable pattern ensures a snug yet flexible fit that stays in place throughout the day.
Materials Needed
Before you begin your crafting journey, gather the following materials. All items are readily available at your local yarn shop or online retailers:
- Yarn: Worsted weight yarn in deep crimson red (approx. 100g / 200 yards). Look for a plush, soft yarn with good stitch definition to showcase the cables and leaf motif. A wool or wool-blend yarn works beautifully for this project.
- Knitting Needles: US 7 (4.5mm) knitting needles. Straight needles work well, but circular needles can also be used if you prefer.
- Cable Needle: A small cable needle (or double-pointed needle) for creating the cable twists.
- Tapestry Needle: For weaving in ends and seaming the headband.
- Stitch Markers (optional): Helpful for keeping track of pattern repeats.
Gauge: 20 stitches and 26 rows = 4 inches in stockinette stitch. Always knit a gauge swatch to ensure your finished headband matches the intended measurements. If your gauge is off, adjust your needle size accordingly.
Step-by-Step Instructions
Let's dive into the pattern! This headband is worked flat in rows, then seamed at the end to create a seamless circle. The pattern is divided into two main sections: the cable pattern (which forms the majority of the headband) and the leaf motif (which sits at the center front).
Abbreviations
- CO: Cast on
- K: Knit
- P: Purl
- C4B: Cable 4 back (slip 2 stitches to cable needle, hold in back, knit next 2 stitches, then knit 2 from cable needle)
- C4F: Cable 4 front (slip 2 stitches to cable needle, hold in front, knit next 2 stitches, then knit 2 from cable needle)
- M1: Make one (increase)
- K2tog: Knit two together
- SSK: Slip, slip, knit (decrease)
- BO: Bind off
Getting Started: Cast On
CO 22 stitches using your preferred method (long-tail cast on works beautifully for this project). Leave a tail of approximately 12 inches for seaming later.
Cable Pattern Section
This section forms the main body of the headband. The cable pattern creates beautiful twisted columns that frame the central leaf motif. Work the following 8 rows repeatedly until your piece measures approximately 17 inches from the cast-on edge.
Row 1 (RS): K2, P2, K6, P2, K6, P2, K2
Row 2 (WS): P2, K2, P6, K2, P6, K2, P2
Row 3: K2, P2, C4F, K2, P2, C4B, K2, P2, K2
Row 4: Repeat Row 2
Row 5: K2, P2, K6, P2, K6, P2, K2
Row 6: Repeat Row 2
Row 7: K2, P2, K2, C4B, P2, K2, C4F, P2, K2
Row 8: Repeat Row 2
Pro Tip: The cables alternate direction every 4 rows, creating a beautiful braided effect. On Row 3, the first cable (C4F) twists to the left, while the second cable (C4B) twists to the right. On Row 7, the directions reverse, creating a symmetrical pattern.
Repeat Rows 1-8 until the headband measures approximately 17 inches from the cast-on edge, ending with a Row 8 (wrong side row). This ensures you're ready to begin the leaf motif on a right-side row.
Leaf Motif Section (Center Front)
Now we'll create the stunning leaf motif that sits at the center front of your headband. This section uses increases to widen the leaf, then decreases to taper it to a point. The increases and decreases are worked within the knit sections, creating a beautiful leaf shape.
Row 1 (RS): K2, P2, K6, P2, K6, P2, K2 (22 sts)
Row 2 (WS): P2, K2, P6, K2, P6, K2, P2
Row 3: K2, P2, K2, M1, K2, M1, K2, P2, K2, M1, K2, M1, K2, P2, K2 (26 sts)
Understanding the increases: On Row 3, you're adding 2 stitches to each knit section (from 6 to 8 stitches). The M1 increases are worked between knit stitches, creating a subtle, invisible increase that widens the leaf shape.
Row 4: P2, K2, P8, K2, P8, K2, P2
Row 5: K2, P2, K8, P2, K8, P2, K2
Row 6: Repeat Row 4
Note: Rows 4-6 establish the widened leaf shape. The purl sections remain constant at 2 stitches on each side, while the knit sections have grown to 8 stitches each.
Row 7: K2, P2, SSK, K4, K2tog, P2, SSK, K4, K2tog, P2, K2 (22 sts)
Row 8: P2, K2, P6, K2, P6, K2, P2
Understanding the decreases: The SSK and K2tog decreases are worked at the edges of each knit section, creating a tapered leaf shape. SSK leans to the left, while K2tog leans to the right, creating a symmetrical decrease on each side of the leaf.
Row 9: K2, P2, SSK, K2, K2tog, P2, SSK, K2, K2tog, P2, K2 (18 sts)
Row 10: P2, K2, P4, K2, P4, K2, P2
Row 11: K2, P2, SSK, K2tog, P2, SSK, K2tog, P2, K2 (14 sts)
Row 12: P2, K2, P2, K2, P2, K2, P2
Row 13: K2, P2, K2tog, P2, K2tog, P2, K2 (10 sts)
Row 14: P2, K2, P2, K2, P2
Row 15: K2, P2tog, P2tog, K2 (6 sts)
Row 16: P2, K2, P2
Row 17: K2tog, K2tog, K2tog (3 sts)
Row 18: K3tog (1 st). Cut yarn, pull through.
Final shaping: As you work through Rows 13-18, the leaf motif narrows dramatically. The purl sections are gradually eliminated, and the final K3tog creates a sharp point at the tip of the leaf. This creates a beautiful, organic shape that mimics a real leaf.
Finishing Touches
Now that your headband is complete, it's time to finish it beautifully:
- Seam the headband: Using the tail from your cast-on edge and a tapestry needle, sew the cast-on edge to the bind-off edge using mattress stitch. This creates a seamless, invisible join that looks beautiful from both sides.
- Weave in ends: Carefully weave in all loose ends using your tapestry needle. Make sure to weave them in securely so they don't unravel with wear.
- Block gently: Block the headband to shape, emphasizing the leaf motif. Wet blocking works beautifully for this project—soak the headband in lukewarm water with a gentle wool wash, then lay flat to dry, gently shaping the cables and leaf. This helps the stitches relax and creates a more polished, professional finish.
Customization Ideas
Once you've mastered this pattern, feel free to make it your own:
- Color variations: While deep crimson evokes warrior energy, this pattern looks stunning in forest green, sapphire blue, or even a soft neutral like cream or grey.
- Adjusting length: To make the headband larger or smaller, simply add or subtract repeats of the cable pattern (Rows 1-8) before beginning the leaf motif. Each repeat adds approximately 1.5 inches to the length.
- Yarn substitutions: Try a chunky yarn with larger needles for a bulkier, cozier headband, or a fingering weight yarn for a delicate, lacy version.
This Amazonian Laurel Headband is more than just an accessory—it's a statement of strength and grace. The intricate cables and sculpted leaf motif make it a joy to knit and a stunning addition to any wardrobe. Whether you're crafting it for yourself or as a gift for a fellow warrior goddess, this pattern is sure to become a favorite in your knitting repertoire.
Happy knitting, and may your inner goddess shine through every stitch!


