Sun-Kissed Citrus Towel Topper Free Pattern – Knit a Refreshing Summer Accent
Sun-Kissed Citrus Towel Topper: A Refreshing Summer Knit
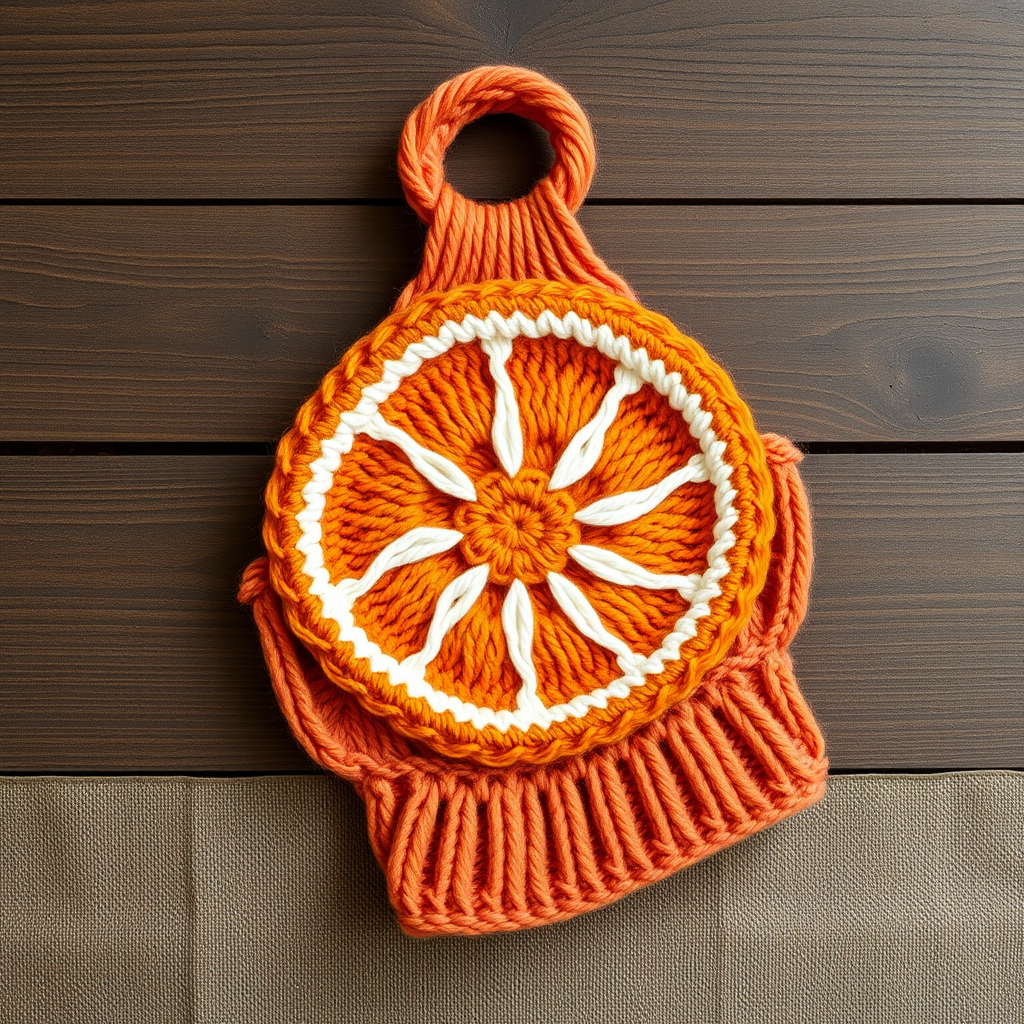
Brighten your kitchen or bath with this cheerful towel topper featuring a juicy orange slice motif and a soft, textured knit. This quick, satisfying project adds a pop of summer color to any space and makes a wonderful handmade gift. Whether you're a seasoned knitter or just starting your journey, this pattern is designed to be accessible, rewarding, and fun. Let's dive into creating this delightful citrus accent together!
Materials Needed
Before you begin, gather the following supplies. Having everything ready will make your knitting experience smooth and enjoyable.
- Yarn: Worsted weight cotton yarn in three colors:
- Orange (MC) – approximately 100g
- White (CC1) – approximately 50g
- Yellow (CC2) – approximately 20g
- Needles: US 7 (4.5mm) knitting needles
- Notions: Tapestry needle for weaving in ends and embroidery, scissors, stitch markers (optional), and a button (optional, for the towel band)
Gauge: 20 stitches and 26 rows = 4 inches in stockinette stitch. Always check your gauge to ensure your finished piece matches the intended size.
Step-by-Step Instructions
This towel topper is knit flat in one piece, starting with the hanging loop, then the decorative orange slice, and finally the towel attachment band. All pieces are worked in stockinette stitch (knit on the right side, purl on the wrong side) unless otherwise noted. Let's get started!
Part 1: The Hanging Loop
- Cast On: With your orange yarn (MC), cast on 10 stitches.
- Knit the Strip: Work in stockinette stitch for 6 inches. This means you'll knit one row, purl one row, and repeat until the piece measures 6 inches from the cast-on edge.
- Bind Off: Bind off all stitches loosely.
- Form the Loop: Fold the knitted strip in half so the short ends meet. Using your tapestry needle and a length of MC yarn, sew the cast-on edge to the bind-off edge to create a loop. Set this piece aside for assembly later.
Part 2: The Orange Slice Motif
This is the star of the show! We'll knit a half-circle shape that mimics a slice of citrus fruit.
- Cast On: With MC (orange), cast on 30 stitches.
- Knit the Base:
- Row 1 (Right Side): Knit all stitches.
- Row 2 (Wrong Side): Purl all stitches.
- Repeat Rows 1 and 2 until the piece measures 2 inches from the cast-on edge, ending with a wrong-side row (you've just purled).
- Shape the Half-Circle: Now we'll decrease stitches to create the curved edge of the orange slice.
- Next Row (RS): K1, k2tog (knit two together), knit to the last 3 stitches, ssk (slip, slip, knit), k1. (You now have 28 stitches)
- Next Row (WS): Purl all stitches.
- Repeat these last two rows until you have 10 stitches remaining, ending with a wrong-side row. Tip: Count your stitches after each decrease row to keep track.
- Finish the Point: Continue decreasing to close the shape.
- Next Row (RS): K1, k2tog, k4, ssk, k1. (8 stitches)
- Next Row (WS): Purl all.
- Next Row (RS): K1, k2tog, k2, ssk, k1. (6 stitches)
- Next Row (WS): Purl all.
- Next Row (RS): K1, k2tog, ssk, k1. (4 stitches)
- Next Row (WS): Purl all.
- Next Row (RS): K2tog, ssk. (2 stitches)
- Next Row (WS): Purl all.
- Next Row (RS): K2tog. (1 stitch)
- Secure the Yarn: Cut the yarn, leaving a 6-inch tail. Thread the tail through the remaining stitch on your needle and pull tight to secure. This completes the half-circle shape.
Part 3: Embroidering the Citrus Details
Now we'll bring our orange slice to life with simple embroidery.
- Segment Lines: Thread your tapestry needle with the white yarn (CC1). Starting from the center of the flat edge of your half-circle, make small, straight stitches radiating outwards to the curved edge. Space these lines evenly to mimic the segments of a citrus fruit. You should have about 5-7 lines.
- Center Detail: Switch to the yellow yarn (CC2). Embroider a small cross or star stitch in the very center of the slice, where all your white lines meet. This represents the core of the fruit.
- Weave in Ends: Carefully weave in the yarn tails from your embroidery on the wrong side of the work.
Part 4: The Towel Attachment Band
- Cast On: With MC (orange), cast on 12 stitches.
- Knit the Band: Work in stockinette stitch for 4 inches.
- Bind Off: Bind off all stitches. This rectangular band will be used to attach your towel.
Part 5: Assembly
Time to put all the pieces together!
- Position the Pieces: Lay your orange slice motif flat with the straight edge at the top. Place the hanging loop at the top center of this straight edge. Place the towel attachment band at the bottom center of the orange slice, perpendicular to the loop (it should hang down from the bottom point).
- Sew the Hanging Loop: Using your tapestry needle and MC yarn, securely sew the ends of the hanging loop to the top center of the orange slice's straight edge.
- Sew the Towel Band: Sew the towel attachment band to the bottom center point of the orange slice. Make sure it's securely attached.
- Weave in All Ends: Use your tapestry needle to weave in any remaining loose yarn ends on the wrong side of the work. This is crucial for a professional finish.
Part 6: Finishing Touches
- Block Your Work: Lightly block the piece to even out your stitches and give the orange slice a nice, flat shape. To block, wet the piece, gently squeeze out excess water, and lay it flat to dry, shaping it as needed.
- Attach the Towel: Fold the towel attachment band over your towel. You can either sew the band closed around the towel for a permanent attachment, or sew a button onto the band and create a buttonhole on the other side for a removable option. If you choose the button, simply sew the button on one end of the band and use the space between stitches as a buttonhole.
And there you have it—a beautiful, sun-kissed citrus towel topper that's ready to brighten your home! This project is perfect for using up scrap yarn and makes a thoughtful, handmade gift. Happy knitting!