Strawberry Fields Beanie Free Pattern – A Knitted Berry Crown
Strawberry Fields Beanie Free Pattern – A Knitted Berry Crown
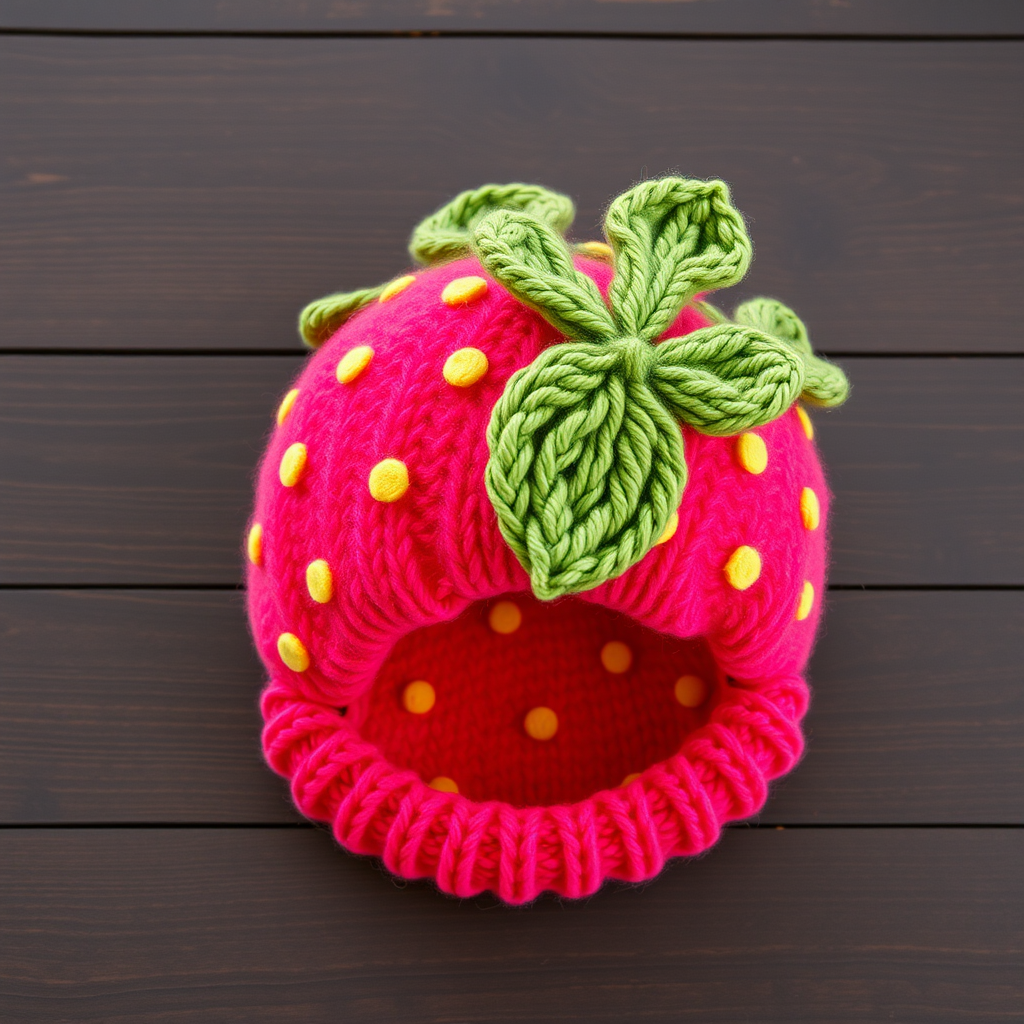
Wrap your head in the sweetness of a hand-knitted strawberry hat, complete with a leafy top and seed-speckled body. This cozy crown is perfect for chilly days and playful photoshoots alike. Whether you're a seasoned knitter looking for a quick weekend project or a beginner ready to tackle your first garment, this pattern is designed to be approachable, rewarding, and utterly adorable. The vibrant pink body, textured seed stitch, and forest green leaves come together to create a hat that looks good enough to eat—but is warm enough to wear all winter long.
This pattern is written for worsted weight yarn, which means it works up quickly and creates a dense, warm fabric. The construction is simple: a ribbed brim, a stockinette body with a subtle seed stitch texture, a classic crown decrease, and five garter stitch leaves that fan out like a crown. You'll also add small yellow French knots to mimic strawberry seeds, giving the hat its signature playful detail. Let's dive in and knit your very own berry crown!
Materials Needed
Before you begin, gather the following supplies. All materials are readily available at your local yarn shop or online.
Yarn
- Main Color (MC): Worsted weight yarn in bright pink – approximately 180–200 yards. A soft acrylic or wool blend works beautifully.
- Contrast Color 1 (CC1): Worsted weight yarn in forest green – approximately 40–50 yards for the leaves.
- Contrast Color 2 (CC2): Worsted weight yarn in yellow – a small amount (about 10 yards) for the seed embellishments.
Needles & Notions
- US 7 (4.5 mm) 16-inch circular needle – for the main body of the hat.
- US 7 (4.5 mm) double-pointed needles (DPNs) – for the crown decreases and for knitting the leaves.
- Stitch marker – to mark the beginning of the round.
- Tapestry needle – for weaving in ends and sewing the leaves.
- Scissors
Gauge
20 stitches and 26 rows = 4 inches in stockinette stitch (knit every round). Always check your gauge before starting to ensure the hat fits properly. If your gauge is off, adjust your needle size accordingly.
Step-by-Step Instructions
Follow these detailed instructions carefully. The pattern is broken into four sections: the hat body, the seed stitch pattern, the crown shaping, and the leaf top with seed embellishments. Take your time, and don't hesitate to refer back to the gauge and materials list if needed.
Hat Body
Cast On & Ribbing
With your circular needle and MC yarn, cast on 88 stitches. Pro tip: Use a stretchy cast-on method like the long-tail cast-on to ensure the brim has plenty of give. Place a stitch marker on your right-hand needle to mark the beginning of the round, then join in the round, being very careful not to twist your stitches. The cast-on edge should lie flat and face the same direction all the way around.
Rounds 1–8: Work in k1, p1 ribbing. This means you'll knit one stitch, then purl one stitch, repeating this sequence all the way around. This creates a snug, stretchy brim that will hug your forehead comfortably. Continue this ribbing pattern for all 8 rounds.
Rounds 9–30: Switch to stockinette stitch by knitting every stitch in every round. This is the simplest stitch pattern—just knit, knit, knit! The fabric will begin to curl slightly at the edges, which is normal and will be hidden by the ribbing. Continue knitting every round until you've completed Round 30. Your work should measure approximately 4.5 inches from the cast-on edge.
Seed Stitch Pattern
Now we'll add a subtle texture to mimic the surface of a strawberry. The seed stitch pattern alternates knit and purl stitches in a checkerboard-like arrangement, creating a bumpy, seed-like texture.
Round 31: *K1, p1, repeat from * to end of round. This means you'll knit one stitch, purl one stitch, and continue this alternating pattern all the way around.
Round 32: Knit all stitches.
Round 33: *P1, k1, repeat from * to end of round. Notice that this is offset from Round 31—you're starting with a purl instead of a knit. This creates the staggered seed effect.
Round 34: Knit all stitches.
Repeat Rounds 31–34 twice more (Rounds 35–42): This means you'll work the same four-round sequence two additional times. After completing Round 42, you'll have a beautiful textured band running through the middle of your hat.
Crown Shaping
Now it's time to shape the top of the hat. We'll decrease stitches gradually to create a rounded crown. As the stitch count decreases, you'll need to switch from your circular needle to your double-pointed needles. Here's how:
Round 43: *K9, k2tog, repeat from * to end of round. (You will have 80 stitches.) K2tog means "knit two stitches together"—insert your right needle into the next two stitches on the left needle as if to knit, then knit them as one. This decreases your stitch count by one.
Round 44: Knit all stitches.
Round 45: *K8, k2tog, repeat from * to end of round. (72 stitches.)
Round 46: Knit all stitches.
Round 47: *K7, k2tog, repeat from * to end of round. (64 stitches.)
Round 48: Knit all stitches.
Round 49: *K6, k2tog, repeat from * to end of round. (56 stitches.)
Round 50: Knit all stitches.
Round 51: *K5, k2tog, repeat from * to end of round. (48 stitches.)
Round 52: Knit all stitches.
Round 53: *K4, k2tog, repeat from * to end of round. (40 stitches.)
Round 54: Knit all stitches.
Round 55: *K3, k2tog, repeat from * to end of round. (32 stitches.)
Round 56: Knit all stitches.
Round 57: *K2, k2tog, repeat from * to end of round. (24 stitches.)
Round 58: Knit all stitches.
Round 59: *K1, k2tog, repeat from * to end of round. (16 stitches.)
Round 60: *K2tog, repeat from * to end of round. (8 stitches.)
At this point, you should have 8 stitches remaining on your needles. Cut your yarn, leaving a tail about 8 inches long. Thread the tail onto your tapestry needle, then slide the needle through all 8 remaining stitches, removing them from the knitting needle. Pull the yarn tight to gather the top of the hat closed. Secure with a knot and weave in the end on the inside of the hat.
Leaf Top
Now for the fun part—the leafy crown! You'll knit five identical leaves and sew them together at the base to form a star shape, then attach them to the top of the hat.
Leaf Pattern (Make 5):
With CC1 (forest green) and one double-pointed needle, cast on 6 stitches. You'll be working back and forth in rows, not in the round.
Row 1: Knit all stitches.
Row 2: K1, m1, k4, m1, k1. (8 stitches.) M1 means "make one"—this is an increase. To do this, pick up the horizontal bar between the stitch you just knit and the next stitch, place it on your left needle, and knit it through the back loop. This creates a new stitch without leaving a hole.
Row 3: Knit all stitches.
Row 4: K1, m1, k6, m1, k1. (10 stitches.)
Row 5: Knit all stitches.
Row 6: K1, m1, k8, m1, k1. (12 stitches.)
Row 7: Knit all stitches.
Row 8: K1, m1, k10, m1, k1. (14 stitches.)
Row 9: Knit all stitches.
Row 10: K1, m1, k12, m1, k1. (16 stitches.)
Row 11: Knit all stitches.
Row 12: K1, m1, k14, m1, k1. (18 stitches.)
Row 13: Knit all stitches.
Row 14: K1, m1, k16, m1, k1. (20 stitches.)
Row 15: Knit all stitches.
Row 16: K1, m1, k18, m1, k1. (22 stitches.)
Row 17: Knit all stitches.
Row 18: K1, m1, k20, m1, k1. (24 stitches.)
Row 19: Knit all stitches.
Row 20: Bind off loosely. To bind off, knit the first two stitches, then pass the first stitch over the second and off the needle. Knit the next stitch, pass the previous stitch over, and continue until one stitch remains. Cut the yarn and pull it through the last loop to secure.
Repeat this leaf pattern four more times so you have a total of five leaves.
Assembling the Leaves:
Lay all five leaves flat with the bind-off edges pointing outward. Arrange them in a star or flower shape, with the cast-on edges meeting in the center. Using your tapestry needle and the yarn tails from the cast-on edges, sew the leaves together at the center point. Make sure the leaves are evenly spaced—like the petals of a flower. Once secured, flip the leaf cluster over so the seams are on the inside.
Attaching the Leaves to the Hat:
Position the leaf cluster on top of the hat, covering the gathered crown. The leaves should fan out naturally. Using the yarn tails from the leaves, sew the leaf cluster securely to the hat. Make several passes through the center of the leaves and the hat fabric to ensure it's firmly attached. Weave in all ends on the inside of the hat.
Seed Embellishments
Now for the finishing touch—the seeds! With CC2 (yellow) yarn and your tapestry needle, embroider small French knots or straight stitches randomly across the pink body of the hat to resemble strawberry seeds.
French Knot Instructions:
Thread your needle with CC2 and bring it up through the fabric from the inside to the outside. Wrap the yarn around the needle two or three times, then insert the needle back into the fabric very close to where it came up. Gently pull the yarn through while holding the wraps in place, creating a small knot on the surface. Repeat this process, spacing the knots about 1 inch apart across the hat body.
Alternative – Straight Stitches:
If French knots feel tricky, you can simply make small straight stitches. Bring the needle up through the fabric, then insert it back down about 1/8 inch away, creating a tiny line. These will look like elongated seeds and are equally charming.
Distribute the seeds evenly across the pink sections of the hat, including the seed stitch band and the stockinette areas. Aim for about 20–30 seeds total, depending on your preference. Once you're happy with the placement, weave in all remaining ends.
Finishing Touches
Give your finished hat a gentle hand wash in cool water with a mild wool wash, then lay it flat to dry. This will help even out the stitches and give the hat a polished look. Once dry, your Strawberry Fields Beanie is ready to wear!
This hat makes a wonderful gift for a friend, a fun addition to a winter wardrobe, or a playful accessory for a themed photoshoot. The combination of the bright pink body, textured seed stitch, and leafy green crown is sure to bring smiles wherever it goes. Happy knitting, and enjoy your handcrafted berry crown!



