Starlight Bloom Lace Wrap Free Pattern – Knit a Celestial Garden Shawl

Starlight Bloom Lace Wrap Free Pattern – Knit a Celestial Garden Shawl
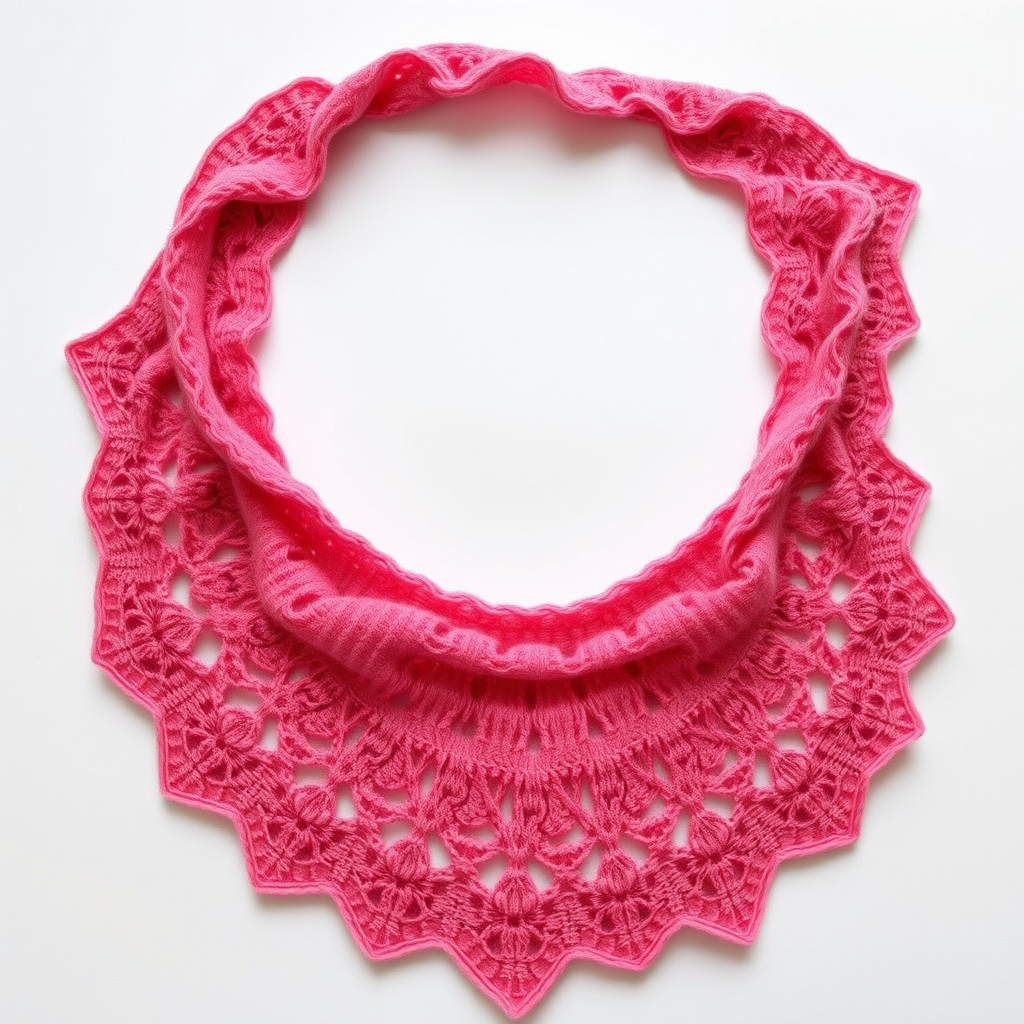
Wrap yourself in a garden of knitted stars with this ethereal lace shawl, where delicate floral motifs bloom across a crescent of soft, hand-dyed yarn. This pattern offers a meditative knit with a breathtaking, airy finish that drapes like a whisper of moonlight. Whether you're a seasoned lace knitter or a confident beginner ready for a gentle challenge, this crescent wrap is the perfect project to slow down, savor the rhythm of yarn overs and decreases, and create something truly magical.
The Starlight Bloom Lace Wrap is knit from the top center down, increasing outward to form a graceful crescent shape. The lace pattern is a repeat of 12 stitches plus 1, with a central spine of yarn overs and decreases that creates the signature crescent silhouette. The result is a shawl that feels like a celestial garden—open, airy, and utterly enchanting.
Materials Needed
Before you begin, gather the following materials to ensure a smooth and enjoyable knitting experience:
- Yarn: Fingering weight yarn (approx. 400-450 yards). Suggested: Malabrigo Sock in "Cielo" or "Primavera" for a soft gradient effect. The gradient will beautifully mimic a twilight sky, with blues, lavenders, and creamy whites blending seamlessly.
- Needles: US 6 (4.0 mm) circular knitting needle, 32-inch or longer. The long circular needle is essential to accommodate the growing number of stitches as the shawl expands.
- Gauge: 20 stitches and 28 rows = 4 inches in stockinette stitch (blocked). Gauge is important for achieving the correct drape and size, but lace is forgiving—focus on consistency rather than perfection.
- Notions: Stitch markers (at least 2), tapestry needle for weaving in ends, blocking mats and pins for the final finishing.
Abbreviations
Familiarize yourself with these standard knitting abbreviations before you start:
- k = knit
- p = purl
- yo = yarn over
- k2tog = knit two together (right-leaning decrease)
- ssk = slip, slip, knit (left-leaning decrease)
- kfb = knit front and back (increase)
- pm = place marker
- sm = slip marker
- rep = repeat
Step-by-Step Instructions
Setup: Casting On and Creating the Foundation
This shawl begins with just 3 stitches and grows outward. The setup rows establish the garter stitch edges and the central spine that will guide your increases.
Cast on: Using a long-tail cast on, cast on 3 stitches.
Row 1 (RS): kfb, k1, kfb (5 stitches)
Row 2 (WS): k2, p1, k2
Row 3 (RS): kfb, k1, yo, k1, yo, k1, kfb (9 stitches)
Row 4 (WS): k2, p5, k2
Row 5 (RS): kfb, k2, yo, k1, yo, k2, kfb (13 stitches)
Row 6 (WS): k2, p9, k2
You now have 13 stitches and a clear central stitch (the "spine") that will be the focal point of your increases throughout the shawl.
Body: Working the Lace Pattern
Now it's time to begin the lace pattern. Place a marker after the first 2 stitches and before the last 2 stitches to mark the garter stitch edges. These edge stitches will always be knit on both sides, creating a neat, stable border.
Row 1 (RS): k2, pm, *yo, ssk, k1, k2tog, yo, k1, rep from * to last 2 sts, yo, k1, yo, pm, k2 (increase at center)
Row 2 (WS): k2, sm, purl to last 2 sts, sm, k2
Row 3 (RS): k2, pm, *k1, yo, ssk, k1, k2tog, yo, k1, rep from * to last 2 sts, yo, k1, yo, pm, k2
Row 4 (WS): same as Row 2
Row 5 (RS): k2, pm, *k2, yo, ssk, k1, k2tog, yo, rep from * to last 2 sts, yo, k1, yo, pm, k2
Row 6 (WS): same as Row 2
Row 7 (RS): k2, pm, *k1, k2tog, yo, k1, yo, ssk, k1, rep from * to last 2 sts, yo, k1, yo, pm, k2
Row 8 (WS): same as Row 2
Row 9 (RS): k2, pm, *k2, k2tog, yo, k1, yo, ssk, rep from * to last 2 sts, yo, k1, yo, pm, k2
Row 10 (WS): same as Row 2
Repeat Rows 1-10 until the shawl measures approximately 20 inches from the center spine, ending with a WS row. The center increases (yo, k1, yo) are what create the crescent shape—each repeat adds 2 stitches at the center, gradually curving the fabric outward.
Pro Tip: As the shawl grows, the stitch count will increase significantly. Don't be alarmed—this is exactly what you want! The long circular needle will accommodate all the stitches comfortably.
Edging: Adding the Scalloped Finish
Once the body reaches your desired length, it's time to add the lace edging. This edging mirrors the body pattern but is worked for a shorter length to create a beautiful, scalloped border that frames the shawl.
Row 1 (RS): k2, pm, *yo, ssk, k1, k2tog, yo, k1, rep from * to last 2 sts, yo, k1, yo, pm, k2
Row 2 (WS): k2, sm, purl to last 2 sts, sm, k2
Row 3 (RS): k2, pm, *k1, yo, ssk, k1, k2tog, yo, k1, rep from * to last 2 sts, yo, k1, yo, pm, k2
Row 4 (WS): same as Row 2
Row 5 (RS): k2, pm, *k2, yo, ssk, k1, k2tog, yo, rep from * to last 2 sts, yo, k1, yo, pm, k2
Row 6 (WS): same as Row 2
Row 7 (RS): k2, pm, *k1, k2tog, yo, k1, yo, ssk, k1, rep from * to last 2 sts, yo, k1, yo, pm, k2
Row 8 (WS): same as Row 2
Row 9 (RS): k2, pm, *k2, k2tog, yo, k1, yo, ssk, rep from * to last 2 sts, yo, k1, yo, pm, k2
Row 10 (WS): same as Row 2
Repeat these 10 rows until the edging measures 3 inches, ending with a WS row. The edging will naturally create gentle points along the edge, giving the shawl its delicate, scalloped appearance.
Bind Off: Finishing the Knit
Loosely bind off all stitches knitwise. It's crucial to bind off loosely—if you bind off too tightly, the edge will pucker and the lace won't drape properly. If needed, use a larger needle for the bind off row to ensure a stretchy finish.
Weave in all ends with a tapestry needle, being careful to weave them invisibly into the garter stitch edges or the wrong side of the work.
Blocking: Revealing the Magic
Blocking is the most important step in any lace project—it's where the magic truly happens. The yarn overs and decreases will look like a crumpled mess before blocking, but trust the process!
Step 1: Soak the shawl in lukewarm water with a gentle wool wash for 20 minutes. This allows the fibers to relax and open up.
Step 2: Gently squeeze out excess water. Do not wring or twist the fabric—this can felt the wool and ruin your hard work. Instead, press the water out or roll the shawl in a clean towel to absorb moisture.
Step 3: Lay the shawl flat on a blocking mat. Begin pinning out the points of the lace edges, stretching the fabric gently to open up the pattern. The crescent shape should be clearly visible, with the center spine running down the middle.
Step 4: Pin the edges evenly, paying special attention to the scalloped points. The goal is to open up the yarn overs so the floral motifs are clearly visible and the fabric has a gossamer, airy quality.
Step 5: Allow the shawl to dry completely. This can take 24-48 hours depending on humidity. Once dry, unpin and enjoy your celestial creation!
Final Thoughts
The Starlight Bloom Lace Wrap is more than just a knitting project—it's a journey. The rhythmic repetition of yarn overs and decreases is deeply meditative, and watching the floral motifs emerge row by row is endlessly satisfying. Whether you're knitting this for yourself or as a gift for someone special, the finished shawl will be a treasured heirloom, draped like a whisper of moonlight around your shoulders.
This pattern is perfect for a beginner-intermediate knitter ready to explore lace. The structure is simple—garter stitch edges, a central spine, and a repeating 10-row pattern—but the result is anything but simple. With each row, you'll build confidence and skill, and by the end, you'll have a stunning piece that showcases the beauty of hand-dyed yarn and the artistry of lace knitting.
So pour yourself a cup of tea, put on your favorite music, and let the Starlight Bloom Lace Wrap carry you away to a celestial garden of your own making. Happy knitting!