Star-Spangled Driftwood Banner Free Pattern – A Knitted Coastal Tribute
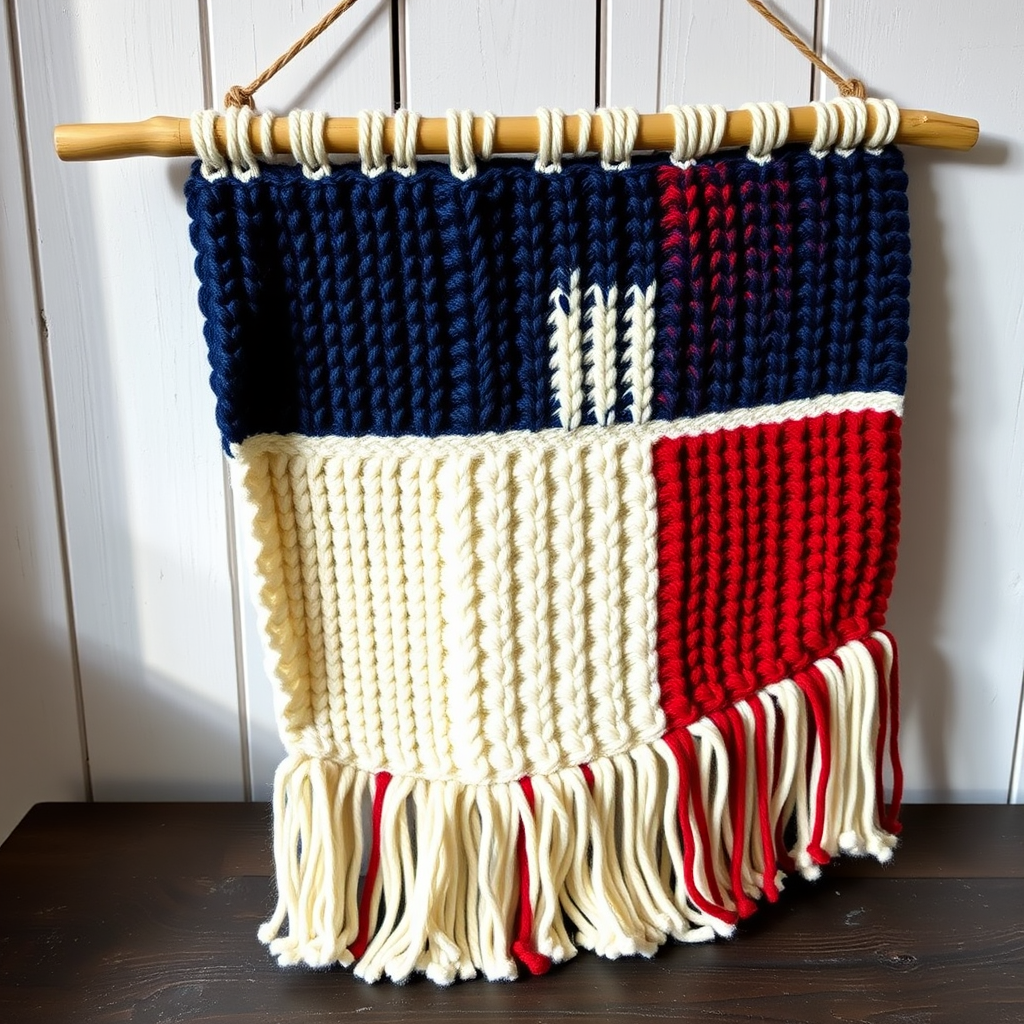
Star-Spangled Driftwood Banner Free Pattern – A Knitted Coastal Tribute
Celebrate Independence Day with a hand-knitted banner that captures the spirit of the shore and the stars. This textured, rustic wall hanging brings a cozy, nautical touch to your patriotic decor. Whether you're decorating a beach house, a cabin, or simply want to add a handmade touch to your summer celebrations, this pattern is perfect for knitters of all skill levels. The combination of three distinct stitch patterns—smooth stockinette, bumpy seed stitch, and ridged garter—creates a visually rich piece that feels both modern and nostalgic.
What makes this banner truly special is its versatility. Hang it on a porch, above a fireplace, or in a entryway to welcome guests with a subtle nod to Independence Day. The natural driftwood stick adds an organic, coastal element that pairs beautifully with the red, white, and blue yarn. Best of all, this is a free pattern that uses simple techniques, making it an ideal weekend project.
Materials Needed
Before you begin, gather the following materials. All items are readily available at craft stores or online. The total cost is minimal, especially if you already have basic knitting supplies on hand.
Yarn
- Worsted weight cotton yarn in three colors:
- Navy (A) – approximately 150g (about 300 yards)
- Cream (B) – approximately 150g (about 300 yards)
- Rust Red (C) – approximately 150g (about 300 yards)
Cotton yarn is recommended for its durability, stitch definition, and ability to hold its shape when hung. If you prefer, you can substitute with any worsted weight acrylic or wool blend.
Needles and Tools
- US 7 (4.5mm) knitting needles – straight or circular, whichever you prefer
- Tapestry needle for seaming and weaving in ends
- Scissors
- Measuring tape or ruler
- Stitch markers (optional, but helpful)
Additional Supplies
- Wooden dowel or driftwood stick – approximately 1 inch in diameter and 20-22 inches long (slightly wider than the finished banner width)
- Jute twine – about 2 feet for hanging loops
- Cream yarn for seaming (you can use the same yarn B)
Gauge
20 stitches and 28 rows = 4 inches in stockinette stitch (knit on RS, purl on WS). Always check your gauge before starting to ensure your finished banner matches the intended dimensions. If your gauge is off, adjust your needle size accordingly.
Step-by-Step Instructions
This banner is knitted in three separate panels (one for each color) and then seamed together with a decorative stitch. Each panel measures approximately 6 inches wide and 24 inches long. The entire project takes about 6-8 hours of knitting time, making it perfect for a weekend project.
Panel 1: Navy (A) – Stockinette Stitch
The navy panel features a smooth, classic stockinette stitch. This creates a sleek, elegant surface that contrasts beautifully with the textured panels on either side.
- Cast on 30 stitches with yarn A. Use a long-tail cast-on for a neat, stretchy edge.
- Row 1 (Right Side): Knit all stitches.
- Row 2 (Wrong Side): Purl all stitches.
- Repeat Rows 1-2 until the piece measures 24 inches from the cast-on edge. To measure, lay the piece flat and use a measuring tape from the cast-on edge to the needle. Do not stretch the fabric while measuring.
- Bind off all stitches loosely. Use a stretchy bind-off method (such as the knit-two-together bind-off or the Elizabeth Zimmermann sewn bind-off) to prevent the edge from pulling. Cut yarn, leaving a 6-inch tail for weaving in later.
Pro tip: Place a stitch marker every 28 rows to help you keep track of your row count without having to count constantly.
Panel 2: Cream (B) – Seed Stitch
The cream panel uses a seed stitch, which creates a bumpy, textured surface that resembles scattered seeds. This adds wonderful visual and tactile interest to the banner.
- Cast on 30 stitches with yarn B.
- Row 1: *K1, P1; repeat from * to end of row. (You will end with a K1 since 30 is an even number.)
- Row 2: *P1, K1; repeat from * to end of row. (This creates the offset pattern characteristic of seed stitch.)
- Repeat Rows 1-2 until the piece measures 24 inches from the cast-on edge. The seed stitch pattern naturally lies flat and doesn't curl, so no blocking is needed.
- Bind off in pattern. This means you'll knit the knit stitches and purl the purl stitches as you bind off. This keeps the edge elastic and matches the texture of the body. Cut yarn, leaving a 6-inch tail.
Note: Seed stitch is sometimes called "moss stitch" in UK terminology. The pattern is the same—just alternate knit and purl stitches on every row.
Panel 3: Rust Red (C) – Garter Stitch
The rust red panel uses garter stitch, which is created by knitting every row. This produces a ridged, bumpy texture that's reversible and lies perfectly flat.
- Cast on 30 stitches with yarn C.
- Knit every row until the piece measures 24 inches from the cast-on edge. That's it—no purling required! This is the simplest of the three panels.
- Bind off all stitches. A standard bind-off works well here since garter stitch is naturally elastic. Cut yarn, leaving a 6-inch tail.
Tip: Count your ridges (each ridge equals two rows of knitting) to track your progress. You'll need approximately 168 rows for 24 inches at the given gauge.
Assembly: Seaming the Panels Together
Now it's time to join the three panels into a single banner. This step requires patience and attention to detail, but the result is a beautiful, professional-looking piece.
- Lay the panels side by side on a flat surface in this order: Navy (A) on the left, Cream (B) in the middle, and Rust Red (C) on the right. Make sure all the right sides are facing up and the cast-on edges are aligned at the bottom.
- Thread a tapestry needle with a length of cream yarn (yarn B) about 3 times the length of the seam you'll be sewing (approximately 72 inches).
- Whip stitch the panels together along the long edges:
- Start at the bottom (cast-on edge) of the Navy and Cream panels.
- Insert the needle from the back to the front through both panels, about 1/4 inch from the edge.
- Bring the needle over the top and insert it again from back to front, about 1/4 inch up from the previous stitch.
- Continue this diagonal wrapping motion up the entire seam. Keep your stitches even and consistent—about 1/4 inch apart.
- When you reach the top, secure the yarn with a knot on the wrong side and weave in the end.
- Repeat the whip stitch to join the Cream panel to the Rust Red panel in the same manner.
- Check your seams. The whip stitches should be visible on the right side, creating a decorative, handcrafted look. If any stitches are uneven, you can gently adjust them with the needle.
Pro tip: To ensure the panels align perfectly, pin them together with safety pins or use stitch markers every few inches before you begin sewing.
Creating the Casing for the Driftwood
The top of the banner needs a casing to hold the driftwood stick. This creates a clean, professional finish and makes hanging easy.
- Fold the top edge of the assembled banner down toward the wrong side by about 1.5 inches. The fold should be even across the entire width.
- Pin the fold in place to keep it secure while you sew.
- Thread your tapestry needle with a length of cream yarn (about 24 inches).
- Sew a straight running stitch along the bottom edge of the fold, about 1 inch from the fold line. This creates a tube (casing) that the driftwood will slide through.
- Leave both ends open—do not sew the sides closed. The openings should be wide enough to easily slide the driftwood through.
- Secure the yarn at both ends with a knot on the wrong side and weave in the ends.
Important: Make sure your casing is wide enough to accommodate your driftwood. If your stick is thicker than 1 inch, adjust the fold depth accordingly.
Adding the Driftwood and Hanging Loops
Now for the finishing touches that make this banner truly special.
- Slide the driftwood stick through the casing you just created. Gently push it through until it's centered.
- Cut two lengths of jute twine, each about 12 inches long.
- Tie one piece of twine to each end of the driftwood stick, just outside the casing. Use a secure knot (a double knot or square knot works well).
- Trim the twine ends to your desired length, leaving enough to tie a loop for hanging. A 3-4 inch loop is usually perfect.
- Test the hanging loops by gently lifting the banner. Adjust the knots if needed to ensure the banner hangs evenly.
Finishing Touches
The final steps will give your banner a polished, professional appearance.
- Weave in all loose ends from the cast-on, bind-off, and seaming. Use your tapestry needle to thread the tails through the wrong side of the fabric, then trim any excess.
- Optional: Add fringe along the bottom edge. This adds a fun, bohemian touch and echoes the coastal theme.
- Cut 8-inch lengths of yarn in all three colors (Navy, Cream, and Rust Red). You'll need about 20-24 pieces total.
- Fold each piece in half to create a loop at the midpoint.
- Insert a crochet hook (or your tapestry needle) through the bottom edge of the banner, from front to back.
- Hook the folded loop and pull it through to the front.
- Thread the two loose ends through the loop and pull tight. This is called a lark's head knot.
- Space the fringe pieces about 1/2 inch apart along the entire bottom edge, alternating colors for a festive look.
- Trim the fringe ends evenly with scissors.
- Block the banner (optional but recommended). Lay it flat, mist with water, and gently pat into shape. Allow to dry completely before hanging. This helps even out the stitches and ensures the banner hangs straight.
Displaying Your Banner
Your Star-Spangled Driftwood Banner is now complete! Here are some ideas for displaying it:
- On a porch or patio – Hang it from a hook or nail near your front door to welcome guests with patriotic charm.
- Above a fireplace mantel – The rustic texture pairs beautifully with natural wood and stone.
- In a coastal-themed room – Combine with seashells, driftwood, and nautical accents for a cohesive look.
- As a table runner backdrop – Drape it behind a buffet table at your Fourth of July gathering.
This banner also makes a thoughtful handmade gift for friends and family who love coastal decor or patriotic celebrations. Consider making one in different color combinations to match other holidays or seasons—the pattern is endlessly adaptable!
We hope you enjoy creating this Star-Spangled Driftwood Banner. It's a rewarding project that combines simple knitting techniques with beautiful design. Happy knitting, and have a wonderful Independence Day!



