Honeycomb Charm Crochet Square Bandana Free Pattern for Small Dogs
Honeycomb Charm Crochet Square Bandana — Free Beginner Pattern for Small Dogs
Introduction
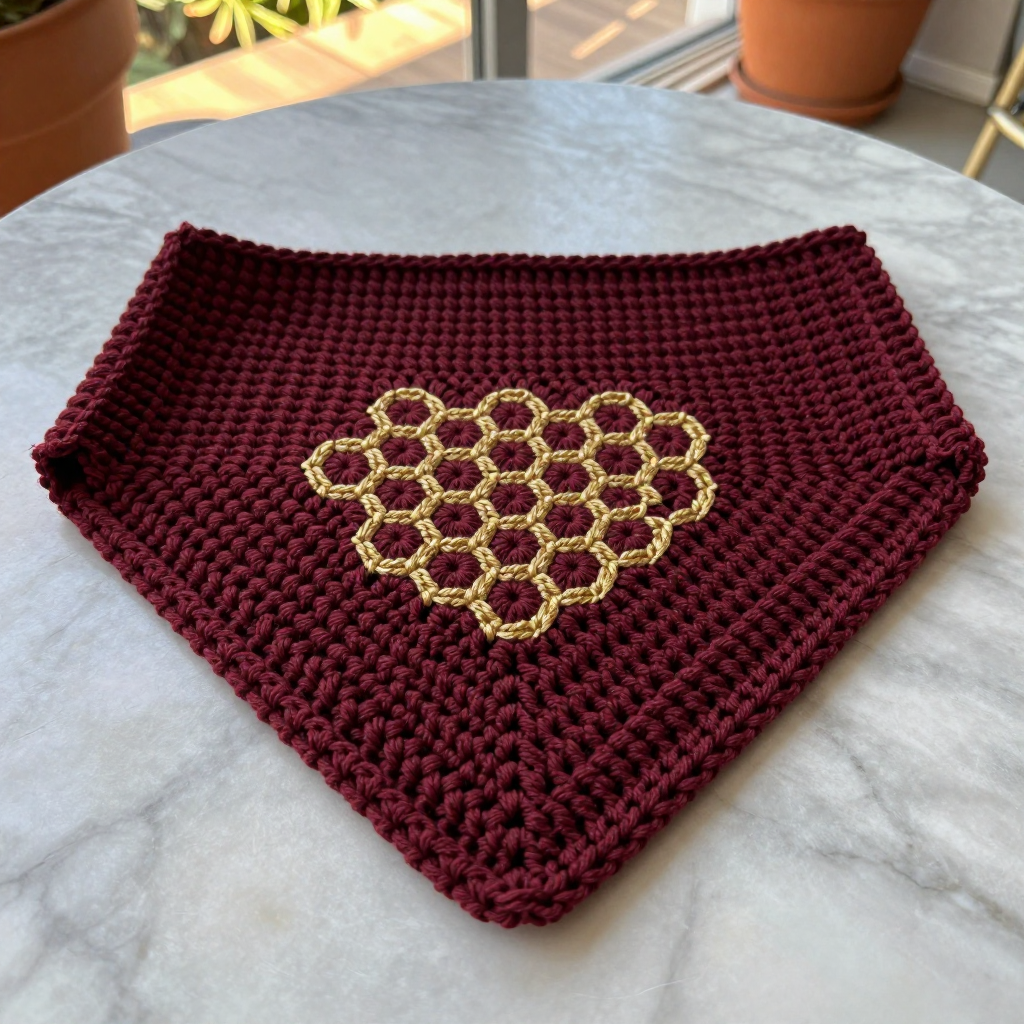
If you have never held a crochet hook before, this is the perfect first project for you. The Honeycomb Charm Bandana is a simple square of rich burgundy single crochet, finished with a delicate gold honeycomb motif that you make separately and sew on at the end — so there are no tricky color changes to worry about. The finished piece is soft, slightly ridged, and matte, with a gentle woolly texture and a little raised gold flower sitting right at the center front. Folded diagonally and tied at the neck, it gives a small dog a sweet fairycore touch and takes only a few hours to make. By the end you will have learned the two most important crochet stitches, how to read a pattern, and how to finish a piece neatly — all in one cozy little accessory.
Materials Needed
- Yarn: Aran weight wool blend (approximately 20% wool, 80% acrylic). Total approximately 60–70 yards: 50–55 yards burgundy (Color A) and 10–15 yards gold (Color B).
- Crochet hook: 5.0 mm (US size H-8), or whatever size you need to match the gauge below.
- Stitch markers: at least 4 (or use small safety pins or scrap yarn loops).
- Tapestry needle (also called a yarn needle — a big needle with a blunt tip and a large eye) for sewing on the motif and weaving in ends.
- Scissors for cutting yarn.
- Pins (optional but helpful) for holding the gold motif in place while you sew.
Finished size: The square measures approximately 9 x 9 inches (23 x 23 cm) before folding. Folded into a triangle, it sits about 9 inches across the top edge and 6.5 inches deep at the center point — a good fit for small dogs with neck circumferences of roughly 9–12 inches (23–30 cm). The gold honeycomb motif is about 2.5 inches (6.5 cm) across.
Abbreviations and Beginner Glossary
Every pattern is written in shorthand. Here is every abbreviation used in this pattern, explained as if you have never crocheted before.
- ch — chain. Make a loop with the yarn on your hook, then pull the yarn through the loop. Each loop you pull through is one chain. Chains look like a little braid and form the foundation of your work.
- sc — single crochet. Insert your hook into the next stitch, wrap the yarn over the hook and pull up a loop (you now have 2 loops on the hook), wrap the yarn over again and pull it through both loops. One single crochet made.
- dc — double crochet. Wrap the yarn over the hook first, insert the hook into the stitch, wrap and pull up a loop (3 loops on hook), wrap and pull through 2 loops, wrap and pull through the last 2 loops. One double crochet made — it is taller than a single crochet.
- sl st — slip stitch. Insert the hook into the stitch, wrap the yarn over, and pull it through both the stitch and the loop on your hook in one motion. It makes an almost invisible joining stitch.
- sp — space. The little gap made by a chain (for example, a "ch-2 sp" is the hole under two chains).
- st(s) — stitch(es). One completed stitch, or several.
- turn — flip your work over so you can crochet back along the row you just made.
- fasten off — cut the yarn a few inches from your work, then pull the tail all the way through the last loop to lock it.
- weave in ends — thread a yarn tail onto the tapestry needle and sew it back and forth through the back of the fabric so it disappears.
- block — gently dampen the finished piece and pin it into shape to dry, so it lies flat and even.
- Honeycomb Petal — a special stitch group used only in the gold motif: work (dc, ch 2, dc, ch 2, dc) all into the same ring or space. This makes a little fan of three double crochets.
Gauge
Gauge: 14 single crochet stitches x 16 rows = 4 inches (10 cm) in single crochet, unblocked.
Gauge simply means how big your stitches come out. If your stitches are bigger than this, your square will be too large for a small dog; if they are smaller, it will be too tight. To make a gauge swatch: chain 20, then single crochet into every chain and work about 18 rows. Lay a ruler across the middle of the swatch and count how many stitches fit in 4 inches, then count how many rows fit in 4 inches. If you have more stitches than 14, try a larger hook; if you have fewer, try a smaller hook. It is worth the ten minutes — a bandana that fits is a bandana that gets worn.
Beginner Tips Before You Start
- Count every row. The square needs exactly 44 rows. Write the row numbers down on paper and tick them off as you go — it is very easy to lose track.
- Do not pull the yarn too tight. Hold the yarn relaxed. Tight stitches make a stiff, curled fabric and make it hard to get your hook into the next stitch.
- Use stitch markers. Place one in the very first stitch of each row so you always know where the row begins and ends. This prevents accidentally adding or losing stitches.
- The turning chain is not a stitch here. At the start of each row you make one chain (ch 1) and then turn. That chain does not count as a stitch, so your first single crochet goes into the very first stitch of the row.
- Keep the gold yarn loose. When you make the honeycomb motif, relaxed tension keeps it flat and pretty. If it cups or curls, you are pulling too hard.
- Block before you sew. Blocking the burgundy square first makes the overlay sit perfectly flat and centered.
Step-by-Step Instructions
Part 1: The Burgundy Square (Color A)
With burgundy yarn, ch 32.
Row 1: Sc in the 2nd ch from the hook and in each ch across. (31 sc) Turn.
Row 2: Ch 1 (does not count as a stitch), sc in each st across. (31 sc) Turn.
Rows 3–44: Repeat Row 2. (31 sc)
After Row 44 you have a rectangle 31 stitches wide by 44 rows tall — approximately 9 x 9 inches (23 x 23 cm) at the stated gauge. Do not fasten off yet.
Part 2: The Border (Color A, worked continuously around the square)
You will now work single crochet all the way around the outside edge of the square. Work "evenly" means space your stitches so they sit neatly without gaps or bunching — roughly one stitch per row along the side edges.
Round 1: Ch 1. Work 31 sc along the top edge, then 3 sc in the corner stitch to turn neatly. Work 44 sc along the first side edge, 3 sc in the corner, 31 sc along the bottom edge, 3 sc in the corner, 44 sc along the second side edge, 3 sc in the final corner, then join with a sl st to the first sc. (31 + 3 + 44 + 3 + 31 + 3 + 44 + 3 = 162 sc) Fasten off burgundy and weave in the ends.
Part 3: The Gold Honeycomb Overlay Motif (Color B)
This small motif is made separately in gold, then sewn onto the center of the square. It is a cluster of linked honeycomb petals about 2.5 inches (6.5 cm) across.
Center Petal — Round 1: With gold, ch 6 and join with a sl st into the first ch to form a ring. Ch 3 (this counts as your first dc), then work (dc, ch 2, dc, ch 2, dc) into the ring. You now have 3 dc separated by two ch-2 spaces. Do not join yet — this is the center petal.
Surrounding Petals — Round 2: Ch 3, dc in the same ring, ch 2. Work a Honeycomb Petal — (dc, ch 2, dc, ch 2, dc) — into the next ch-2 space of the center petal, ch 2. Work a Honeycomb Petal into the next ch-2 space, ch 2, then join with a sl st to the base of the first ch-3. You now have 3 petals arranged around the center.
Round 3: Ch 1, work 1 sc in each dc and 2 sc in each ch-2 space around the entire motif, joining with a sl st to the first sc. This gives the cluster a neat, slightly rounded edge. Fasten off gold, leaving a 10-inch (25 cm) tail for sewing.
Part 4: Attaching the Overlay
Step 1: Block the burgundy square lightly (see Finishing) and let it dry completely.
Step 2: Place the gold honeycomb motif in the exact center of the square — about 4.5 inches (11.5 cm) from each edge. Pin it in place.
Step 3: Thread the gold tail onto the tapestry needle and sew the motif to the burgundy fabric with small, even stitches all around the outer sc round, catching only the surface of the burgundy fabric so the stitches do not show on the back.
Step 4: Weave in all remaining ends.
Assembly and Finishing
Seaming: There are no seams in this project — the square is one flat piece, and the only sewing is attaching the gold motif as described in Part 4. Work your sewing stitches through the surface of the burgundy fabric only, not all the way through to the back, so the back of the bandana stays clean.
Weaving in ends: Thread each yarn tail onto the tapestry needle. Sew it back and forth through the back of the fabric for about 2 inches, changing direction once or twice so it cannot work loose, then trim close to the fabric.
Blocking: Lightly dampen the finished square with a spray bottle or a damp towel. Pin it out flat to exactly 9 x 9 inches on a towel or blocking mat, pressing the gold overlay flat without squashing the stitch texture. Leave it to dry completely away from direct heat, then unpin.
Wearing: Fold the square diagonally so the gold honeycomb sits at the center front of the triangle. Tie the two long corners loosely at the back of the neck — the bandana should sit comfortably without pulling. For a more secure fit on active dogs, thread a narrow ribbon or a short crocheted chain tie through the folded top edge and knot it at the back.
Care: Hand wash cold with mild wool soap, reshape, and dry flat away from direct heat.
Pro Tips and Variations
- Change the colors: Swap burgundy and gold for any two colors you love — a cream square with a mustard motif, or a forest green square with a copper motif, both look lovely. Keep the motif in a contrasting color so the honeycomb stands out.
- Adjust the size: For a larger dog, add rows in pairs (each pair adds about half an inch of height) and add chains in pairs to Row 1 (each pair adds about half an inch of width). For a smaller dog, remove rows and chains the same way. Always keep the square square.
- Substitute the yarn: Any aran weight yarn works — cotton gives a crisper, washable bandana, while a softer acrylic is gentler on sensitive necks. Match the gauge with your hook size, not the label on the ball.
- Add a second motif: Make two honeycomb motifs and place one at each of the two front corners of the folded triangle for an extra fairycore touch.