Double Layer Tulip Ribbed Bandana Free Crochet Pattern for Medium Dogs
Double Layer Tulip Ribbed Bandana – Free Beginner Crochet Pattern for Medium Dogs
Introduction
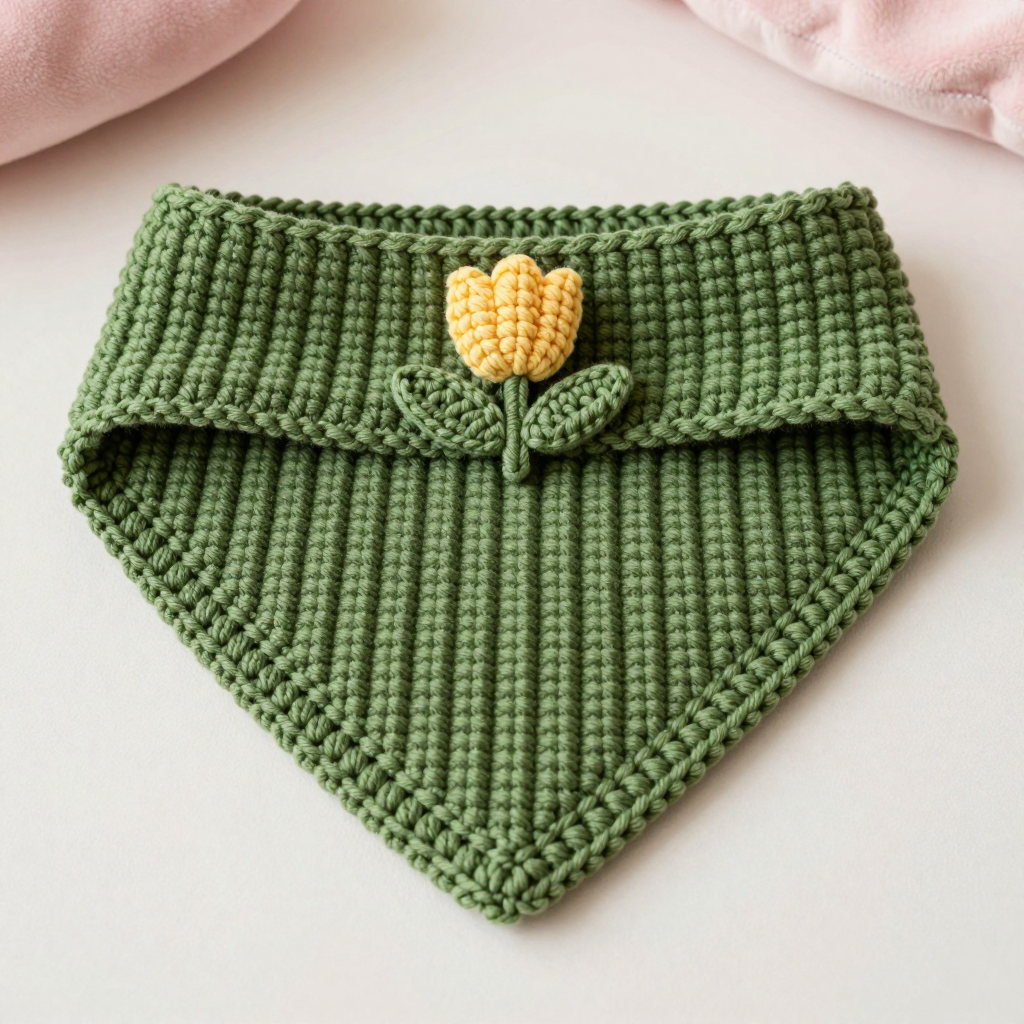
If you have never held a crochet hook before, this is the perfect first project for you. This little bandana is worked flat, row by row, in a simple triangle shape that grows one stitch at a time — no complicated shaping, no counting in circles, and no sewing together big pieces. The finished bandana is about 12 inches wide and 8 inches deep, made from thick, fuzzy chenille yarn in a soft olive green with a tiny ochre tulip appliqué near the neckline. It feels plush and squishy in your hands, like a tiny corduroy cushion, and the raised ribbing gives it a cozy, kawaii folk-art look that suits medium dogs beautifully. Slip it over your dog's collar or tie it loosely at the back of the neck, and you have a handmade gift that looks far more advanced than it really is.
Materials Needed
- Yarn: Chenille plush yarn, super bulky (weight 6), approx. 55 yd / 50 m per 100 g skein. Olive: 1 skein (approx. 60 yd used — buy 2 skeins to be safe). Ochre: 1 skein (approx. 12 yd used).
- Main hook: Size L/11 (8.0 mm) crochet hook.
- Small hook: Size H/8 (5.0 mm) crochet hook (for the tulip appliqué only).
- Stitch marker (one is enough — a safety pin or scrap of contrasting yarn works too).
- Tapestry needle (a large-eye, blunt-tip needle for sewing in ends and attaching the tulip).
- Scissors for cutting yarn.
- Finished size: approx. 12 in / 30 cm wide across the top edge and 8 in / 20 cm deep at the center point — sized for a medium dog (roughly 25–50 lb / 11–23 kg).
Abbreviations and Beginner Glossary
Every abbreviation used in this pattern is listed here. Read this once before you start — you will refer back to it often, and that is completely normal.
- ch – chain. Make a loop of yarn on your hook, wrap the yarn over the hook, and pull it through the loop. That is one chain.
- st / sts – stitch / stitches. One completed unit of crochet.
- sl st – slip stitch. Insert hook into the stitch, wrap yarn over, and pull it through both the stitch and the loop on your hook at once. It makes an almost invisible join.
- sc – single crochet. Insert hook into stitch, pull up a loop (2 loops on hook), wrap yarn over, pull through both loops. (1 loop left on hook.)
- hdc – half double crochet. Wrap yarn over hook first, insert into stitch, pull up a loop (3 loops on hook), wrap yarn over, pull through all 3 loops.
- dc – double crochet. Wrap yarn over hook, insert into stitch, pull up a loop (3 loops on hook), wrap yarn over, pull through 2 loops, wrap yarn over, pull through last 2 loops.
- FPdc – front post double crochet. Work a normal double crochet, but instead of going into the top of the stitch below, insert your hook horizontally under the post (the vertical body) of the stitch from the front, pushing the hook toward the back. This pushes the stitch forward and makes a raised rib.
- BPdc – back post double crochet. Same as FPdc, but insert the hook under the post from the back of the work, pushing toward the front. This pushes the stitch backward.
- magic ring – an adjustable loop of yarn used to start a circle with no hole in the middle. Make a loop, work your stitches into it, then pull the short tail tight to close it.
- turn – flip your work over so the other side faces you before starting the next row.
- fasten off – cut the yarn leaving a tail, pull the tail all the way through the last loop, and tug gently to lock it.
- weave in ends – thread a yarn tail onto the tapestry needle and sew it back and forth through the back of the fabric to hide it.
- increase – adding a stitch so the piece gets wider. In this pattern, an increase is one extra dc worked into the same stitch as the last stitch of the row.
- right side (RS) – the side of the fabric that faces outward when worn.
Gauge
Gauge: 8 sts and 8 rows = 4 in / 10 cm in post-stitch ribbing, using the 8.0 mm hook.
Gauge simply means how big your stitches come out. If your stitches are bigger than the pattern's, the bandana will be too large for a medium dog; if smaller, it will be too tight. To check, crochet a small square about 4 in / 10 cm across in the FPdc/BPdc ribbing (just repeat Row 3 of Layer 1 without the increase), then lay a ruler across the middle and count how many stitches fit in 4 inches. If you have more than 8, try a larger hook; if fewer, try a smaller hook. Chenille yarn is stretchy and fuzzy, so do not panic if you are off by half a stitch — just aim to be close.
Beginner Tips Before You Start
- Count every row. This triangle grows by exactly one stitch per row. Before you turn, count your stitches and compare to the number in parentheses. If you are off, fix it now — it is much easier than fixing it later.
- The ch 2 at the start of a row does not count as a stitch. It is just a little "ladder" to give the row height. Your first real stitch goes into the first stitch of the row below.
- Do not pull the yarn tight. Chenille yarn is fragile and will snap or shed if you yank it. Keep your tension relaxed and even — think "gentle hug," not "clenched fist."
- Use your stitch marker to mark the first stitch of each row so you never lose your place, and to mark the increase stitch at the end of the row.
- Work FPdc around FPdc and BPdc around BPdc. The raised ribs should line up in straight vertical columns. If a rib starts to wander sideways, you have worked into the wrong post — undo that stitch and try again.
- Chenille hides mistakes but also hides stitches. Work in good light and feel the posts with your fingers if you cannot see them clearly.
Step-by-Step Instructions
Layer 1 – Main Triangle (olive, 8.0 mm hook)
Worked flat, turning at the end of every row. The triangle grows by adding one stitch at the end of every row. The ch 1 or ch 2 at the start of a row does not count as a stitch.
Row 1: Ch 3. Work 3 dc in the 3rd ch from hook. Turn. (3 sts)
Row 2: Ch 2, FPdc around the first st, BPdc around the next st, FPdc around the last st, then 1 dc in the same last st (increase made). Turn. (4 sts)
Row 3: Ch 2, FPdc around first st, *BPdc around next st, FPdc around next st; repeat from * to last st, 1 dc in last st (increase). Turn. (5 sts)
Rows 4–16: Repeat Row 3 thirteen more times, always working FPdc around FPdc posts and BPdc around BPdc posts, and always adding 1 dc at the end of the row. Each row adds 1 st. (16 sts after Row 16)
Row 17 (final row): Ch 1, sc evenly across the top edge of the triangle (approx. 16 sc), then sc evenly down the right slanted edge (approx. 17 sc) and up the left slanted edge (approx. 17 sc), working 3 sc in the center point. Join with sl st to first sc. Fasten off, weave in ends.
Layer 2 – Folded Ribbed Top Layer (olive, 8.0 mm hook)
With right side facing, join olive yarn with a sl st at the right corner of the top edge of Layer 1.
Row 1: Ch 2, work 1 FPdc around each sc along the top edge to the left corner. Turn. (16 sts)
Rows 2–5: Ch 2, *FPdc around next st, BPdc around next st; repeat from * across. Turn. (16 sts)
Row 6: Ch 1, sc in each st across. Fasten off, leaving a 10 in / 25 cm tail. Fold Layer 2 down over the front of Layer 1 and tack the lower edge in place at both corners with the tapestry needle and tail. This creates the stacked double-ribbed band.
Tulip Appliqué (ochre, 5.0 mm hook)
Petal cup (make 1):
Round 1: Magic ring, ch 2, work 6 dc into ring, join with sl st to first dc. (6 sts)
Round 2: Ch 2, 2 dc in each st around, join with sl st. (12 sts)
Round 3: Ch 1, *sc in next st, ch 2, skip 1 st; repeat from * around, join with sl st. Fasten off, leaving a 12 in / 30 cm tail.
Fold the cup in half so the ch-2 spaces form a soft V-shaped tulip petal, and pinch the base to shape it.
Stem (make 1): With ochre, ch 8. Sl st in 2nd ch from hook and in each ch across. Fasten off. (7 sts)
Leaf (make 1): With ochre, ch 6. Sl st in 2nd ch from hook, sc in next ch, hdc in next ch, dc in next ch, 3 dc in last ch, then work back along the opposite side: dc in next ch, hdc in next ch, sc in next ch, sl st in last ch. Fasten off.
Assembly and Finishing
Sewing on the tulip: Thread the long tail of the petal cup onto your tapestry needle. Place the cup high on the bandana, centered about 1.5 in / 4 cm below the top edge, with the folded V pointing up. Take a few small stitches through the base of the cup and into the bandana, going through the fabric but not all the way to the front. Sew the stem below the cup, pointing down toward the center point, and the leaf angled to one side. Secure each piece with three or four tiny stitches and knot the tail on the back.
Weaving in ends: Thread each yarn tail onto the tapestry needle and sew it back and forth through the back of the fabric for about 1 in / 2.5 cm, changing direction once so it cannot pull loose. Trim the tail close to the fabric. Never knot bulky chenille tails on the front — they will show.
Blocking: Do not soak chenille. Instead, lay the bandana flat on a towel, mist it very lightly with water, and gently pat the ribbing into shape with your fingers. Let it dry completely. If you have a steamer, hold it a few inches away and steam briefly — just enough to relax the ribbing, never enough to flatten it.
To wear: Slide the bandana over the dog's collar, or tie the top corners loosely at the back of the neck, leaving two fingers of ease so it is comfortable and safe.
Pro Tips and Variations
- Change the colors: Try a dusty rose bandana with a cream tulip, or a mustard bandana with a rust tulip. Chenille comes in many shades, and the folk-art look works in any palette.
- Adjust the size: For a small dog, stop Layer 1 at Row 12 (12 sts) and work Layer 2 with 12 sts. For a large dog, continue Layer 1 to Row 20 (20 sts) and work Layer 2 with 20 sts. Keep the same gauge and the proportions stay correct.
- Substitute the yarn: If chenille is hard to find, a super bulky (weight 6) acrylic or a double strand of worsted (weight 4) yarn works well. Check your gauge again, since the fabric will look and stretch differently.
- Make it reversible: Sew the tulip on with a few hidden stitches only, so the bandana can be flipped and worn plain on the other side for a simpler everyday look.