Sunbeam Circle Curtain: Free Crochet Moss Stitch Pattern
Sunbeam Circle Curtain: Free Crochet Moss Stitch Pattern
Introduction
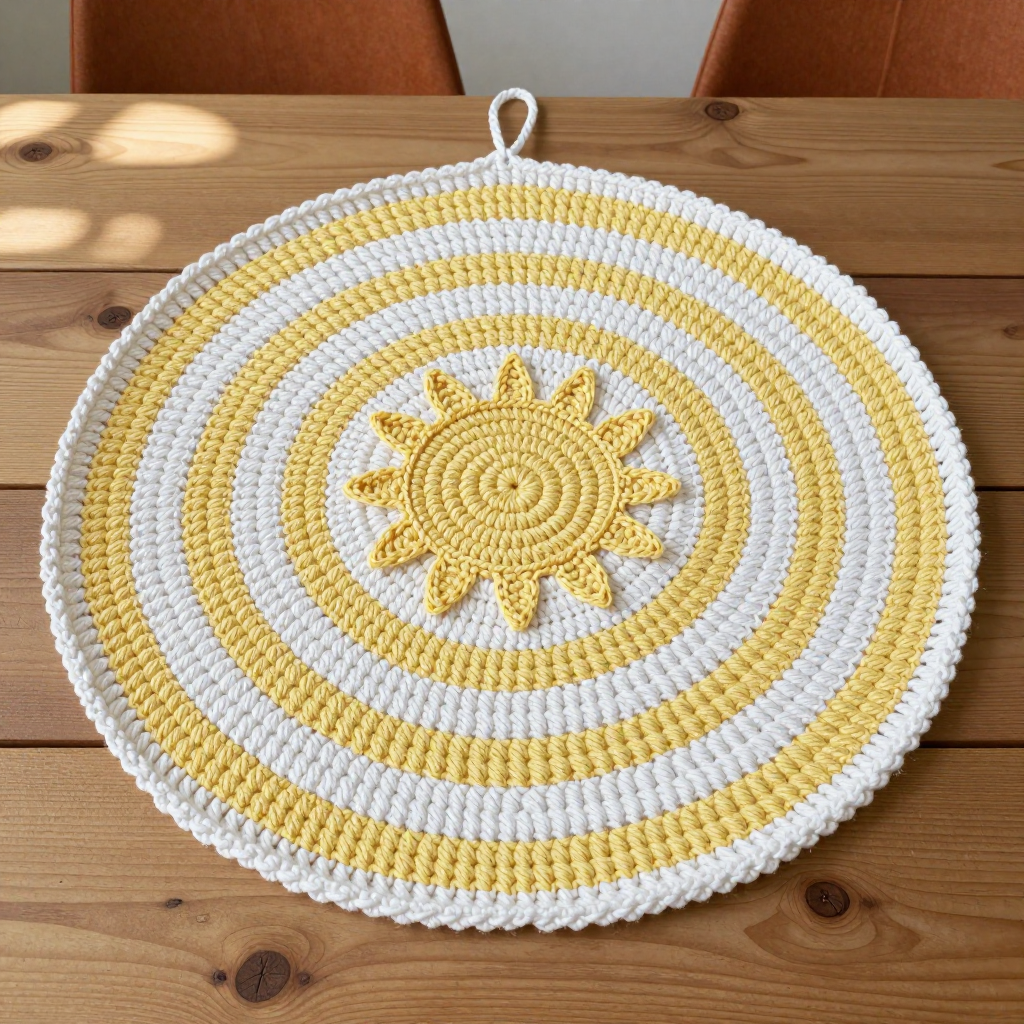
If you have never held a crochet hook before, this Sunbeam Circle Curtain is a wonderful first real project. It is worked entirely in one simple, repeating stitch called moss stitch (also called linen stitch), so once you learn it in the first few rounds, the rest of the panel is a calm, meditative repeat you can do while watching TV. The finished piece is a flat 24-inch circle of soft, matte cotton that looks like woven fabric, with concentric rings of white and butter yellow that glow gently when the light comes through your window. A tiny crocheted sun sits at the exact center, and a single loop at the top lets it hang from one point like a little round banner. It is forgiving, beautiful, and absolutely beginner-friendly.
Materials Needed
- Yarn: Worsted-weight (category 4) cotton yarn, approx. 220 yd (200 m) per 100 g skein. You need 2 skeins White (Color A) — approx. 380 yd (350 m) — and 1 skein Butter Yellow (Color B) — approx. 170 yd (155 m). The small amount for the sun appliqué is included in the yellow amount.
- Hook: US H-8 / 5.0 mm crochet hook (or whatever size gives you the gauge below).
- Stitch marker (one is enough; a safety pin or paper clip works too).
- Tapestry needle (a big blunt needle with a large eye for weaving in yarn ends).
- Scissors.
- 1 small wooden ring or 1 in (2.5 cm) curtain clip for hanging.
- Finished size: approx. 24 in (61 cm) diameter.
Abbreviations and Beginner Glossary
- ch – chain. Make a loop of yarn over your hook and pull it through the loop already on your hook. This creates a small chain link.
- sc – single crochet. Insert your hook into the stitch, pull up a loop of yarn (2 loops on hook), yarn over, pull through both loops. One sc made.
- sl st – slip stitch. Insert hook into the stitch, yarn over, and pull that loop straight through the loop on your hook. It joins or moves you along without adding height.
- dc – double crochet. Yarn over, insert hook into stitch, pull up a loop (3 loops on hook), yarn over and pull through 2 loops, yarn over and pull through last 2 loops.
- sp – space. The little gap made by a chain; you work into the gap, not into a stitch.
- st(s) – stitch(es).
- rep – repeat. Do the instruction again.
- beg – beginning.
- rnd – round. One complete circle of work.
- magic ring – an adjustable loop of yarn you crochet into, then pull tight so there is no hole in the center. (If it feels hard, chain 4 and join with a sl st into a ring instead.)
- moss stitch in the round – sc in each ch-1 sp, ch 1, skip the next sc, all the way around. You always work into the chain spaces of the round below, never into the sc stitches.
Gauge
16 sts and 16 rounds = 4 in (10 cm) in moss stitch worked in the round, after light blocking.
Gauge means how big your stitches come out. It matters because the finished 24-inch diameter depends on it — if your stitches are too big, the curtain will be oversized; too small, and it will be too small. To check: crochet a small flat circle of about 20 rounds following the pattern below, lay it flat, and measure across 4 inches (10 cm) counting the sc stitches. If you get more than 16 in 4 inches, try a larger hook; if fewer, try a smaller hook. Always check gauge before starting the real panel.
Beginner Tips Before You Start
- Use a stitch marker. Place it in the first stitch of each round so you always know where the round begins and ends. Move it up each round.
- Do not pull the yarn too tight. Keep your chains relaxed and even. Tight chains make the moss stitch stiff and hard to work into.
- Work into the spaces, not the stitches. The most common beginner mistake is crocheting into the sc stitches. Always go into the little ch-1 gaps.
- Count your increase points. Each increase round adds one extra (sc, ch 1) at every increase point, which keeps the circle flat. If your circle starts to cup or ruffle, you have missed or added an increase.
- Change color at the start of a round and carry the unused color loosely up the back, or fasten off and rejoin — whichever feels easier.
- Relax and enjoy it. Moss stitch is repetitive by design. There is no wrong way to hold your hook; find what is comfortable.
Step-by-Step Instructions
Setup
With Color A (White), make a magic ring.
Rnd 1: Ch 1 (this does not count as a stitch), work 8 sc into the ring, join with sl st to the first sc. (8 sc)
Rnd 2: Ch 1, [sc in next st, ch 1] 8 times, join with sl st to first sc. (8 sc, 8 ch-1 sps)
Body
Rnd 3 (increase rnd): Ch 1, *sc in next ch-1 sp, ch 1, sc in same sp, ch 1; rep from * around, join with sl st. (16 sc, 16 ch-1 sps)
Rnd 4: Ch 1, sc in each ch-1 sp, ch 1, around, join with sl st. (16 sc, 16 ch-1 sps)
Rnd 5 (increase rnd): Ch 1, *sc in next ch-1 sp, ch 1, sc in same sp, ch 1, sc in next ch-1 sp, ch 1; rep from * around, join with sl st. (24 sc, 24 ch-1 sps)
Rnd 6: Work even in moss stitch (sc in each ch-1 sp, ch 1) around, join with sl st. (24 sc, 24 ch-1 sps)
Continue in this manner — one increase round (adding one extra sc, ch 1 at each increase point) followed by one even round — until the panel measures approx. 24 in (61 cm) across. This is approximately 40 rounds total. Change color as follows so the stripes read as concentric rings:
- Rnds 1–4: A (White)
- Rnds 5–8: B (Butter Yellow)
- Rnds 9–12: A
- Rnds 13–16: B
- Rnds 17–20: A
- Rnds 21–24: B
- Rnds 25–28: A
- Rnds 29–32: B
- Rnds 33–36: A
- Rnds 37–40: B
Fasten off B. Do not fasten off A yet.
Edging
With A, join to any ch-1 sp on the final round.
Edging rnd: Ch 1, sc in each ch-1 sp and in each sc around, join with sl st. Fasten off and weave in ends.
Hanging Point
Fold the panel in half to find the top center. With A, join to the top edge at that point, ch 8, sl st back into the same point to form a loop, fasten off. Slip the wooden ring or curtain clip through the loop.
Sun Appliqué (make 1, with B)
Rnd 1: Make a magic ring, ch 1, work 8 sc into the ring, join with sl st. (8 sc)
Rnd 2: Ch 1, 2 sc in each st around, join with sl st. (16 sc)
Rnd 3: Ch 1, [sc in next st, 2 sc in next st] around, join with sl st. (24 sc)
Rnd 4 (rays): *Ch 4, sl st in 2nd ch from hook, sc in next ch, dc in next ch, skip 1 st on the circle, sl st in next st; rep from * around (12 rays). Fasten off, leaving a 10 in (25 cm) tail.
Assembly and Finishing
Blocking: Pin the panel flat on a towel, mist lightly with water, and let it dry completely. This evens out the stitches and opens the texture.
Attaching the sun: Using the 10 in (25 cm) tail, sew the sun appliqué to the exact center of the panel with small, even stitches all around its edge. Pull gently so it lies flat.
Weaving in ends: Thread each loose yarn end onto the tapestry needle and weave it back and forth through the back of the fabric for about 2 inches, then trim close. Never knot your ends — weaving hides them securely.
Hanging: Slip the wooden ring or curtain clip through the top loop and hang from a single point.
Pro Tips and Variations
- Change the colors: Swap Butter Yellow for blush pink, sage green, or sky blue for a different mood. Keep the 4-round stripe rhythm so the rings stay even.
- Adjust the size: For a larger curtain, keep alternating increase and even rounds until you reach your desired diameter — every increase round adds 8 stitches, so the circle stays flat. For a smaller one, simply stop earlier.
- Substitute yarn: Any worsted-weight cotton or cotton-blend works. Always re-check your gauge, because a different yarn may change your finished size.
- Add a border: Work one extra round of sc all the way around the edge in Color B for a soft yellow rim that frames the panel.