Moss Stitch Bohemian Glass Sleeve Free Pattern
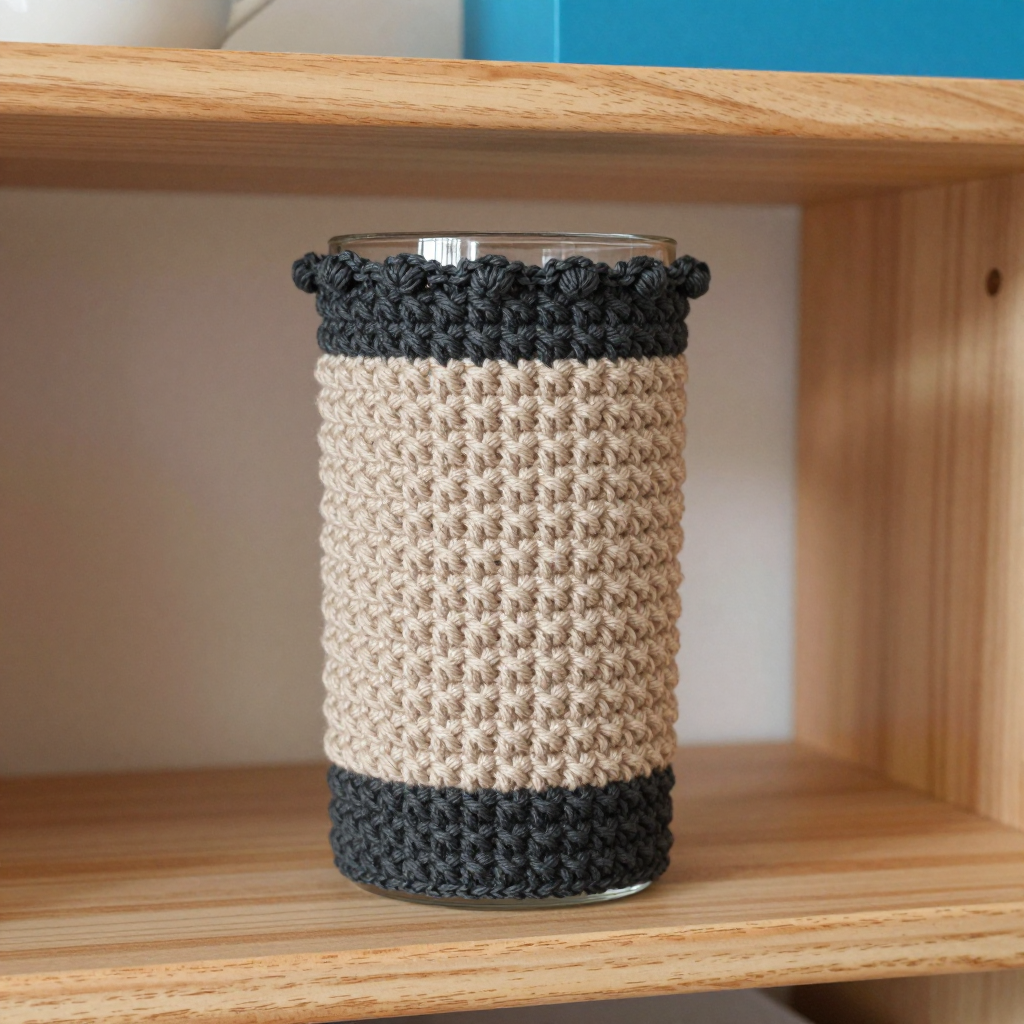
Moss Stitch Bohemian Glass Sleeve — Free Beginner Crochet Pattern
Introduction
If you have ever wanted to make something beautiful with your own hands but felt intimidated by big blankets and complicated sweaters, this project is for you. The Moss Stitch Bohemian Glass Sleeve is a small, satisfying first project that you can finish in an afternoon — even if you have never held a crochet hook before. It is a cozy little tube that slips over a standard drinking glass, keeping your hands comfortable with hot drinks and your table dry from condensation with cold ones. Worked in a nubby, woven-looking stitch called moss stitch, it has a dense, rustic texture that looks far more complicated than it actually is. With a warm oatmeal middle framed by two charcoal bands and a tiny picot (bumpy) edge at the rim, the finished sleeve looks handmade in the best possible way — boho, cozy, and charming. By the end, you will have a finished object you can actually use every single day, and you will have learned the two most important crochet stitches: the chain and the single crochet.
Materials Needed
- Yarn: Worsted weight (Category 4) cotton yarn, approximately 60–70 yards total — about 35 yards oatmeal and 25 yards charcoal. Cotton is recommended because it is absorbent, machine washable, and holds the moss stitch texture crisply.
- Crochet hook: 4.5 mm (US size 7).
- Stitch marker (just one is plenty) — a small plastic clip or even a safety pin works.
- Tapestry needle — a blunt-tipped needle with a large eye, used for weaving in yarn ends.
- Scissors — any small sharp pair.
- Finished size: Approximately 3 inches in diameter and 4 inches tall, designed to fit a standard drinking glass with a 2.5–3 inch base. The bottom charcoal band is about 1.25 inches tall, the oatmeal middle about 2.5 inches, and the top charcoal band about 1 inch, plus the picot edge.
Abbreviations and Beginner Glossary
Every abbreviation used in this pattern is listed below with a plain-English explanation. Read through this list once before you begin — nothing here requires prior knowledge.
- ch — chain: Make a loop of yarn on your hook (a "slip knot"), then wrap the yarn over the hook and pull it through the loop already on the hook. That is one chain. Chains are the foundation you build on.
- sc — single crochet: Insert your hook into the stitch or space indicated, wrap the yarn over the hook, pull it back through (you now have 2 loops on the hook), wrap the yarn over again, and pull it through both loops. One single crochet made.
- sl st — slip stitch: Insert your hook into the stitch indicated, wrap the yarn over, and pull it straight through both the stitch and the loop on your hook in one motion. It makes an almost invisible join.
- st(s) — stitch(es): A general word for any loop or completed stitch on your work.
- sp — space: The little gap created by a chain. In this pattern, "ch-1 sp" means the gap under a one-chain from the previous round.
- rnd — round: One complete trip around the tube. Because we work in a circle, we say "round" instead of "row."
- picot: A tiny decorative bump made by chaining 3 and then slip stitching back into the third chain from the hook.
- fasten off: Cut the yarn a few inches from your work and pull the tail all the way through the last loop to lock it.
- weave in ends: Thread a yarn tail onto a tapestry needle and sew it back and forth through the inside of the fabric so it disappears.
- moss stitch: A simple two-stitch repeat — one single crochet, then one chain — where each single crochet is always worked into the chain space of the round below. It creates a dense, nubby, woven texture.
Gauge
16 stitches and 16 rounds = 4 inches in moss stitch (sc, ch 1) worked in the round.
Why gauge matters: Gauge is simply how big your stitches come out. If your stitches are bigger than the pattern's, your sleeve will be too loose and slide off the glass; if they are smaller, it won't fit over the glass at all. Checking gauge first saves you from ripping out a finished project.
How to make a gauge swatch: With your 4.5 mm hook and worsted yarn, chain 22. Join with a slip stitch to form a ring (careful not to twist it). Work Round 1 as written below, then repeat Round 2 until your swatch is about 4½ inches tall. Lay it flat and measure across the middle: 16 stitches should equal 4 inches, and 16 rounds should equal 4 inches. If you have more stitches than 16 in 4 inches, your tension is tight — try a slightly larger hook. If you have fewer, try a smaller hook. A small difference is fine for this project, since cotton has some stretch.
Beginner Tips Before You Start
- Count your chain spaces, not your stitches. Every round of this pattern should have exactly 12 chain-1 spaces. If you count 12 spaces, you are on track — no need to count single crochets separately.
- Use a stitch marker. Place it in the first single crochet of each round. When you come back around, you will know exactly where to join and won't accidentally add or lose a stitch.
- Do not pull the yarn too tight. Beginners tend to choke the hook. Keep your chains relaxed and even — moss stitch needs a little breathing room to show its texture.
- Check for twisting after the setup chain. When you join your starting chain into a ring, make sure all the chains face the same direction like a little bracelet. A twist here cannot be fixed later.
- Carry the unused color loosely. When you switch from charcoal to oatmeal and back, let the resting yarn trail along the inside of the tube with a little slack. If you pull it tight, the sleeve will pucker.
- Work a few practice chains first. Chain 10 and pull it out two or three times before starting. It loosens your hands and makes your first real round much neater.
Step-by-Step Instructions
Notes Before You Begin
- The sleeve is worked in the round from the bottom up, without turning — you always work with the right side facing you.
- Moss stitch is worked as (sc in ch-1 sp, ch 1) repeated around. The single crochet is always placed in the chain-1 space of the previous round, never into a stitch.
- The first single crochet of each round is worked into the same space as the joining slip stitch unless otherwise noted.
- Do not fasten off between color changes; carry the unused color loosely along the inside.
Setup and Bottom Band (Charcoal)
Setup: With charcoal, ch 24. Join with sl st to the first ch to form a ring, being careful not to twist the chain.
Round 1 (charcoal): Ch 1 (does not count as a st). Sc in the same ch as the join. Ch 1, skip next ch, [sc in next ch, ch 1, skip next ch] around. Join with sl st to first sc. (12 sc, 12 ch-1 sps)
Round 2 (charcoal): Ch 1. Sc in first ch-1 sp. Ch 1, [sc in next ch-1 sp, ch 1] around. Join with sl st to first sc. (12 sc, 12 ch-1 sps)
Rounds 3–6 (charcoal): Repeat Round 2 four more times. (12 sc, 12 ch-1 sps) Fasten off charcoal after Round 6, or carry it loosely along the inside if you prefer.
Oatmeal Middle
Round 7 (oatmeal): Join oatmeal with sl st in any ch-1 sp. Ch 1. Sc in same sp. Ch 1, [sc in next ch-1 sp, ch 1] around. Join with sl st to first sc. (12 sc, 12 ch-1 sps)
Rounds 8–17 (oatmeal): Repeat Round 2 ten times. (12 sc, 12 ch-1 sps) This gives you 10 rounds of oatmeal total.
Top Band (Charcoal)
Round 18 (charcoal): Change to charcoal. Ch 1. Sc in first ch-1 sp. Ch 1, [sc in next ch-1 sp, ch 1] around. Join with sl st to first sc. (12 sc, 12 ch-1 sps)
Rounds 19–22 (charcoal): Repeat Round 2 four times. (12 sc, 12 ch-1 sps)
Picot Edge
Round 23 (charcoal): Ch 1. Sc in first ch-1 sp. *Ch 3, sl st in the third ch from hook (picot made), sc in next ch-1 sp. Repeat from * around. Join with sl st to first sc. (12 picots) Fasten off.
Row count check: 6 charcoal rounds (bottom) + 11 oatmeal rounds (middle) + 5 charcoal rounds (top) + 1 picot round = 23 rounds total, which at 16 rounds per 4 inches gives approximately 4 inches of height — matching the finished size.
Assembly and Finishing
Weaving in ends: Thread each yarn tail onto your tapestry needle. Working on the inside of the sleeve, sew the tail back and forth through the backs of several stitches in one direction, then reverse direction and sew through a few more. This locks the end so it will not work loose in the wash. Trim the yarn close to the fabric. Do this for every tail — the starting tail, the charcoal tail at Round 6, the oatmeal join, and the final tail.
Blocking: Blocking means gently shaping and smoothing the finished piece with moisture so the stitches settle evenly. Fill a spray bottle with water and lightly mist the sleeve all over until it is damp but not soaking. Slip it over a drinking glass or a similar cylinder (a jar or cardboard tube works well) and smooth it with your fingers, easing the picot bumps so they sit evenly around the rim. Let it dry completely — a few hours, or overnight. This opens up the moss stitch texture and gives the sleeve a crisp, professional finish.
To use: Slip the sleeve over a drinking glass and enjoy. Hand wash in cool water and lay flat to dry when needed.
Pro Tips and Variations
- Change the colors: Swap the oatmeal and charcoal for any two colors you love — sage green and cream, terracotta and sand, or navy and mustard. Keep one color light and one dark so the bands stand out. You can also make the middle band striped by alternating colors every two rounds.
- Adjust the size: To fit a wider glass or mason jar, add 2 chains to the setup (ch 26 instead of 24) and work the same rounds — you will simply have 13 chain-1 spaces per round instead of 12. To make it taller, add extra repeats of Round 2 in the oatmeal section, then finish with the charcoal top band and picot edge as written.
- Substitute the yarn: Any worsted weight (Category 4) yarn works, but cotton or a cotton-blend is best because it is absorbent and washable. Acrylic will work but can feel slippery on glass; a linen blend gives an even more rustic, bohemian look.
- Skip the picot: If the picot edge feels fiddly, finish Round 23 with a simple round of slip stitches around the rim instead — it gives a clean, smooth edge that is just as pretty.


