Meadow Mushroom Pin Cushion Free Crochet Pattern
Meadow Mushroom Pin Cushion: A Beginner-Friendly Free Crochet Pattern
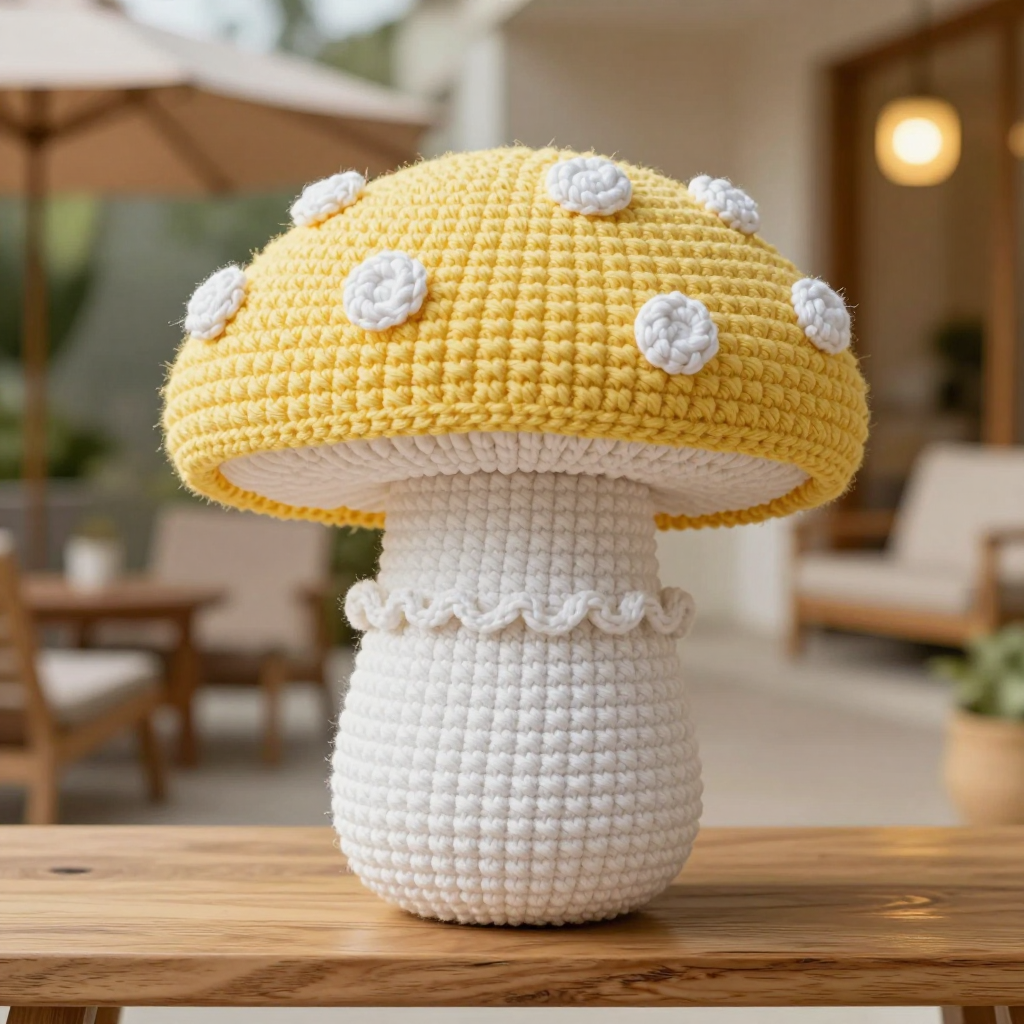
If you have never held a crochet hook before, this little mushroom is the perfect first project for you. It is worked almost entirely in single crochet, the simplest and most forgiving stitch there is, and it comes together in just a few hours. The finished piece is a squat white stem topped with a butter yellow domed cap, dotted with tiny raised white French knots that look like little spots. It stands about 3 inches tall and feels firm and sturdy in your hand, exactly what you want in a desk companion that holds your pins. Best of all, it is small enough to finish in one sitting, so you get that wonderful "I made this!" feeling right away.
Materials Needed
- Yarn: Worsted weight (category 4) acrylic or cotton yarn. You will need approximately 60 yards of white and 40 yards of butter yellow. Scraps from your stash work beautifully here.
- Crochet hook: Size H/8 (5.0 mm).
- Stitch marker: At least one, to mark the first stitch of each round. A safety pin or a scrap of contrasting yarn works too.
- Tapestry needle (yarn needle): A blunt-tipped needle with a large eye, for sewing the cap on and embroidering the French knots.
- Scissors: Any small sharp pair for cutting yarn.
- Stuffing: A small handful of polyester fiberfill (toy stuffing).
- Finished size: Approximately 3 inches (7.5 cm) tall and 3 1/2 inches (9 cm) wide across the cap. The stem is about 2 1/2 inches (6.5 cm) tall and 2 1/4 inches (5.5 cm) wide.
Abbreviations and Beginner Glossary
Do not worry if these look like a secret code. Here is every abbreviation used in this pattern, explained in plain English.
- ch – chain. Make a loop of yarn and pull another loop through it. (This pattern actually starts with a magic ring instead, so you may not need chains at all.)
- sc – single crochet. Insert your hook into the stitch, wrap the yarn over the hook, pull up a loop (you now have 2 loops on the hook), wrap the yarn over again, and pull it through both loops. One single crochet made.
- sl st – slip stitch. Insert your hook into the stitch, wrap the yarn over, and pull it straight through both the stitch and the loop on your hook. It makes a nearly invisible joining stitch.
- sc2tog – single crochet 2 stitches together (a decrease). Insert your hook into the first stitch, pull up a loop, insert your hook into the next stitch, pull up a loop (3 loops on hook), wrap the yarn over, and pull through all 3 loops. Two stitches become one.
- 2 sc in next st – an increase. Work two single crochets into the same stitch, which adds one stitch to your round.
- st(s) – stitch or stitches.
- rnd – round. One complete circle of stitches worked around.
- magic ring – a loop of yarn you make with your fingers that you crochet into, then pull closed so there is no hole in the center. If you have never made one, search "magic ring crochet" for a short video; it takes about a minute to learn.
- fasten off – cut the yarn a few inches from your work, then pull the tail all the way through the last loop to lock it.
- weave in ends – thread a yarn tail onto your tapestry needle and run it back and forth through the inside of the work so it disappears.
Gauge
16 single crochet stitches x 18 rounds = 4 inches (10 cm) in single crochet worked in the round.
Why gauge matters: Gauge is simply how big your stitches turn out. If your stitches are bigger than the pattern expects, your mushroom will be too large and the cap may not fit the stem. If they are smaller, it will be too small. Because this project is stuffed and sewn together, matching gauge keeps all the pieces the right size for each other.
How to make a gauge swatch: With your white yarn and H/8 hook, make a magic ring and work 6 sc into it. Work increase rounds exactly like Rnds 2–6 of the stem below, then work plain rounds until your swatch is at least 4 inches across. Lay it flat and measure 4 inches across the middle. Count the stitches in that 4 inches. If you have more than 16, your stitches are too tight; try a larger hook. If you have fewer than 16, your stitches are too loose; try a smaller hook. The round count matters less for a small stuffed piece, so focus on the stitch count.
Beginner Tips Before You Start
- Use a stitch marker every single round. Because you work in a continuous spiral, the first stitch of each round drifts. Place your marker in the first stitch you make, and move it up each round. Without it, you will lose your place.
- Do not pull your yarn too tight. Tension is the number one beginner struggle. Hold the yarn gently; your stitches should be snug but easy to insert your hook into.
- Count out loud. Counting your stitches at the end of every round catches mistakes immediately, before they multiply.
- Stuff firmly, but in small handfuls. Add stuffing a little at a time so the stem stays smooth and holds its shape instead of getting lumpy.
- Keep your starting tail long. A 6-inch tail on the stem and an 18-inch tail on the cap give you plenty of yarn for closing and sewing.
- Work in good light. White yarn on a white hook is hard to see. A bright lamp makes a huge difference.
Step-by-Step Instructions
Notes: Work in continuous rounds unless otherwise stated. Do not join or turn at the end of each round; use a stitch marker to mark the first stitch of each round. The pin cushion is worked from the bottom of the stem upward, stuffed firmly, then the cap is made separately and sewn on top. French knots are embroidered on the cap after assembly.
Stem (white yarn)
Rnd 1: Make a magic ring, work 6 sc into the ring. Pull the ring closed. (6 sts)
Rnd 2: 2 sc in each st around. (12 sts)
Rnd 3: [Sc in next st, 2 sc in next st] around. (18 sts)
Rnd 4: [Sc in next 2 sts, 2 sc in next st] around. (24 sts)
Rnd 5: [Sc in next 3 sts, 2 sc in next st] around. (30 sts)
Rnd 6: [Sc in next 4 sts, 2 sc in next st] around. (36 sts)
Rnds 7–16: Sc in each st around. (36 sts for 10 rounds)
Rnd 17: [Sc in next 4 sts, sc2tog] around. (30 sts)
Rnd 18: [Sc in next 3 sts, sc2tog] around. (24 sts)
Stuff the stem firmly with polyester fiberfill, shaping it into a squat cylinder about 2 1/2 inches (6.5 cm) tall and 2 1/4 inches (5.5 cm) wide. Add more stuffing as you close the top so the stem holds its shape.
Rnd 19: [Sc in next 2 sts, sc2tog] around. (18 sts)
Rnd 20: [Sc in next st, sc2tog] around. (12 sts)
Rnd 21: [Sc2tog] around. (6 sts)
Fasten off, leaving a 6-inch (15 cm) tail. Thread the tail through the remaining 6 sts and pull tight to close the top. Weave in the end.
Cap (butter yellow yarn)
Rnd 1: Make a magic ring, work 6 sc into the ring. Pull the ring closed. (6 sts)
Rnd 2: 2 sc in each st around. (12 sts)
Rnd 3: [Sc in next st, 2 sc in next st] around. (18 sts)
Rnd 4: [Sc in next 2 sts, 2 sc in next st] around. (24 sts)
Rnd 5: [Sc in next 3 sts, 2 sc in next st] around. (30 sts)
Rnd 6: [Sc in next 4 sts, 2 sc in next st] around. (36 sts)
Rnd 7: [Sc in next 5 sts, 2 sc in next st] around. (42 sts)
Rnd 8: [Sc in next 6 sts, 2 sc in next st] around. (48 sts)
Rnds 9–12: Sc in each st around. (48 sts for 4 rounds)
Rnd 13: [Sc in next 6 sts, sc2tog] around. (42 sts)
Rnd 14: [Sc in next 5 sts, sc2tog] around. (36 sts)
Rnd 15: [Sc in next 4 sts, sc2tog] around. (30 sts)
Rnd 16: [Sc in next 3 sts, sc2tog] around. (24 sts)
Lightly stuff the cap with a small amount of fiberfill to give it a gentle dome shape, being careful not to overstuff. Do not close the opening; the open edge will be sewn to the stem.
Fasten off, leaving a long 18-inch (45 cm) tail for sewing.
Assembly
Step 1: Turn the cap right side out if needed. Center the cap over the top of the stuffed stem, aligning the open edge of the cap with the upper side of the stem. The cap should sit like a beret, with its edge overlapping the top 1/2 inch (1.3 cm) of the stem.
Step 2: Thread the long tail onto a yarn needle. Sew the cap to the stem using small, even whipstitches all the way around, catching only the outer loops of the stem stitches so the stitching stays hidden. Pull gently to snug the cap against the stem.
Step 3: Fasten off and weave in the end securely.
French Knot Spots (white yarn)
Cut a 24-inch (60 cm) length of white yarn and thread it onto a yarn needle. Work 9 to 12 French knots evenly spaced over the butter yellow cap, using the following method for each knot:
1. Bring the needle up through the cap from the inside to the outside at the desired spot.
2. Wrap the yarn around the needle 2 times.
3. Insert the needle back into the cap right next to the exit point, keeping the wraps snug around the needle.
4. Pull the needle through to the inside while holding the wraps in place with your thumb, forming a small raised knot.
5. Secure the yarn on the inside with a small stitch before moving to the next spot.
Space the knots about 1/2 inch (1.3 cm) apart in a loose, natural arrangement. Fasten off and weave in the end on the inside of the cap.
Assembly and Finishing
Seaming: Whipstitch means passing your needle over the edge of both pieces and back through, like a tiny spiral of thread. Work slowly and keep your stitches small and even, catching only the outer loops of the stem so the seam disappears into the mushroom. Check as you go that the cap sits level all the way around before you fasten off.
Weaving in ends: Thread each yarn tail onto your tapestry needle and run it back and forth through the inside of the work for about an inch, changing direction once or twice so it cannot work loose. Trim the tail close to the fabric.
Blocking: Blocking means gently shaping a finished piece with moisture. For this project, light steaming is enough. Hold a steam iron a few inches above the cap (never touch the iron to the yarn) and let the steam relax the stitches, then shape the dome with your fingers and let it dry completely. You can also lightly mist the cap with water and pat it into shape.
Final shaping: Gently shape the pin cushion with your hands. The finished pin cushion measures approximately 3 inches (7.5 cm) tall and 3 1/2 inches (9 cm) wide across the cap.
Pro Tips and Variations
- Change the colors: Try a cream stem with a dusty rose cap, or a tan stem with a rust cap for an autumn mushroom. Any two worsted weight colors you love will work.
- Adjust the size: Use a smaller hook (such as a G/6, 4.0 mm) with the same yarn for a mini mushroom, or a larger hook (such as a J/10, 6.0 mm) for a bigger one. Just remember the cap and stem must be made with the same hook so they fit together.
- Swap the yarn: Cotton yarn gives a crisper, sturdier finish that holds pins beautifully, while acrylic is softer and slightly squishier. Both work with the same gauge.
- Skip the French knots: If embroidery feels intimidating, sew on a few tiny white buttons or leave the cap plain for a clean, modern look.