Free Pattern: The Drifting Dune Solstice Wrap
The Drifting Dune Solstice Wrap — A Free Beginner Crochet Shawl Pattern
Introduction
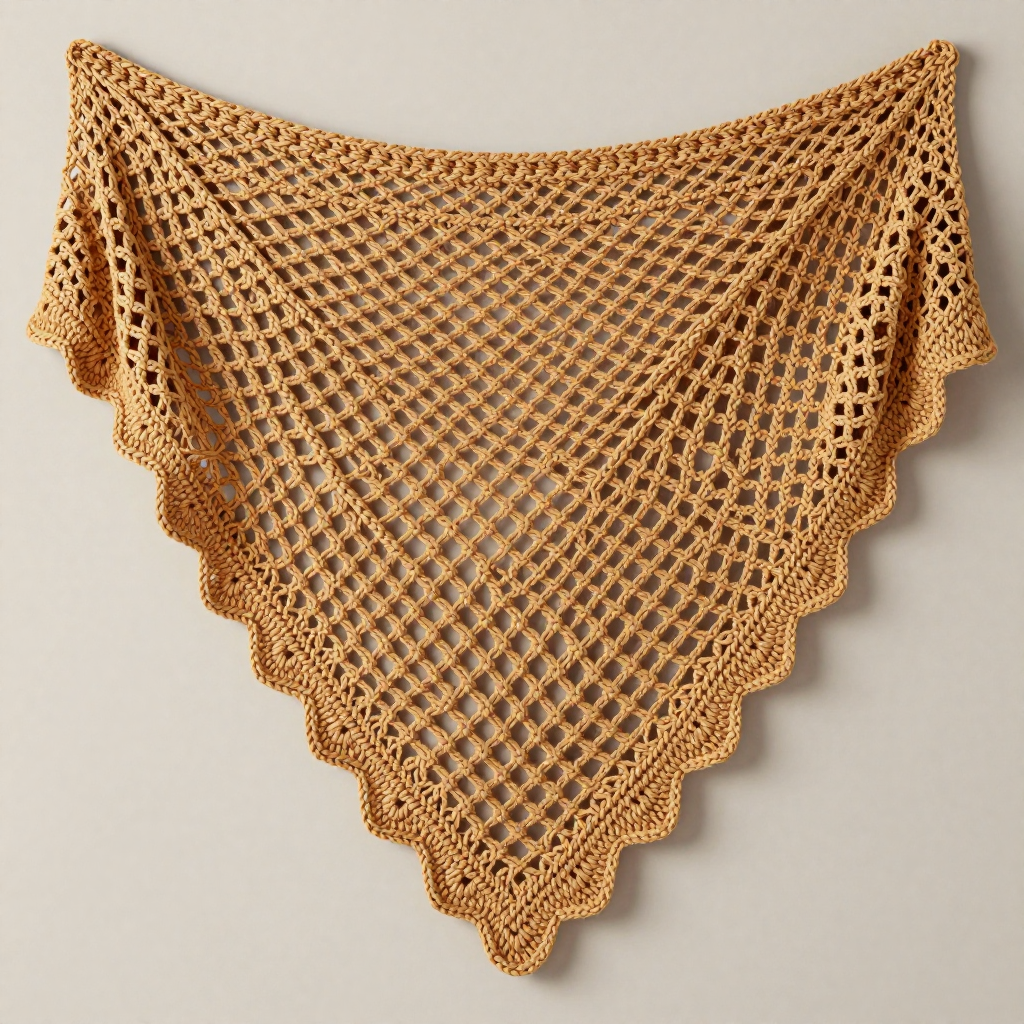
Welcome to the Drifting Dune Solstice Wrap, a breezy, openwork crochet shawl that is genuinely perfect for someone who has never held a crochet hook before. It is built entirely from airy "love knots" (also called Solomon's knots), which are simple loops you pull up and secure with a tiny stitch — no complicated shaping, no counting dozens of stitches, and no confusing stitch combinations. Because it is worked side-to-side in a chunky, bulky yarn on a big 10 mm hook, it grows quickly and forgivingly, so you can see real progress in a single sitting. The finished piece is a long, shallow triangle that drapes softly over the shoulders, with a delicate lacy mesh of diamond-shaped holes and a gently scalloped edge that catches the light. In a warm sand-ochre or dusty terracotta yarn, it looks like sun-warmed dunes at golden hour — light, floaty, and endlessly wearable.
Materials Needed
- Yarn: Bulky (weight 5) yarn, approximately 350–400 yards (320–365 m). A soft cotton-blend or acrylic in a warm sand/ochre or dusty terracotta shade works beautifully. (One large skein or two smaller skeins will be plenty.)
- Crochet hook: 10 mm (US size N/15) crochet hook.
- Stitch markers: At least 2–4 removable stitch markers (or safety pins, or even short scraps of contrasting yarn) to mark the first and last love knot of a row.
- Tapestry needle: A blunt-tipped yarn needle with an eye large enough for bulky yarn, for weaving in ends.
- Scissors: Any sharp pair of craft scissors for cutting yarn.
- Optional: A spray bottle of water and rust-proof blocking pins (or a towel and a flat surface) for light blocking.
- Finished size: Approximately 42 inches (107 cm) along the top straight edge and 21 inches (53 cm) deep at the center point, forming a long, shallow triangle. Because the fabric is open and drapey, the exact size can vary slightly with your tension — and that is perfectly fine.
Abbreviations and Beginner Glossary
Every abbreviation used in this pattern is listed below and explained in plain English. If you have never crocheted before, read this section twice before you begin — it is your dictionary.
- ch — chain. Make a loop with your yarn, then pull a new loop of yarn through that loop with your hook. Each loop you pull through is one chain. Chains look like a little braid or a row of V shapes.
- LK — love knot (also called a Solomon's knot). This is the building block of the whole shawl. To make one: pull up a loop on your hook so it is about 1/2 inch (1.25 cm) long (this long loop is the "chain" part of the knot), then yarn over (wrap the working yarn around your hook) and draw it through the loop on your hook. That is the first half. To complete the love knot, you work a single crochet into the back of that long loop to lock it in place. In this pattern, "1 LK" always means one completed love knot (loop plus locking single crochet).
- sc — single crochet. Insert your hook into the stitch or space, yarn over (wrap yarn around hook), pull up a loop (you now have 2 loops on your hook), yarn over again, and pull through both loops on your hook. One loop remains. That is one single crochet. (This is the little locking stitch used inside each love knot.)
- dc — double crochet. Yarn over (wrap yarn around hook), insert hook into the stitch or space, yarn over, pull up a loop (3 loops on hook), yarn over, pull through the first 2 loops (2 loops remain), yarn over, pull through the last 2 loops (1 loop remains). That is one double crochet. Used only in the optional edging.
- sl st — slip stitch. Insert your hook into the stitch or space, yarn over, and pull the yarn through both the stitch and the loop on your hook in one motion. It makes a nearly invisible joining stitch. In this pattern, you slip stitch into the "eye" (the center hole) of a love knot to join knots together.
- sts — stitches. The individual loops/units you have made.
- yo — yarn over. Wrap the working yarn (the yarn coming from the ball) around your hook from back to front. This is the motion used in almost every crochet stitch.
- turn — flip your work over (like turning a page) so you can work back along the row you just made. Your hook stays in your hand; you simply rotate the fabric.
- fasten off — cut the yarn a few inches from your work, then pull the cut tail all the way through the last loop on your hook and tug gently to secure it so it will not unravel.
- weave in ends — thread a yarn tail onto a tapestry needle and sew it back and forth through the fabric for a few inches so it is hidden and secure.
- eye (of a love knot) — the open hole in the center of a completed love knot. This is where you insert your hook to slip stitch knots together.
- right side (RS) — the "front" or prettier face of the fabric, the side meant to show.
- gauge — how many stitches and rows fit into a set measurement (here, 4 inches / 10 cm). Explained fully in the next section.
Gauge
Gauge: 4 love knots (measured as 4 completed loops) = approximately 4 inches (10 cm).
Why gauge matters: Gauge is simply how big your stitches turn out. If your love knots are much larger than the gauge above, your shawl will come out bigger than the finished size; if they are much smaller, it will come out smaller. For this open, drapey shawl, gauge is not critical — the pattern is forgiving and the size can vary a little without any problem. What matters most is that your tension is loose and relaxed, because a looser tension gives the best airy, lacy effect. If you pull your love knots tight, the fabric will look dense and stiff instead of floaty.
How to make a gauge swatch: Using your 10 mm hook and bulky yarn, chain 2, then work 1 love knot (see the glossary). Work 2 more love knots, slip stitching each one into the eye of the previous knot, so you have a short chain of 3–4 knots. Lay the swatch flat on a table and measure across 4 completed knots with a ruler. If 4 knots measure about 4 inches (10 cm), you are right on track. If they measure much less, relax your hands and pull your loops up a little longer; if they measure much more, pull your loops up slightly shorter. There is no need to rip out and redo — just adjust your loop length as you go.
Beginner Tips Before You Start
- Make your loops long enough. The single most common beginner mistake with love knots is pulling the long loop too small. Aim for about 1/2 inch (1.25 cm) — roughly the width of your fingertip. Long loops make the open, airy mesh that defines this shawl.
- Do not pull your yarn too tight. Keep a relaxed, gentle hold on the working yarn. Tight tension makes stiff, cramped knots. If your hand starts to ache or your knots look tiny, stop, shake out your hands, and loosen up.
- Use stitch markers to track your rows. Place a removable stitch marker in the eye of the first love knot of each row and another in the eye of the last love knot. When you turn your work, these markers tell you instantly where the row begins and ends, so you never lose your place.
- Count your love knots at the end of every row. The pattern tells you exactly how many knots you should have after each row. Take ten seconds to count them before you turn. Catching a mistake on the same row is far easier than discovering it five rows later.
- Work in good light and keep your work flat. Love knots are large and open, and it is easy to accidentally skip an eye in dim light. Lay the shawl flat on your lap or table every few rows to check that the mesh looks even and the triangle is growing symmetrically.
- Do not stress about perfection. This is an intentionally loose, organic, boho-style fabric. Slightly uneven knots are part of its charm and will disappear once the shawl is blocked and draped.
Step-by-Step Instructions
PATTERN NOTES (read before starting): This shawl is worked side-to-side, from one narrow tip to the other, in rows of love knots, creating a long, shallow triangle. Each "LK" is one completed love knot: pull up a loop about 1/2 inch (1.25 cm) long, yarn over, draw through the loop, then work 1 single crochet into the back of that long loop to secure it. You join knots by working a slip stitch into the eye (the center hole) of the previous knot. The shawl increases by 2 love knots per row until it reaches its widest point, works a few straight rows, then decreases by 2 love knots per row back down to a point.
Setup
Setup Row: Chain 2. Work 1 LK. (1 love knot)
Increase Section (the shawl grows wider)
Row 1 (increase row): Turn. Work 2 LK. Slip stitch into the eye of the previous love knot. Turn. (2 love knots)
Row 2 (increase row): Work 2 LK. Slip stitch into the eye of the first love knot of the previous row. Work 1 LK. Slip stitch into the eye of the last love knot. Turn. (4 love knots)
Row 3 (increase row): Work 2 LK. Slip stitch into the eye of the first love knot. *Work 1 LK, slip stitch into the eye of the next love knot.* Repeat from * to * across, ending with 1 LK and a slip stitch into the eye of the last love knot. Turn. (6 love knots)
Row 4: Repeat Row 3 exactly (work 2 LK, slip stitch into the eye of the first love knot, then *1 LK and slip stitch into the eye of the next love knot* across, ending with a slip stitch into the eye of the last love knot). Turn. (8 love knots)
Row 5: Repeat Row 3 exactly. Turn. (10 love knots)
Row 6: Repeat Row 3 exactly. Turn. (12 love knots)
Row 7: Repeat Row 3 exactly. Turn. (14 love knots)
Row 8: Repeat Row 3 exactly. Turn. (16 love knots)
Row 9: Repeat Row 3 exactly. Turn. (18 love knots)
Row 10: Repeat Row 3 exactly. Turn. (20 love knots)
Row 11: Repeat Row 3 exactly. Turn. (22 love knots)
Row 12: Repeat Row 3 exactly. Turn. (24 love knots)
Row 13: Repeat Row 3 exactly. Turn. (26 love knots)
Row 14: Repeat Row 3 exactly. Turn. (28 love knots)
Row 15: Repeat Row 3 exactly. Turn. (30 love knots)
Row 16: Repeat Row 3 exactly. Turn. (32 love knots)
Row 17: Repeat Row 3 exactly. Turn. (34 love knots)
Row 18: Repeat Row 3 exactly. Turn. (36 love knots)
Row 19: Repeat Row 3 exactly. Turn. (38 love knots)
Row 20: Repeat Row 3 exactly. Turn. (40 love knots)
Row 21: Repeat Row 3 exactly. Turn. (42 love knots)
Row 22: Repeat Row 3 exactly. Turn. (42 love knots) — the shawl has now reached its full width and measures approximately 42 inches (107 cm) along the top edge and 21 inches (53 cm) deep at the center.
Straight Section (the widest part)
Row 23: Work 1 LK. Slip stitch into the eye of the first love knot. *Work 1 LK, slip stitch into the eye of the next love knot.* Repeat from * to * across, ending with a slip stitch into the eye of the last love knot. Turn. (42 love knots)
Row 24: Repeat Row 23 exactly. Turn. (42 love knots)
Row 25: Repeat Row 23 exactly. Turn. (42 love knots)
Row 26: Repeat Row 23 exactly. Turn. (42 love knots)
Decrease Section (the shawl narrows back down)
Row 27: Work 1 LK. Skip the first love knot of the previous row. Slip stitch into the eye of the second love knot. *Work 1 LK, slip stitch into the eye of the next love knot.* Repeat from * to * across, ending with a slip stitch into the eye of the last love knot. Turn. (40 love knots)
Row 28: Repeat Row 27 exactly (work 1 LK, skip the first love knot, slip stitch into the eye of the second love knot, then *1 LK and slip stitch into the eye of the next love knot* across, ending with a slip stitch into the eye of the last love knot). Turn. (38 love knots)
Row 29: Repeat Row 27 exactly. Turn. (36 love knots)
Row 30: Repeat Row 27 exactly. Turn. (34 love knots)
Row 31: Repeat Row 27 exactly. Turn. (32 love knots)
Row 32: Repeat Row 27 exactly. Turn. (30 love knots)
Row 33: Repeat Row 27 exactly. Turn. (28 love knots)
Row 34: Repeat Row 27 exactly. Turn. (26 love knots)
Row 35: Repeat Row 27 exactly. Turn. (24 love knots)
Row 36: Repeat Row 27 exactly. Turn. (22 love knots)
Row 37: Repeat Row 27 exactly. Turn. (20 love knots)
Row 38: Repeat Row 27 exactly. Turn. (18 love knots)
Row 39: Repeat Row 27 exactly. Turn. (16 love knots)
Row 40: Repeat Row 27 exactly. Turn. (14 love knots)
Row 41: Repeat Row 27 exactly. Turn. (12 love knots)
Row 42: Repeat Row 27 exactly. Turn. (10 love knots)
Row 43: Repeat Row 27 exactly. Turn. (8 love knots)
Row 44: Repeat Row 27 exactly. Turn. (6 love knots)
Row 45: Repeat Row 27 exactly. Turn. (4 love knots)
Row 46: Repeat Row 27 exactly. Turn. (2 love knots)
Final Row
Final Row: Work 1 LK. Slip stitch into the eye of the remaining love knot. Fasten off and weave in ends. (1 love knot)
Edging (optional but recommended)
Edging Row: With the right side facing you, join your yarn at one narrow tip with a slip stitch. Work a simple scalloped border along the two long diagonal edges only (do not work along the straight top edge): *Skip approximately 1 inch (2.5 cm) of edge, work 5 double crochet into the next love knot eye, skip 1 inch (2.5 cm), slip stitch into the next eye.* Repeat from * to * along both diagonal edges. Fasten off. (The exact number of scallops will vary with your tension — that is fine; simply keep the scallops evenly spaced.)
Assembly and Finishing
This shawl is worked in one continuous piece, so there are no seams to sew — the only "assembly" is finishing your ends and blocking the fabric into shape.
- Weaving in ends: Thread each loose yarn tail onto your tapestry needle. Working on the wrong (back) side, sew the tail back and forth through the thickest part of a few nearby love knots — go over and under the knot loops for about 3 inches (7.5 cm), then reverse direction and sew back another inch for extra security. Trim the tail close to the fabric. Do this for the starting tail, the fasten-off tail, and the two edging tails.
- Blocking: Light blocking opens up the love knots and evens out the mesh. Lay the shawl flat on a towel or blocking mat, right side up. Mist it lightly and evenly with water from a spray bottle until it is damp but not soaking. Gently pat and shape the triangle so the top edge is straight and the two diagonal edges are smooth, then pin the corners and a few points along the edges with rust-proof pins. Do not over-stretch the love knots — you want them relaxed and open, not pulled into thin strings. Leave it to dry completely (usually several hours or overnight), then remove the pins.
- Final check: Hold the shawl up by the top edge and let it hang. The fabric should fall in soft, airy folds. If any knots look cramped, give them a gentle tug with your fingers to open them up.
Pro Tips and Variations
- Change colors for a sunset effect: Work the increase section in a warm sand or ochre, switch to a dusty terracotta for the straight section, and finish the decrease section in a soft blush or cream. Simply fasten off at the end of a row, join the new color at the start of the next row, and weave in the tails as described above. A gradient of three shades looks stunning in this open mesh.
- Adjust the size: To make the shawl larger, continue the increase section (adding 2 love knots per row) until you reach your desired width, work 4 straight rows, then decrease back down. To make a smaller shawlette, stop increasing earlier — for example, at 30 love knots — work the 4 straight rows, then decrease back to 2. The triangle shape stays the same; only the number of rows changes.
- Substitute yarn: A soft cotton-blend or acrylic bulky yarn gives the best combination of drape and stitch definition. A slightly fuzzy yarn (like a brushed acrylic) will make the shawl look softer and warmer, while a smooth cotton will make the love knots crisper and more defined. Always check that your chosen yarn still gives roughly 4 love knots per 4 inches (10 cm) with the 10 mm hook.
- Add a fringe or tassels: For a boho finish, cut 8-inch (20 cm) lengths of yarn, fold each in half, and use your hook to pull the fold through an eye along the two diagonal edges, then pull the loose ends through the fold to secure. Space the tassels evenly every few knots for a playful, beachy look.