Fablewood Fox Mittens Free Pattern – Knit a Whimsical Woodland Pair
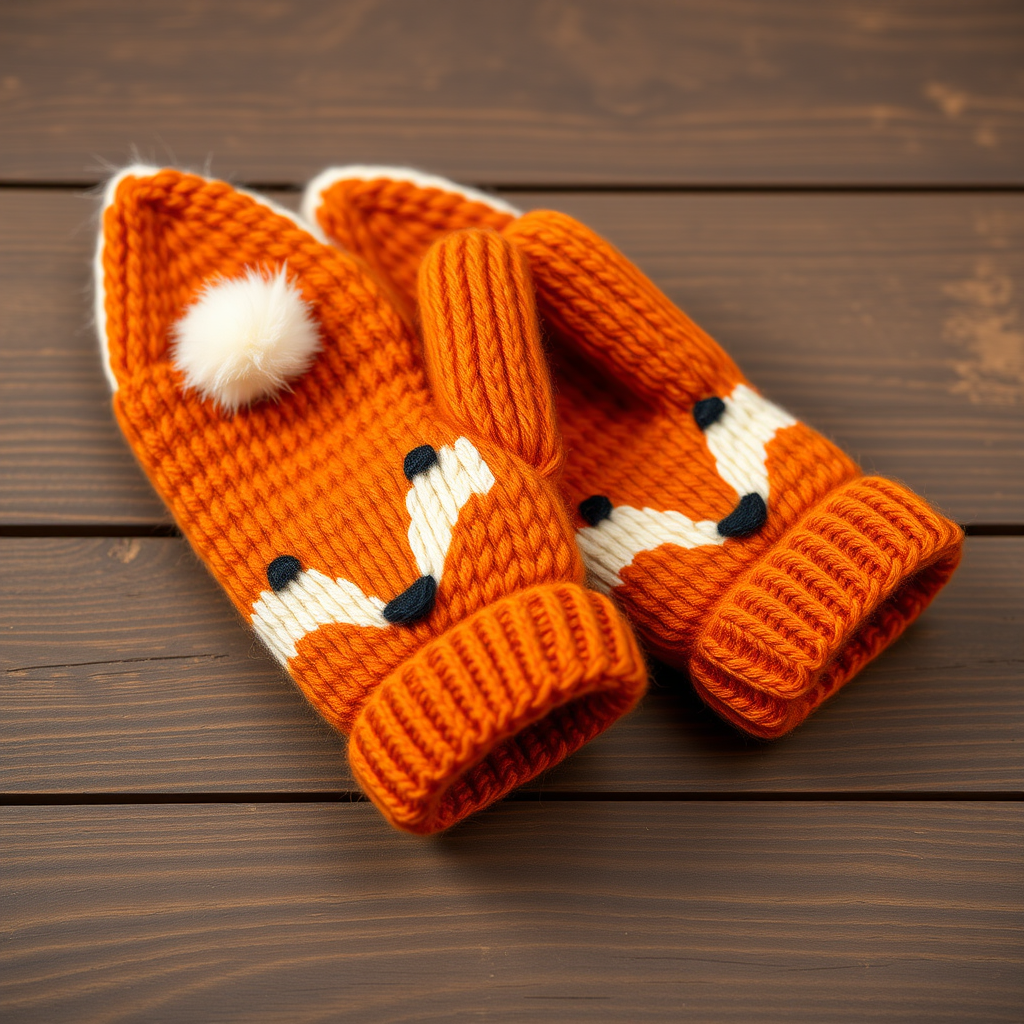
Fablewood Fox Mittens Free Pattern – Knit a Whimsical Woodland Pair
Wrap little hands in storybook charm with these knitted fox mittens, featuring a pointed ear cuff and a fluffy faux-fur trim. The stranded colorwork creates a cozy, dimensional look that feels like a forest adventure. This free pattern is perfect for intermediate knitters looking to try colorwork, or ambitious beginners ready for a fun challenge. The result is a pair of mittens that will be treasured for years—imagine your child's delight as they slip on these adorable fox paws!
This pattern creates a whimsical woodland accessory that's both practical and playful. The rust orange body with cream muzzle and black ear tips captures the essence of a friendly fox, while the faux-fur trim adds a touch of luxury and extra warmth. Whether you're knitting for your own little one or as a handmade gift, these mittens are sure to become a favorite.
Materials Needed
Before you begin, gather these supplies:
- Yarn: Worsted weight yarn in:
- Rust orange (MC) – approximately 100-120 yards
- Cream (CC1) – approximately 50-60 yards
- Black (CC2) – small amount for ear tips and face details
- White faux fur yarn – small amount for trim
- Needles: US 6 (4.0 mm) double-pointed needles (or circular for magic loop technique)
- Notions: Tapestry needle for weaving ends, stitch markers, waste yarn or stitch holder for thumb stitches
Gauge: 22 stitches and 28 rows = 4 inches in stockinette stitch. Always check your gauge before starting to ensure proper fit!
Step-by-Step Instructions
Sizes and Abbreviations
Sizes: Child 3-5 (6-8). Finished palm circumference: 5.5 (6.5) inches.
Abbreviations:
- k = knit
- p = purl
- k2tog = knit two together (decrease)
- ssk = slip slip knit (decrease)
- m1 = make one (increase)
- st(s) = stitch(es)
- MC = main color (rust orange)
- CC1 = cream
- CC2 = black
Cuff (Make 2)
- Cast on 28 (32) stitches with MC. Join in the round, being careful not to twist your work. Place a stitch marker to mark the beginning of the round.
- Work k1, p1 ribbing for 12 rounds. This creates a stretchy, snug cuff that will keep little hands warm.
- Next round: *k2, m1* repeat to end – you should now have 42 (48) stitches. The increase round ensures the hand of the mitten is roomier than the wrist.
Hand (Worked in Stranded Colorwork)
Now you'll begin the fox face pattern on the top half of the mitten. Work in stockinette stitch (knit every round) following this chart. Remember to carry the unused yarn loosely behind your work to prevent puckering.
- Rounds 1-4: All MC. These rounds establish the base of the mitten.
- Round 5: Work 21 (24) sts in MC, then 21 (24) sts in CC1 (cream) for the muzzle area. This begins the fox face.
- Round 6: Work 18 (21) MC, 6 (6) CC1, 18 (21) MC.
- Round 7: Work 15 (18) MC, 12 (12) CC1, 15 (18) MC.
- Round 8: Work 12 (15) MC, 18 (18) CC1, 12 (15) MC.
- Round 9: Work 9 (12) MC, 24 (24) CC1, 9 (12) MC.
- Round 10: Work 6 (9) MC, 30 (30) CC1, 6 (9) MC.
- Round 11: Work 3 (6) MC, 36 (36) CC1, 3 (6) MC.
- Round 12: All CC1. This completes the cream muzzle area.
- Round 13: Work 3 (6) CC1, 36 (36) MC, 3 (6) CC1 (reverse colors for the top of the head).
- Round 14: Work 6 (9) CC1, 30 (30) MC, 6 (9) CC1.
- Round 15: Work 9 (12) CC1, 24 (24) MC, 9 (12) CC1.
- Round 16: Work 12 (15) CC1, 18 (18) MC, 12 (15) CC1.
- Round 17: Work 15 (18) CC1, 12 (12) MC, 15 (18) CC1.
- Round 18: Work 18 (21) CC1, 6 (6) MC, 18 (21) CC1.
- Round 19: All MC. The fox face is now complete.
- Rounds 20-22: All MC. Continue in stockinette to reach the desired length.
Thumb Gusset
- On the next round, place a marker after the first 6 (7) sts. Work in MC for the rest of the round. This marks where your thumb increases will happen.
- Increase round: k to marker, m1, k to end. Repeat this increase every 3 rounds until you have 12 (14) sts between markers for the thumb. The increases should be worked on either side of the marker to create a wedge shape.
- Slip the thumb sts onto a waste yarn holder. Cast on 2 sts over the gap (using backward loop cast on) and continue working the hand in the round for 10 (12) more rounds, or until the mitten reaches the base of the fingers. Try it on your child to check the length if possible.
Shape the Top
- Decrease round: *k2, k2tog* repeat to end – 32 (36) sts. This begins the rounded top of the mitten.
- Next round: *k1, k2tog* repeat to end – 21 (24) sts.
- Next round: *k2tog* repeat to end – 11 (12) sts.
- Cut yarn, leaving a 6-inch tail. Thread through remaining sts using your tapestry needle, pull tight to close the top, and weave in the end securely.
Thumb
- Pick up the held thumb sts plus 2 sts from the cast-on gap. Distribute evenly on your needles. Work in stockinette in the round for 8 (10) rounds. The thumb should reach just past the first knuckle.
- Decrease round: *k2tog* repeat to end – 7 (8) sts. Cut yarn, pull through remaining sts, and secure tightly. Weave in the end.
Fox Ear Cuffs (Make 2)
- With MC, cast on 10 sts. Work back and forth in stockinette for 6 rows. This creates the base of the ear.
- Next row (right side): k2tog, k to last 2 sts, k2tog – 8 sts. This begins the triangular shaping.
- Repeat decrease row every other row until 2 sts remain. K2tog, cut yarn, and pull through. This creates a pointed ear shape.
- With CC2 (black), pick up and knit 10 sts along the cast-on edge. Work 2 rows of stockinette, then bind off. Fold the black part over the orange to form the ear tip, and sew the ear to the top of the mitten, positioning it so it points upward. The ear should sit centered on the top of the mitten, slightly toward the back.
Finishing
- Using CC2, embroider a small triangle nose at the center of the cream muzzle (around round 12). Use satin stitch for a smooth, solid triangle.
- Using CC2, create two small eyes using French knots on the MC area above the muzzle. Position them symmetrically on either side of the center, about 2-3 rows above the cream section.
- Attach a small faux fur pompom or a strip of faux fur yarn to the top of each ear for extra coziness. You can make a tiny pompom using a fork or purchase small faux fur pompoms.
- Weave in all ends carefully, making sure to secure the colorwork floats on the inside.
- Block gently. Soak the mittens in lukewarm water with a drop of wool wash, then gently press out excess water (don't wring!). Lay flat to dry, shaping the mittens and ears as they dry.
Tips for Success
- Colorwork tension: Keep your floats loose when carrying yarn across the back. Stretch the stitches on your right needle slightly before switching colors to prevent puckering.
- Try as you go: If possible, have your child try on the mitten as you work to ensure the length is perfect.
- Make it your own: Feel free to experiment with different color combinations—a gray fox, arctic fox, or even a red panda version would be adorable!
- Gauge matters: If your gauge is off, the mittens won't fit properly. Take time to swatch and adjust needle size if needed.
These Fablewood Fox Mittens are more than just a knitting project—they're an heirloom piece that captures childhood imagination. The stranded colorwork creates a dimensional fox face that seems to come alive, while the pointed ears and faux fur trim add that extra touch of woodland magic. Perfect for winter adventures, school mornings, or simply snuggling up with a storybook, these mittens will keep little hands warm and hearts happy.
Happy knitting, and may your little foxes have many woodland adventures!



