Coral Cascade Storage Basket Free Pattern – A Knitted Ocean-Inspired Organizer
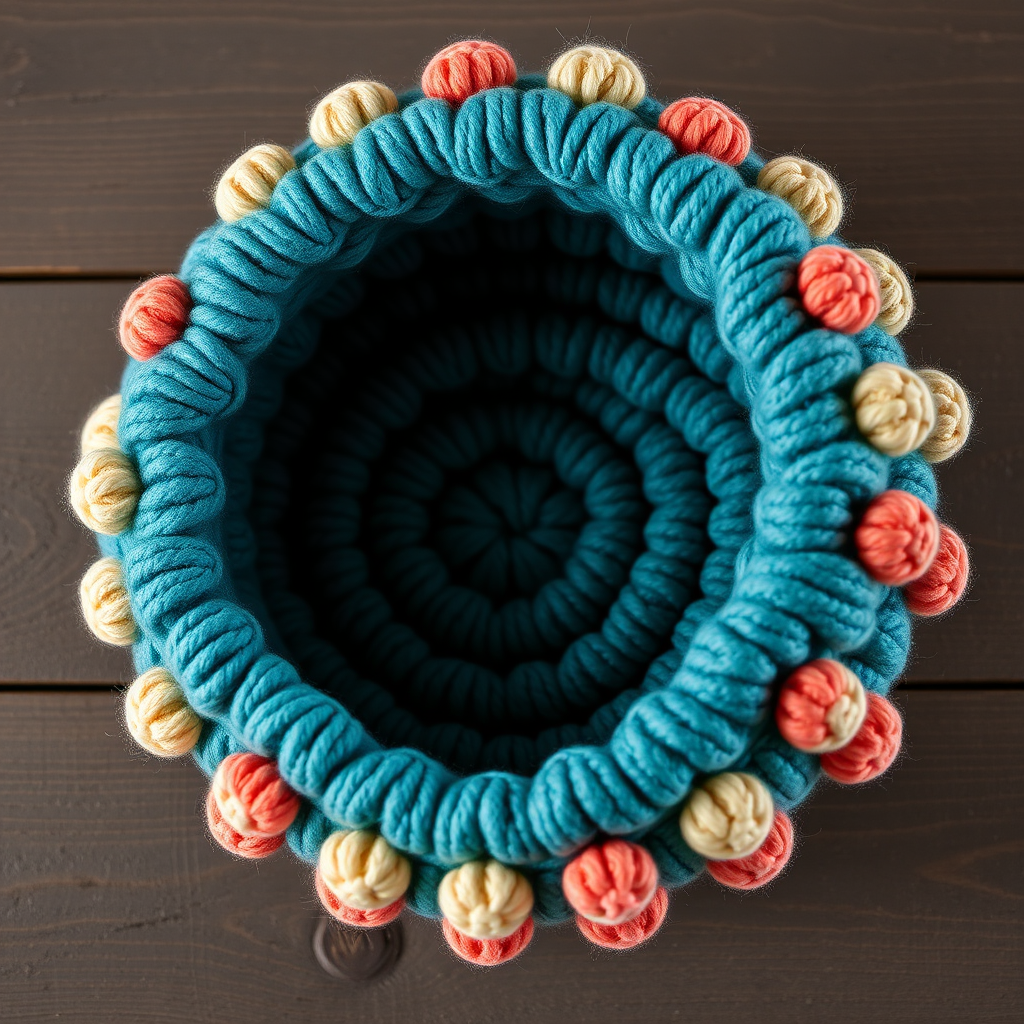
Coral Cascade Storage Basket Free Pattern – A Knitted Ocean-Inspired Organizer
Dive into a fresh take on home organization with this textured basket that mimics the organic beauty of a coral reef. The chunky, sculptural stitches create a stunning statement piece while keeping your space beautifully tidy. This free knitting pattern is perfect for intermediate beginners who want to explore texture and structure in a practical, decorative project. The combination of bobbles and twisted stitches gives the basket a rich, organic surface that will instantly elevate any room.
Whether you're storing yarn, toys, blankets, or magazines, this sturdy basket is as functional as it is beautiful. The dense ribbing ensures it holds its shape, while the ocean-inspired color palette—deep teal, sandy beige, and coral pink—brings a calming, coastal vibe to your home. Let's get started!
Materials Needed
Before you begin, gather the following materials. All items are readily available at your local yarn shop or online.
Yarn
- Super bulky weight yarn (approx. 250–300 yards total)
- Ocean Teal (MC) – Main color for the base and most of the body
- Sandy Beige (CC1) – Accent color for bobbles
- Coral Pink (CC2) – Accent color for twisted stitches
Tip: Choose a yarn with good stitch definition, such as a wool or wool-blend, to make the bobbles and twists pop.
Needles & Notions
- US 13 (9 mm) circular knitting needle, 24-inch cable
- Set of double-pointed needles (DPNs) in the same size (optional, for the bottom)
- Stitch markers (at least 1)
- Tapestry needle for weaving in ends
- Scissors
Gauge
8 stitches and 12 rows = 4 inches in stockinette stitch (knit one row, purl one row).
Always check your gauge to ensure the basket comes out the right size. Adjust needle size if necessary.
Step-by-Step Instructions
This basket is knitted in the round from the bottom up, using a combination of knit and purl stitches to create a dense, sturdy fabric. The coral-inspired texture is achieved with bobbles and twisted stitches. Follow along carefully, and you'll have a beautiful basket in no time.
Abbreviations
- K = knit
- P = purl
- K2tog = knit two stitches together
- M1 = make one stitch (increase)
- BO = bind off
- Rep = repeat
Knitting the Bottom
Step 1: Cast on 8 stitches using the magic ring method, or cast onto a double-pointed needle and distribute across three DPNs (3, 3, 2 stitches).
Step 2: Round 1: K8 (8 stitches).
Step 3: Round 2: M1 at the beginning of each stitch (16 stitches). To M1, pick up the bar between stitches and knit into the back of it.
Step 4: Round 3: K all stitches (16).
Step 5: Round 4: *M1, K1* rep around (24 stitches).
Step 6: Round 5: K all stitches (24).
Step 7: Round 6: *M1, K2* rep around (32 stitches).
Step 8: Round 7: K all stitches (32).
Step 9: Continue increasing in this pattern—M1, then knit the increased number of stitches between increases—until you have 64 stitches total. The sequence is: M1, K3; M1, K4; M1, K5; M1, K6; M1, K7. After each increase round, knit one round even.
Step 10: Work 2 more rounds even in stockinette (knit all stitches) to create a flat, circular base.
Your bottom should now be a flat circle about 10–12 inches in diameter.
Knitting the Sides
Step 1: Switch to the circular needle if not already using it. Place a stitch marker to indicate the beginning of the round.
Step 2: Round 1 (Set-up): *K2, P2* rep around (64 stitches).
Step 3: Round 2: *K2, P2* rep around (64).
Step 4: Round 3: *K2, P2* rep around (64). This establishes the ribbing pattern.
Step 5: Round 4: *K2, P2* rep around (64).
Step 6: Round 5 (Bobble round): *K2, P2* rep around, but on the knit stitches, create bobbles as follows:
- To make a bobble: (K1, P1, K1, P1, K1) all into the same stitch.
- Then pass the 2nd, 3rd, 4th, and 5th stitches over the first stitch.
- This creates a small, raised bump.
Work bobbles on every 4th knit stitch in the ribbing for even spacing. Use CC1 (Sandy Beige) for the bobbles to create contrast.
Step 7: Round 6: *K2, P2* rep around (64).
Step 8: Round 7: *K2, P2* rep around (64).
Step 9: Round 8 (Twist round): *K2tog but do not slip off the left needle, then K1 into the first stitch again, slip both stitches off* – this creates a twisted stitch that mimics the branching of coral. Then P2. Rep around. Use CC2 (Coral Pink) for the twisted stitches.
Step 10: Rounds 9–12: *K2, P2* rep around (64).
Step 11: Round 13 (Bobble round): Repeat Round 5.
Step 12: Rounds 14–16: *K2, P2* rep around (64).
Step 13: Round 17 (Twist round): Repeat Round 8.
Step 14: Rounds 18–20: *K2, P2* rep around (64).
Step 15: Round 21 (Bobble round): Repeat Round 5.
Step 16: Rounds 22–24: *K2, P2* rep around (64).
Step 17: Round 25 (Twist round): Repeat Round 8.
Step 18: Rounds 26–28: *K2, P2* rep around (64).
Step 19: Round 29 (Bobble round): Repeat Round 5.
Step 20: Rounds 30–32: *K2, P2* rep around (64).
Step 21: Round 33 (Twist round): Repeat Round 8.
Step 22: Rounds 34–36: *K2, P2* rep around (64).
Step 23: Round 37 (Bobble round): Repeat Round 5.
Step 24: Rounds 38–40: *K2, P2* rep around (64).
Step 25: Round 41 (Twist round): Repeat Round 8.
Step 26: Rounds 42–44: *K2, P2* rep around (64).
Step 27: Round 45 (Bobble round): Repeat Round 5.
Step 28: Rounds 46–48: *K2, P2* rep around (64).
Step 29: Round 49 (Twist round): Repeat Round 8.
Step 30: Rounds 50–52: *K2, P2* rep around (64).
Step 31: Round 53 (Bobble round): Repeat Round 5.
Step 32: Rounds 54–56: *K2, P2* rep around (64).
Step 33: Round 57 (Twist round): Repeat Round 8.
Step 34: Rounds 58–60: *K2, P2* rep around (64).
Step 35: Round 61 (Bobble round): Repeat Round 5.
Step 36: Rounds 62–64: *K2, P2* rep around (64).
Step 37: Bind off loosely in pattern (knit the knits and purl the purls). Weave in all ends with a tapestry needle.
Finishing Touches
Step 1: To give the basket extra structure, you can optionally line it with a fabric liner or use a stiffening spray. However, the dense ribbing and bobbles will naturally hold the shape well.
Step 2: Fold the top edge down slightly to create a rolled rim, or leave it as is for a tall, structured basket.
Step 3: Gently block the basket by misting it with water and shaping it with your hands. Allow it to dry completely.
Tips for Success
- Keep your tension even – This is key for a uniform, professional-looking basket.
- Use stitch markers – Place one at the beginning of each round to avoid losing your place.
- Count your stitches – After each increase round, count to ensure you have the correct number.
- Practice bobbles first – If you're new to bobbles, practice on a swatch before starting the basket.
- Customize your colors – Feel free to swap the color palette to match your home decor.
This Coral Cascade Storage Basket is a joy to knit and a stunning addition to any room. The combination of textures and colors creates a piece that looks far more complex than it actually is. Enjoy the process, and don't forget to share your finished basket with the knitting community!
Happy knitting!



