Cactus Bloom Crochet Mittens Free Pattern: Desert Boho Tube Mittens with Flower Appliqué
Cactus Bloom Crochet Mittens: A Desert-Boho Pattern for Total Beginners
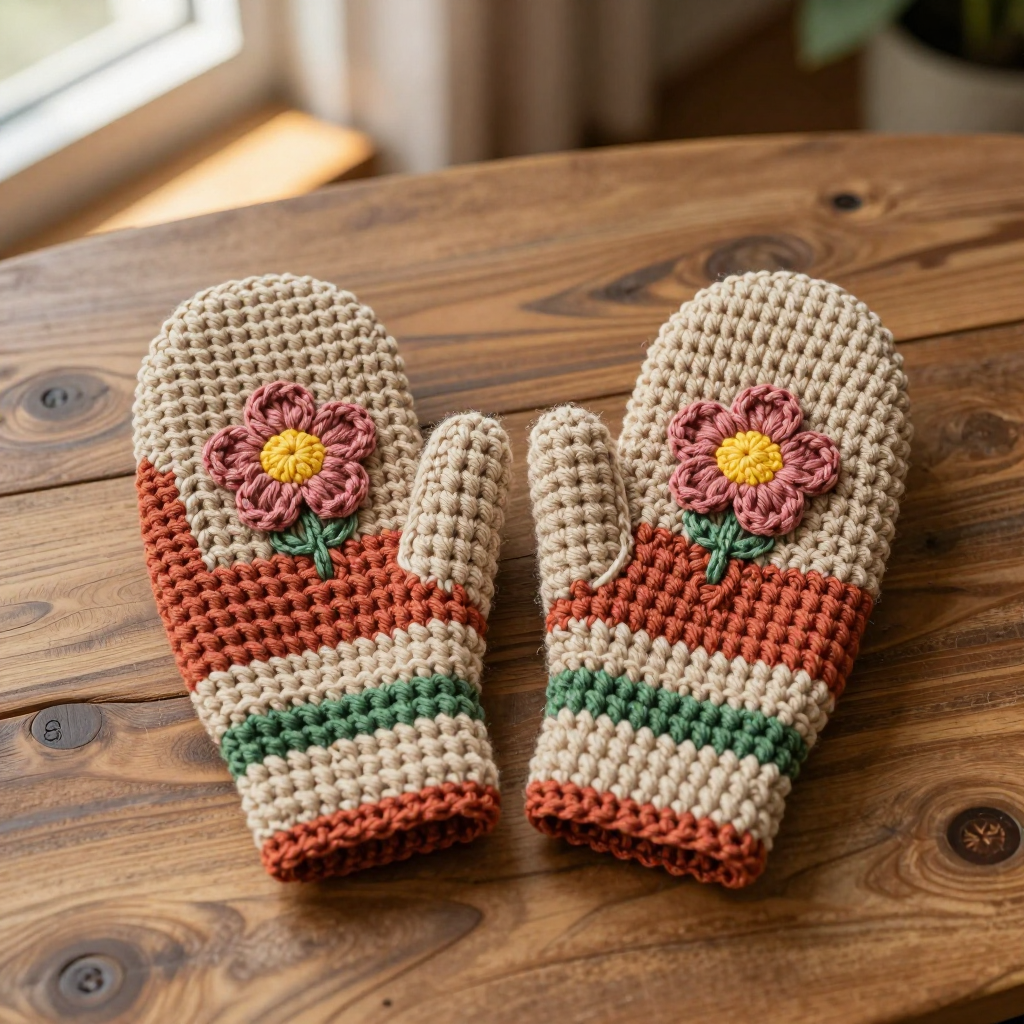
If you have never held a crochet hook before, these Cactus Bloom Mittens are the perfect first real project. They are worked flat in plain single crochet rows — no shaping, no working in the round, no complicated counting — then folded and seamed into a cozy tube. The finished mittens are soft, squishy, and warm, with a sand-to-terracotta-to-prickly-pear color story that looks like a desert sunset, plus a cheerful five-petal flower appliqué on the back of each hand. They make wonderful gifts for kids and adults alike, and because the whole mitten is just a rectangle, you truly cannot go wrong. Let's make a pair together.
Materials Needed
- Yarn: Worsted weight (category 4) acrylic or wool-blend yarn, approximately 150 (190, 230) yds total, in five colors:
- Color A — Sand: approx 60 (75, 90) yds
- Color B — Terracotta: approx 25 (30, 35) yds
- Color C — Prickly Pear Green: approx 45 (55, 70) yds
- Color D — Dusty Rose: approx 15 yds (for the flower)
- Color E — Sunflower Yellow: approx 5 yds (for the flower center)
- Crochet hook: Size H/8 (5.0 mm), or whatever size you need to match the gauge below.
- Stitch markers: at least 4 (to mark the thumb opening and the first stitch of rows).
- Tapestry needle: a blunt-tipped yarn needle with a large eye, for seaming and weaving in ends.
- Scissors for cutting yarn.
- Measuring tape for checking gauge and placement.
Finished sizes (circumference x length):
- Small (child 4–6 yrs): 6 in x 8.5 in
- Medium (child 10–13 yrs): 7 in x 10.5 in
- Large (adult women's glove size 7–8.5): 8 in x 11.5 in
Abbreviations and Beginner Glossary
- ch — chain. Make a loop, wrap the yarn over the hook, and pull it through the loop on your hook. That's one chain.
- sc — single crochet. Insert the hook into the stitch, wrap yarn over the hook, pull up a loop (you now have 2 loops on the hook), wrap yarn over again, and pull through both loops. One single crochet made.
- sl st — slip stitch. Insert the hook into the stitch, wrap yarn over, and pull it straight through both the stitch and the loop on your hook. It joins without adding height.
- st(s) — stitch(es). One completed unit of crochet.
- rep — repeat. Do the instruction again the number of times stated.
- turn — flip your work over so you can crochet back across the row you just made.
- fasten off — cut the yarn a few inches from your work, pull the tail all the way through the last loop, and tug gently to lock it.
- magic ring — an adjustable loop of yarn you crochet into, then pull closed so there is no hole in the middle. If it feels tricky, you can instead ch 2 and work all stitches into the first chain.
- whipstitch — a simple seaming stitch: bring the needle up through both layers, over the edge, and back down, repeating along the seam like tiny slanted stitches.
- mattress stitch — a seaming stitch that goes under the bars between stitches on each edge, creating an invisible, flat seam.
- right sides together — the pretty, outward-facing side of your work facing the other pretty side, so the seam ends up hidden inside.
Gauge
Gauge: 4 sc = 1 inch; 4 rows = 1 inch.
Gauge means how many stitches and rows fit in one inch of your crochet. It matters because it decides the final size: if your stitches are bigger than mine, your mitten will come out too large; if smaller, too tight. To check, crochet a small square about 4 in x 4 in in single crochet with Color A, then lay it flat and measure 4 inches across the middle. Count the stitches in that 4 inches — you want about 16. Count the rows in 4 inches — you want about 16. If you have more stitches, switch to a larger hook; if fewer, switch to a smaller hook. Always check gauge before starting so your pair fits.
Beginner Tips Before You Start
- Count every row. Single crochet rows are easy to lose track of, so place a stitch marker in the first stitch of each row as you go, or tick off rows on paper.
- Don't pull the yarn tight. Keep your tension relaxed and even. Tight, grippy stitches make seaming hard and the mitten stiff.
- The ch 1 at the start of a row is not a stitch. Skip it when counting, and work your first sc into the very first stitch of the row.
- Mark the thumb opening before you sew. Use stitch markers on the seam edge to pin where the opening begins and ends, so both mittens match.
- Keep your color changes tidy. Change color on the last stitch of the row by pulling the new color through the final two loops, then continue.
- Make both mittens the same. Work them one after the other with the same hook and yarn so the sizes match.
Step-by-Step Instructions
Notes: Mittens are worked flat in rows of single crochet, then seamed along the side edge to form a tube. The thumb is a separate small tube sewn onto the side opening. Each mitten is made identically; the flower goes on the back of each hand. The color sequence from cuff to fingertip is: A Sand, B Terracotta, A Sand, C Prickly Pear Green, A Sand. Numbers are given as Small (Medium, Large).
Mitten Body (make 2)
With Color A (Sand), ch 25 (29, 33).
Row 1: Sc in 2nd ch from hook and in each ch across. Turn. (24 [28, 32] sc)
Rows 2–8 (2–10, 2–12): Ch 1, sc in each st across. Turn. (24 [28, 32] sc)
Change to Color B (Terracotta).
Rows 9–12 (11–16, 13–20): Ch 1, sc in each st across. Turn. (24 [28, 32] sc)
Change to Color A (Sand).
Rows 13–16 (17–22, 21–26): Ch 1, sc in each st across. Turn. (24 [28, 32] sc)
Change to Color C (Prickly Pear Green).
Rows 17–24 (23–32, 27–38): Ch 1, sc in each st across. Turn. (24 [28, 32] sc)
Change to Color A (Sand).
Rows 25–34 (33–42, 39–46): Ch 1, sc in each st across. Turn. (24 [28, 32] sc)
Fasten off, leaving a 20-in tail for seaming.
Seaming the Body
Fold the rectangle in half with right sides together, matching the starting chain edge (the cuff) to the final row (the fingertip). Thread the long tail onto your tapestry needle. Using whipstitch or mattress stitch, sew the two side edges together from cuff to fingertip, but leave a 1.5-in (2-in, 2-in) opening for the thumb, positioned about 1.5 in (2 in, 2.25 in) below the fingertip edge. Place stitch markers at the start and end of the opening so you don't sew it shut. Fasten off and weave in the end. Turn right side out.
Thumb (make 2)
With Color A (Sand), ch 11 (13, 15).
Row 1: Sc in 2nd ch from hook and in each ch across. Turn. (10 [12, 14] sc)
Rows 2–8 (2–10, 2–12): Ch 1, sc in each st across. Turn. (10 [12, 14] sc)
Fasten off, leaving a 10-in tail. Fold the thumb piece in half lengthwise with right sides together and seam the long edges to form a tube. Turn right side out. Pin the thumb tube into the body opening, aligning the raw edges, and sew in place with the tapestry needle. Weave in the end.
Cuff Edging (optional)
Join Color B (Terracotta) at the cuff edge. Ch 1, work 1 round of sc evenly around the cuff opening (about 24 [28, 32] sc), then sl st to the first sc. Fasten off and weave in the end. Repeat for the second mitten.
Cactus Flower Appliqué (make 2)
With Color D (Dusty Rose), make a magic ring.
Round 1: Ch 1, work 10 sc into the ring, sl st to the first sc. (10 sc)
Round 2: Ch 1, [sc in next st, ch 2, sl st in same st] 5 times to form 5 petals. Fasten off, leaving a 6-in tail.
With Color E (Sunflower Yellow), make a magic ring, work 5 sc into the ring, and sl st to the first sc to close. Fasten off, leaving a 4-in tail. Sew the yellow center to the middle of the flower.
Assembly and Finishing
Pin one flower appliqué to the back of each mitten, centered about 1 in below the fingertip edge. Using your tapestry needle and matching yarn or thread, sew the flower in place with small stitches around the petals, catching only the top layer of the mitten so the stitches don't show inside. Weave in all ends by threading each tail onto the needle and running it through the back of several stitches, then trimming close. Block lightly if desired: mist the mittens with water, smooth them flat to the measurements above, and let them dry away from direct heat. Your Cactus Bloom Mittens are finished — wear them, gift them, and enjoy the desert-boho glow.
Pro Tips and Variations
- Change the color story. Swap the sand for cream, the terracotta for rust, or the green for sage to match your wardrobe — just keep the same row counts so the sizes stay true.
- Adjust the size. To make a bigger or smaller mitten, add or remove 4 chains at the start (each 4 stitches equals about 1 inch) and add or remove rows in the final sand section to match the length you want.
- Substitute yarn. Any worsted weight yarn works; a wool blend is warmer, while acrylic is easy to wash. Always re-check your gauge with the new yarn.
- Make it a matching set. Use the leftover flower colors to crochet a tiny flower pin or a coordinating headband for a gift set.