Bubble Shell Hexagon Buttons Free Crochet Pattern
Bubble Shell Hexagon Buttons: A Tiny, Beginner-Friendly Crochet Project
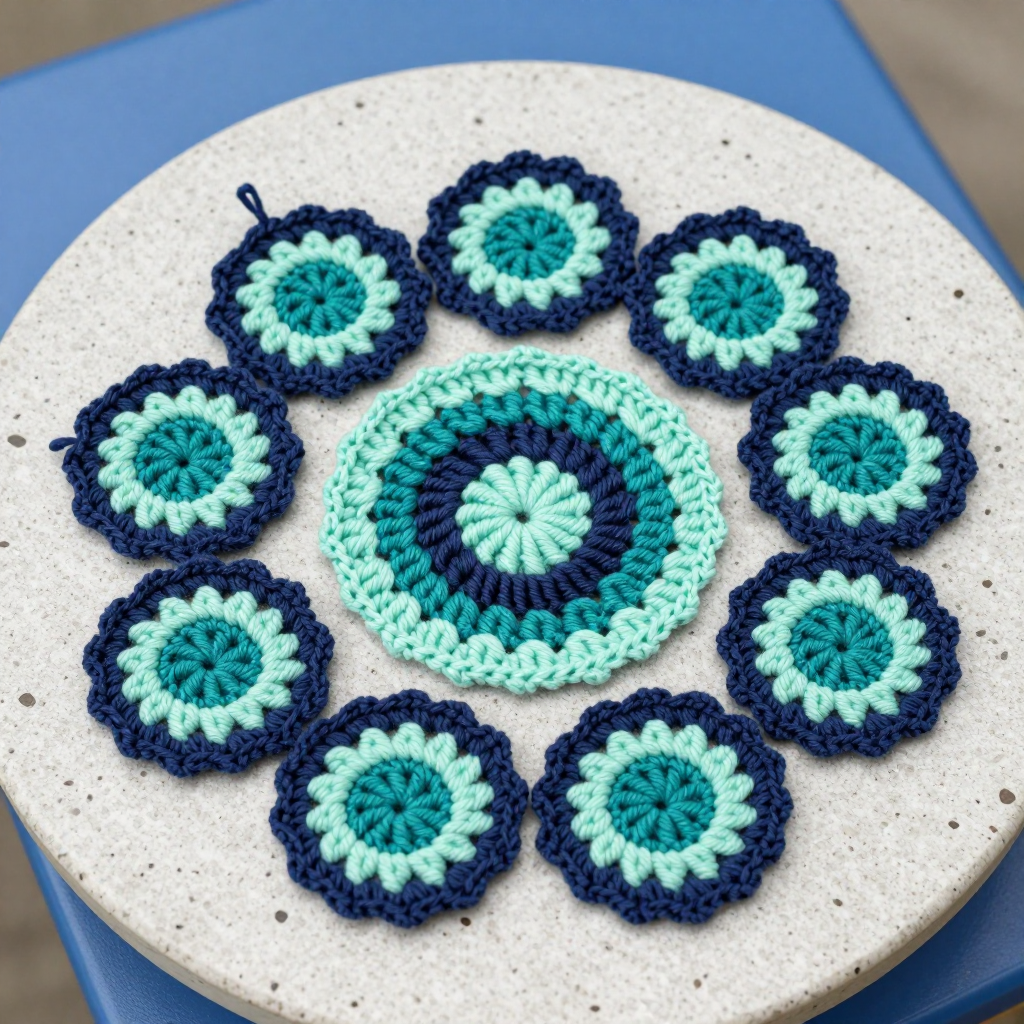
If you have never held a crochet hook before, these little buttons are the perfect first project. They are small enough to finish in a single sitting, so you get the thrill of a completed object without committing to a big blanket or sweater. Each button is a six-sided hexagon worked in three ocean blues, with a raised "bubble shell" fan at the center that makes it look like a tiny piece of sea glass. The finished button measures about 1.5 cm (5/8 inch) across, lies flat, and feels firm and slightly textured under your fingers. Sew one onto a cardigan, a tote bag, or a gift, and you have a bold handmade detail that nobody else owns.
Materials Needed
- Yarn: Fine (2) weight cotton yarn, approximately 23–26 stitches to 4 inches (10 cm). You need only small amounts of three ocean blues: A = deep navy, B = teal, C = seafoam. Each button uses just a few yards.
- Crochet hook: B/1 (2.25 mm). The "B/1" is the US size and "2.25 mm" is the metric size — they are the same hook.
- Stitch markers: At least one, to mark the first stitch of each round.
- Tapestry needle: A blunt needle with a large eye, for weaving in ends and making the shank.
- Small sharp scissors: For trimming yarn tails.
- Finished size: Each button measures approximately 1.5 cm (about 5/8 inch) across the flat hexagon, with a small raised bubble shell at the center.
Abbreviations and Beginner Glossary
Every term below is explained as if you have never crocheted. Read this list once before you start, and keep it beside you.
- ch – chain: wrap the yarn over the hook and pull it through the loop on your hook. This makes a small link.
- sl st – slip stitch: insert the hook into the stitch, wrap yarn over, and pull it through both the stitch and the loop on your hook at once. It joins things without adding height.
- sc – single crochet: insert the hook into the stitch, wrap yarn over, pull up a loop (2 loops on hook), wrap yarn over again, and pull through both loops. One short stitch.
- dc – double crochet: wrap yarn over the hook first, insert into the stitch, wrap and pull up a loop (3 loops on hook), wrap and pull through 2 loops, wrap and pull through the last 2 loops. A taller stitch.
- hdc – half double crochet: wrap yarn over, insert into the stitch, wrap and pull up a loop (3 loops on hook), wrap and pull through all 3 loops at once. Medium height.
- tr – treble crochet: wrap yarn over twice, insert into the stitch, pull up a loop, then pull through 2 loops three times. The tallest stitch here.
- sc2tog – single crochet 2 together: a decrease. Insert the hook into the first stitch, pull up a loop, insert into the next stitch, pull up a loop, then pull through all 3 loops. (Listed for reference; not used in this pattern.)
- ch-2 sp – chain-2 space: the small gap made by two chain stitches in the previous round. You work into the gap, not into a stitch.
- beg – beginning: the start of a round.
- st(s) – stitch(es).
- rnd – round: one complete circle of stitches, joined at the end.
- magic ring – an adjustable loop: wrap the yarn around your fingers to make a loop, work your stitches into it, then pull the tail to close the hole completely.
- Bubble Shell – a special stitch: [dc, ch 1, dc, ch 1, dc] all worked into the same chain-2 space. It makes a small raised fan that reads as a bubble.
Gauge
Gauge: 34 sc by 40 rows = 10 cm by 10 cm (4 inches by 4 inches) in single crochet. Each finished button measures approximately 1.5 cm across.
Why gauge matters: Gauge is how many stitches and rows fit into a set measurement. If your stitches are looser than the gauge, your button will be too big and floppy; if tighter, it will be too small and stiff. How to make a gauge swatch: with your 2.25 mm hook and Color A, chain 20, then work single crochet rows until the piece is about 4 inches tall. Lay a ruler across the middle and count how many single crochet stitches fit in 4 inches. If you count more than 34, your tension is tight — try a slightly larger hook or relax your hands. If you count fewer, your tension is loose — try a smaller hook or pull the yarn a little firmer. Because these buttons are tiny, a small difference in tension changes the finished size a lot, so a quick swatch is worth the five minutes.
Beginner Tips Before You Start
- Use a stitch marker. Place it in the first stitch of each round so you always know where the round began and where to join.
- Do not pull the yarn too tight. Firm tension keeps the button flat and shaped, but yanking the yarn will make the hexagon curl and the hook hard to insert.
- Fasten off between colors. Because the buttons are tiny, tying off and rejoining each color gives the neatest result. Carry yarns loosely only if you prefer fewer ends.
- Close the magic ring completely. Pull the tail gently right after Round 1 so the center hole disappears — it is much harder to fix later.
- Count every round. The stitch counts in parentheses tell you exactly what you should have. If the count is off, undo back to the last correct round before continuing.
- Work a test button first. Make one complete button before starting a set, so you learn the rhythm of the hexagon points and the bubble shell.
Step-by-Step Instructions
Notes: Work in joined rounds. Each round is joined with a sl st to the first stitch of the round. Change colors at the join as directed. Keep tension firm so the button holds its shape. Make as many buttons as you need — each uses only a few yards of yarn.
Center and Rings (Rounds 1–3)
Rnd 1 (Color A – deep navy): Make a magic ring. Ch 1 (does not count as a st). Work 6 sc into the ring. Join with a sl st to the first sc. (6 sc) Pull the magic ring tail gently to close the center hole completely.
Rnd 2 (Color B – teal): Join B with a sl st in any sc. Ch 1. Work 2 sc in each sc around. Join with a sl st to the first sc. (12 sc) Fasten off B.
Rnd 3 (Color C – seafoam): Join C with a sl st in any sc. Ch 1. Work [sc in next sc, ch 2, skip next sc] 6 times around. Join with a sl st to the first sc. (6 sc, 6 ch-2 sps) Do not fasten off C.
Hexagon Shaping (Round 4)
Rnd 4 (Color C – seafoam): Sl st into the first ch-2 sp. Ch 1. Work the following into each ch-2 sp around: [sc, hdc, dc, hdc, sc]. Join with a sl st to the first sc. (30 sts total, forming 6 gentle points) Fasten off C.
Bubble Shell and Edge (Rounds 5–6)
Rnd 5 (Color A – deep navy): Join A with a sl st in any sc at the tip of a hexagon point. Ch 1. Work sc in each st around, working 1 sc in each sc, hdc, and dc of Rnd 4. Join with a sl st to the first sc. (30 sc) Do not fasten off.
Rnd 6 (Color A – deep navy, bubble shell center): Ch 1. Sc in each of the next 14 sc. Work the Bubble Shell ([dc, ch 1, dc, ch 1, dc]) in the next sc. Sc in each of the remaining 15 sc. Join with a sl st to the first sc. (29 sc, 1 bubble shell) Fasten off A, leaving a 10 cm (4 inch) tail.
Note: The bubble shell sits slightly off-center on the button face, giving a playful asymmetric detail. If you prefer it centered, adjust the sc count before and after the shell so the shell falls at the middle of the round.
Assembly and Finishing
- Weave in the ends. Thread each yarn tail onto the tapestry needle and pass it in and out of the stitches on the wrong side of the button for about 1 cm, then trim. Do not trim the final tail yet.
- Make the shank. Thread the final tail through the center of the button from front to back, then back to front. Wrap the tail around those strands 3–4 times to form a short 3–4 mm shank (the little loop that lets a button sit above thick fabric). Secure with a small knot on the wrong side and trim.
- Shape the points. Gently pinch each of the six hexagon points with your fingers so they sit crisply. Do not iron. If the button looks rumpled, hold a steam iron just above the fabric (never touching it) for a second, then reshape by hand.
- Attach the button. Sew the button to a garment, bag, or accessory using the shank and a matching thread or fine yarn. Pass the needle through the shank several times and knot securely on the wrong side of the fabric.
Pro Tips and Variations
- Change the color order. Swap which blue is used for the center, the rings, and the outer edge. Making a set with varied color placement gives you a coordinated but playful collection.
- Make a flatter button. Omit the bubble shell in Round 6 and work sc evenly around instead. This version is ideal for children's clothing or anywhere a smooth surface is needed.
- Make a larger button. In Round 4, work [sc, hdc, dc, tr, dc, hdc, sc] into each ch-2 sp, then continue Rounds 5–6 as written, adjusting stitch counts to keep the hexagon flat. This gives a bigger button for coats and bags.
- Substitute yarn. Any fine (2) weight cotton works; a smooth, tightly spun cotton holds the hexagon shape best. Avoid fuzzy or slippery yarns for your first buttons, as they make the tiny stitches hard to see.