Willowmere High Neck Baby Sweater & Speedy Dress Set Free Pattern
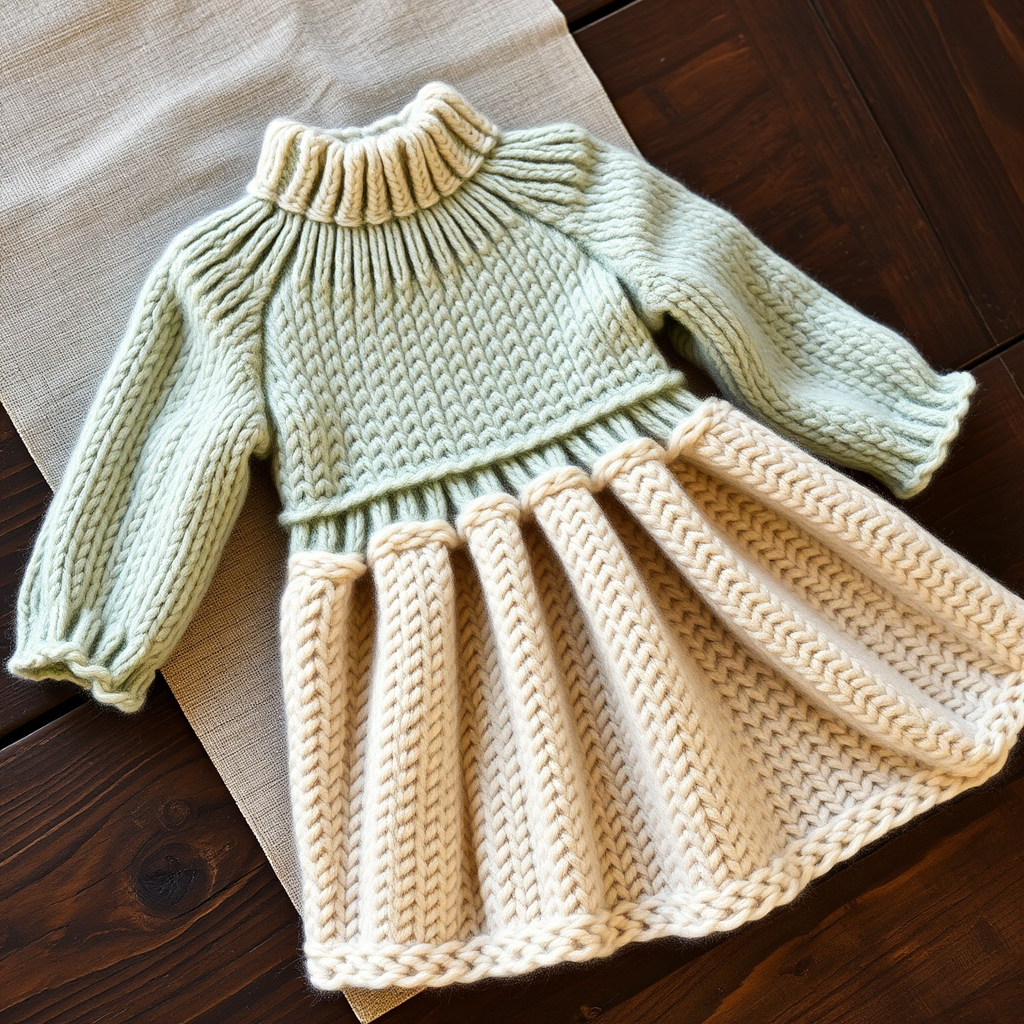
Introducing the Willowmere High Neck Baby Sweater & Speedy Dress Set
There are certain knitting projects that transcend mere garments and become treasured heirlooms—pieces lovingly crafted that are destined to be passed down through generations. The Willowmere High Neck Baby Sweater & Speedy Dress Set is exactly that kind of project. This exquisite two-piece ensemble features a snuggly, high-neck sweater with a seamless yoke and a matching A-line dress with delicate puff sleeves, both knit in soft, breathable cotton. Designed with a modern twist on classic baby layette pieces, this set is perfect for chilly morning snuggles, holiday portraits, or as the ultimate baby shower gift that will leave new parents speechless. The entire set is worked top-down in one piece, meaning minimal seaming and maximum satisfaction as you watch this beautiful garment take shape row by row.
Whether you're a seasoned knitter looking for a rewarding weekend project or a confident beginner ready to tackle their first garment, this pattern offers clear instructions, elegant increases, and a finish that looks professionally made. The combination of a ribbed high neckline, subtle raglan-style increases, and a gently flared body creates a silhouette that is both timeless and contemporary. Let's dive into everything you need to create this heirloom-quality set.
Materials Needed
Before you begin, gather the following materials to ensure a smooth and enjoyable knitting experience. The Willowmere set is knit in worsted weight cotton, which provides excellent stitch definition and a soft, matte finish that only improves with washing.
Yarn
- Worsted weight cotton or cotton-blend yarn (approx. 400-500 yds for the complete set, depending on size). Choose a soft, breathable cotton like Pima cotton or a cotton-bamboo blend for the best drape and comfort against baby's delicate skin. The sample uses a palette of sage green, cream, or dusty rose for that heirloom aesthetic.
Needles
- US 7 (4.5 mm) circular needles in both 16" and 24" lengths (for yoke and body)
- US 7 (4.5 mm) double-pointed needles (for sleeves)
- US 6 (4.0 mm) circular needles (for ribbing on neckline, hem, and cuffs)
Notions
- Stitch markers (at least 4)
- Stitch holders or waste yarn (for holding sleeve stitches)
- Tapestry needle for weaving in ends
- Small button (optional, for back neck closure)
- Measuring tape
Gauge
- 20 sts x 28 rows = 4" in stockinette stitch on US 7 needles
Always take time to swatch! Gauge is critical for achieving the correct finished measurements. Wash and block your swatch before measuring.
Step-by-Step Instructions
This pattern is written for sizes 0-3 (3-6, 6-12) months, with finished chest measurements of 16 (17, 18)". Instructions are given for the smallest size, with larger sizes in parentheses. Follow the numbers that correspond to your chosen size throughout.
Abbreviations
- k = knit
- p = purl
- k2tog = knit two together (decrease)
- ssk = slip slip knit (decrease)
- yo = yarn over (increase)
- pm = place marker
- sm = slip marker
- st(s) = stitch(es)
- RS = right side
- WS = wrong side
Part 1: The High Neck Sweater (Worked Top-Down in One Piece)
Yoke
Step 1: With your smaller US 6 needles, cast on 56 (60, 64) stitches. Place a marker at the beginning of the round and join, being careful not to twist your stitches.
Step 2: Work k1, p1 ribbing for 1.5 inches. This creates the high, snuggly neckline that gives this sweater its signature look. The ribbing should be firm but not tight.
Step 3: Switch to your larger US 7 needles. Work 2 rounds in stockinette stitch (knit every stitch).
Step 4 - Increase Round 1: *k7 (8, 9), yo, k1, yo, k7 (8, 9)* repeat from * to end of round. You have added 2 stitches per repeat, for a total of 8 stitches increased. You should now have 64 (68, 72) stitches.
Step 5: Work 3 rounds in stockinette stitch (no increases).
Step 6 - Increase Round 2: *k8 (9, 10), yo, k1, yo, k8 (9, 10)* repeat from * to end. You now have 72 (76, 80) stitches.
Step 7: Work 3 rounds in stockinette stitch.
Step 8 - Increase Round 3: *k9 (10, 11), yo, k1, yo, k9 (10, 11)* repeat from * to end. You now have 80 (84, 88) stitches.
Step 9: Continue in this manner, increasing every 4th round (i.e., work 3 plain rounds between each increase round), always adding 1 more knit stitch before and after the yo-k1-yo center stitch. Continue until you have 128 (136, 144) stitches total. This will take approximately 8 increase rounds. The yo-k1-yo pattern creates beautiful, subtle raglan lines that radiate from the neckline.
Step 10: Once you've reached the correct stitch count, work even (no increases) in stockinette stitch until the yoke measures 4.5 (5, 5.5) inches from the cast-on edge. This measurement is taken from the top of the neckline, not from the ribbing edge.
Divide for Body and Sleeves
Step 11: This is where the magic of top-down knitting happens. On your next round: k20 (22, 24) stitches (this is the back), place the next 24 (26, 28) stitches on a holder or waste yarn (this is the first sleeve), cast on 4 stitches underarm using the backward loop method, k40 (42, 44) stitches (this is the front), place the next 24 (26, 28) stitches on a holder (this is the second sleeve), cast on 4 stitches underarm, k20 (22, 24) stitches (this completes the back). You should now have 88 (94, 100) stitches on your needles for the body.
Step 12: Work in stockinette stitch in the round until the body measures 5 (6, 7) inches from the underarm. Try it on a doll or visualize the length—this should fall just below the baby's natural waistline for a classic fit.
Step 13: Switch to your smaller US 6 needles and work k1, p1 ribbing for 1 inch. Bind off loosely in pattern. A loose bind-off is essential here to ensure the hem doesn't pucker or restrict movement.
Sleeves
Step 14: Place the held sleeve stitches onto your larger double-pointed needles. Pick up and knit 4 stitches from the underarm cast-on edge. You should now have 28 (30, 32) stitches on your needles. Place a marker at the center of the underarm to mark the beginning of the round.
Step 15: Work in stockinette stitch in the round, decreasing 1 stitch on each side of the underarm marker every 4th round. To decrease: work k2tog before the marker and ssk after the marker. Continue decreasing until the sleeve measures 4 (5, 6) inches from the underarm, or your desired length. For a classic baby sweater, the sleeve should end just at the wrist.
Step 16: Switch to smaller needles and work k1, p1 ribbing for 0.5 inches. Bind off loosely. Repeat for the second sleeve.
Part 2: The Speedy A-Line Dress (Worked Top-Down in One Piece)
Yoke
Step 1: With your smaller US 6 needles, cast on 64 (72, 80) stitches. Join in the round, placing a marker at the beginning.
Step 2: Work k1, p1 ribbing for 1 inch. This creates a neat, fitted neckline for the dress.
Step 3: Switch to your larger US 7 needles. Work 2 rounds in stockinette stitch.
Step 4 - Increase Round 1: *k7 (8, 9), yo, k1, yo, k7 (8, 9)* repeat from * to end. You now have 72 (80, 88) stitches.
Step 5: Work 3 rounds in stockinette stitch.
Step 6 - Increase Round 2: *k8 (9, 10), yo, k1, yo, k8 (9, 10)* repeat from * to end. You now have 80 (88, 96) stitches.
Step 7: Continue increasing every 4th round in this pattern until you have 144 (160, 176) stitches (approximately 8 increase rounds total). The yoke of the dress is slightly more generous than the sweater to accommodate the A-line silhouette.
Step 8: Work even in stockinette stitch until the yoke measures 4 (4.5, 5) inches from the cast-on edge.
Divide for Sleeves
Step 9: On your next round: k22 (25, 28) stitches (back), place the next 28 (30, 32) stitches on a holder (sleeve), cast on 4 stitches underarm, k44 (50, 56) stitches (front), place the next 28 (30, 32) stitches on a holder (sleeve), cast on 4 stitches underarm, k22 (25, 28) stitches (back). You should now have 96 (108, 120) stitches for the body.
Skirt
Step 10: Work in stockinette stitch in the round for 2 inches. This creates the fitted portion of the dress just below the yoke.
Step 11 - First Increase Round: *k3, yo* repeat from * to end of round. This adds 32 (36, 40) stitches. You now have 128 (144, 160) stitches. The yarn overs create small decorative eyelets that add to the dress's charm.
Step 12: Work in stockinette stitch for 2 inches.
Step 13 - Second Increase Round: *k4, yo* repeat from * to end. You now have 160 (180, 200) stitches. This dramatic increase creates the beautiful A-line flare that makes this dress so special.
Step 14: Continue working in stockinette stitch until the skirt measures 6 (7, 8) inches from the underarm. The dress should fall just above or at the knee for a classic baby dress length.
Step 15: Switch to smaller needles and work k1, p1 ribbing for 0.75 inches. Bind off loosely in pattern. The ribbed hem adds structure and prevents the skirt from curling.
Sleeves (Dress)
Step 16: Work the sleeves exactly as for the sweater, but make them 3 (4, 5) inches long. These shorter sleeves create the adorable puff sleeve effect that perfectly complements the A-line skirt.
Finishing Touches
Step 1: Weave in all loose ends using your tapestry needle. Take your time with this step—neat finishing makes a professional-looking garment.
Step 2: Block the pieces gently to the specified measurements. For cotton yarn, wet blocking works beautifully. Soak the garments in lukewarm water with a drop of gentle wool wash, gently squeeze out excess water (never wring), and lay flat to dry, shaping to the correct dimensions.
Step 3 (Optional): Sew a small button at the back neck of the sweater to make dressing easier. This is especially helpful for newborns and makes the garment more practical for everyday wear.
Step 4: Once completely dry, your Willowmere set is ready to be gifted, photographed, or wrapped around a precious little one. The cotton yarn will soften further with each wash, making this set even more comfortable over time.
This heirloom-quality set is more than just a knitting project—it's a labor of love that will be cherished for years to come. Whether you're creating it for your own little one or as a gift for a baby shower, the Willowmere High Neck Baby Sweater & Speedy Dress Set is sure to become a family favorite. Happy knitting!



