Whispering Pines Forest Wall Hanging Free Pattern – Textured Crochet Woodland Art
Whispering Pines Forest Wall Hanging Free Pattern – Textured Crochet Woodland Art
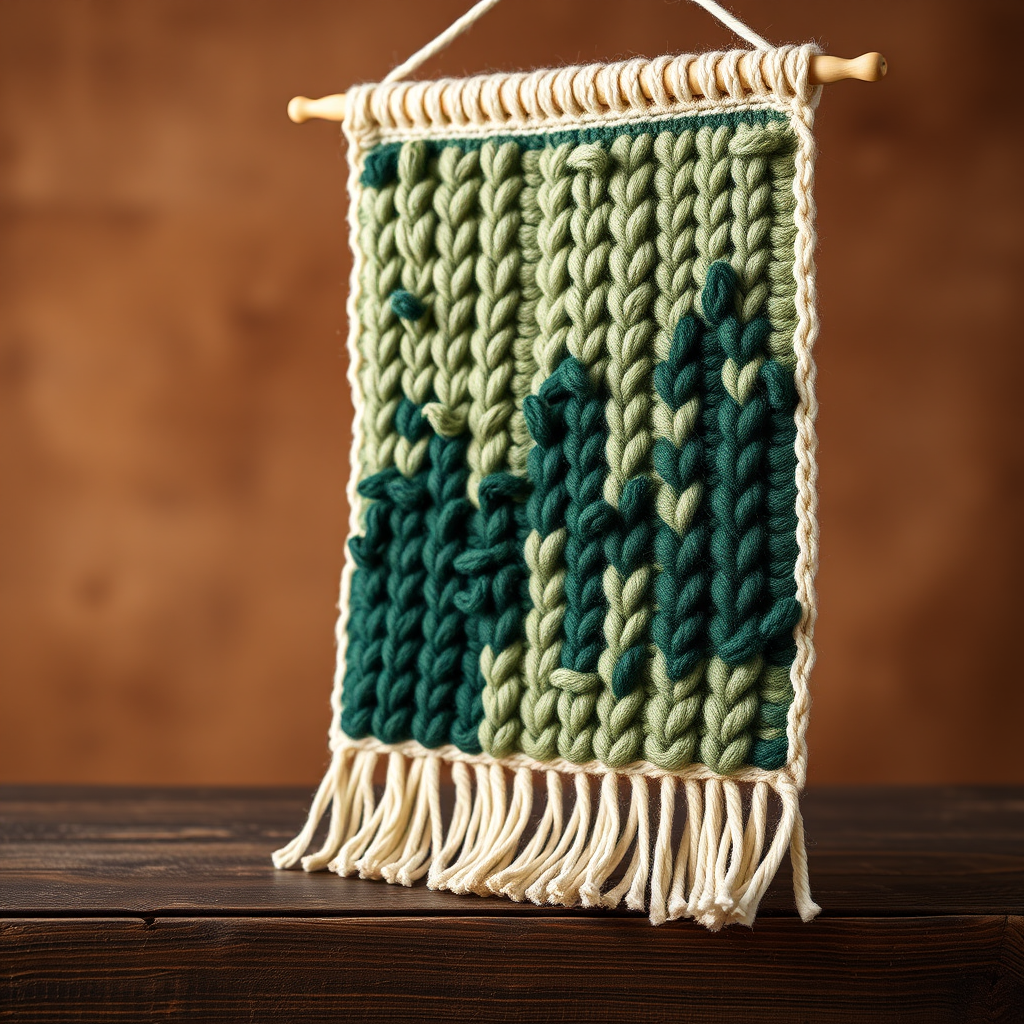
Bring the serene beauty of a pine forest into your home with this richly textured crochet wall hanging. The combination of loop stitches and varied greens creates a lush, dimensional landscape that adds warmth and depth to any room. Whether you're a seasoned crocheter or a curious beginner, this pattern is designed to be both meditative and rewarding, resulting in a stunning piece of fiber art that evokes a misty, tranquil woodland atmosphere.
This modern boho decor piece is perfect for adding a handmade touch to your living space, nursery, or entryway. The tactile loop stitch mimics the soft needles of pine trees, while the gradient of greens—from deep forest to soft sage—creates a beautiful, organic transition. Let's gather our materials and begin crafting this forest masterpiece.
Materials Needed
Before we dive into the stitches, let's ensure you have everything you need. This project uses simple, readily available materials, making it an accessible weekend project.
Yarn & Notions
- Yarn: Worsted weight yarn in 5 shades of green:
- Color A: Dark Forest Green
- Color B: Pine Green
- Color C: Moss Green
- Color D: Sage Green
- Color E: Cream/Off-White (for border and fringe)
- Hook: 5.5 mm (I-9) crochet hook
- Dowel: Natural wood dowel, 12-16 inches long
- Notions: Tapestry needle, scissors
Gauge & Size
Gauge: 4 inches = 12 sc and 13 rows. Gauge is not critical for this project, but maintaining a consistent tension throughout will ensure your wall hanging hangs evenly.
Finished Size: Approximately 10 inches wide by 12 inches tall (excluding fringe), but this can vary based on your tension.
Step-by-Step Instructions
This pattern is worked flat in rows. We'll start with the base, build up the textured forest, and finish with a beautiful border and fringe. Let's get started!
Abbreviations
- ch = chain
- sc = single crochet
- hdc = half double crochet
- dc = double crochet
- sl st = slip stitch
- st(s) = stitch(es)
- RS = right side
Pattern Notes
- Worked flat in rows. Each row begins with ch 1 (does not count as a stitch) unless noted.
- The Loop Stitch: This is the star of our pattern, creating the 'pine needle' texture. Here's how to make it:
- Insert hook into the next stitch.
- Yarn over and pull up a loop (you'll have 2 loops on your hook).
- Wrap the yarn around your finger (or a spare pen) to create a loop about 1 inch in diameter.
- Yarn over and pull through both loops on your hook.
- Release the finger loop. The loop will sit on the right side (RS) of your work, creating the textured effect.
- Color Changes: When changing colors, carry the unused yarn loosely along the back of the work, or use separate bobbins to avoid tangling. We'll switch colors within rows to create the vertical bands of forest.
Creating the Forest Base
We'll start with a simple foundation of single crochet in our darkest green, then build up the textured bands.
Row 1 (RS): With Color A (Dark Forest Green), ch 31. Sc in the 2nd ch from the hook and in each ch across. (30 sc) Turn.
Row 2: Ch 1, sc in each st across. Turn. (30 sc)
Building the Textured Pine Bands
Now we begin the loop stitch pattern. We'll work in sections, creating wider bands of lighter greens as we move down the piece, mimicking the natural layering of a forest.
Row 3: Ch 1, sc in first 5 sts. Switch to Color B (Pine Green), loop stitch in the next 20 sts. Switch back to Color A, sc in the last 5 sts. Turn. (Note: Carry yarns loosely along the back or use bobbins.)
Row 4: Ch 1, sc in each st across (all sc, working over the loops from the previous row). Turn. (30 sc)
Row 5: Repeat Row 3. (5 sc, 20 loop sts, 5 sc)
Row 6: Ch 1, sc in each st across. Turn. (30 sc)
Row 7: Ch 1, sc in first 3 sts. Switch to Color C (Moss Green), loop stitch in the next 24 sts. Switch to Color A, sc in the last 3 sts. Turn.
Row 8: Ch 1, sc in each st across. Turn. (30 sc)
Row 9: Repeat Row 7. (3 sc, 24 loop sts, 3 sc)
Row 10: Ch 1, sc in each st across. Turn. (30 sc)
Row 11: Ch 1, sc in first 2 sts. Switch to Color D (Sage Green), loop stitch in the next 26 sts. Switch to Color A, sc in the last 2 sts. Turn.
Row 12: Ch 1, sc in each st across. Turn. (30 sc)
Row 13: Repeat Row 11. (2 sc, 26 loop sts, 2 sc)
Row 14: Ch 1, sc in each st across. Turn. (30 sc)
Row 15: Repeat Row 11. (2 sc, 26 loop sts, 2 sc)
Row 16: Ch 1, sc in each st across. Turn. (30 sc)
Row 17: Ch 1, sc in first 3 sts. Switch to Color C (Moss Green), loop stitch in the next 24 sts. Switch to Color A, sc in the last 3 sts. Turn.
Row 18: Ch 1, sc in each st across. Turn. (30 sc)
Row 19: Repeat Row 17. (3 sc, 24 loop sts, 3 sc)
Row 20: Ch 1, sc in each st across. Turn. (30 sc)
Row 21: Ch 1, sc in first 5 sts. Switch to Color B (Pine Green), loop stitch in the next 20 sts. Switch to Color A, sc in the last 5 sts. Turn.
Row 22: Ch 1, sc in each st across. Turn. (30 sc)
Row 23: Repeat Row 21. (5 sc, 20 loop sts, 5 sc)
Row 24: Ch 1, sc in each st across. Turn. (30 sc)
Row 25: Ch 1, sc in each st across. Turn. Fasten off Color A and Color B. (30 sc)
Adding the Top Border
Now that the main body is complete, we'll add a clean, cream-colored border at the top to prepare for mounting.
With the RS facing, attach Color E (Cream) to the top-right corner. Ch 1, work sc evenly across the top edge (approximately 30 sc). Fasten off.
Creating the Bottom Fringe
The fringe adds a beautiful, bohemian finish to our wall hanging.
- Cut strands of Color E (Cream), each 12 inches long. You'll need about 15 strands (one for every other stitch).
- Fold each strand in half to create a loop.
- Insert your hook into the bottom edge of the wall hanging, from front to back.
- Pull the folded loop through the edge.
- Pull the two loose ends through the loop and tighten gently to secure.
- Space the fringe every other stitch across the bottom edge.
- Once all fringe is attached, trim the ends evenly for a polished look.
Finishing Touches
Your forest wall hanging is almost complete! Let's put it all together.
- Weave in all ends: Use your tapestry needle to carefully weave in all loose yarn ends on the back of the piece. This ensures a clean, professional finish.
- Mount on the dowel: Fold the top border over the wooden dowel. Use your tapestry needle and a length of Color E yarn to whipstitch the border closed, securing it around the dowel. Make sure the stitches are even and hidden within the border.
- Add a hanging cord: Cut a length of yarn or leather cord (about 12-18 inches). Tie each end securely to the ends of the dowel to create a hanging loop. You can also use a decorative piece of twine or a leather strap for a more rustic look.
And there you have it—a beautiful, textured Whispering Pines Forest Wall Hanging! This piece is sure to be a conversation starter and a cozy addition to your home. The combination of the loop stitch and the earthy color palette creates a truly unique piece of fiber art. Enjoy your handmade woodland masterpiece!


