Whispering Dunes Boho Wall Hanging Free Pattern
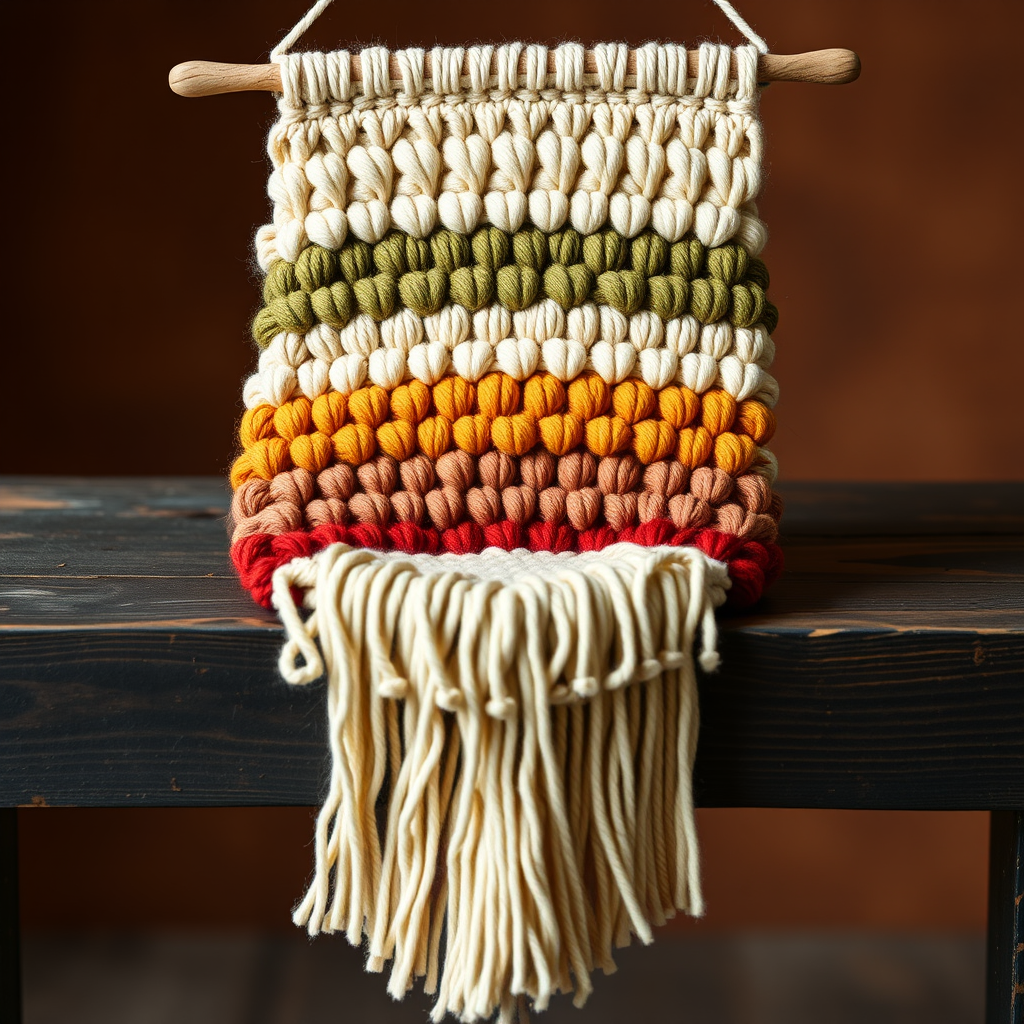
Whispering Dunes Boho Wall Hanging: A Free Crochet Pattern
Bring the serene beauty of desert landscapes into your home with this textured, boho-chic wall hanging. The combination of shell stitches and earthy tones creates a stunning, modern piece that adds warmth and dimension to any room. Whether you're a seasoned crocheter or a confident beginner looking for your next project, this pattern is designed to be both relaxing to make and rewarding to display. The rhythmic repetition of stitches mimics the rolling dunes, while the color palette—from warm sand to deep terracotta—captures the essence of a desert sunset.
Materials Needed
Before you begin, gather the following supplies to ensure a smooth and enjoyable crochet experience:
- Yarn: Worsted weight cotton yarn in 5 colors:
- Sand (A) – approx. 50g
- Terracotta (B) – approx. 50g
- Olive (C) – approx. 50g
- Mustard (D) – approx. 50g
- Cream (E) – approx. 50g
- Hook: 5.5mm crochet hook (US I-9)
- Notions: Tapestry needle for weaving in ends
- Mounting: 12-inch wooden dowel or a sturdy branch (approx. 1 inch in diameter)
Gauge: 4 shell stitches x 6 rows = 4 inches in pattern. Gauge is not critical for this project, but maintaining consistent tension will ensure a neat, even fabric.
Step-by-Step Instructions
Finished Size
12 inches wide x 24 inches long (excluding fringe). This creates a beautiful, elongated piece perfect for a gallery wall or above a console table.
Special Stitches
Master these two stitches, and you'll have the entire pattern down:
- Shell (sh): Work 5 double crochet (dc) in the same stitch. This creates a fan-like shape that gives the pattern its texture.
- V-stitch (v-st): (dc, chain 1, dc) all in the same stitch. This forms a "V" shape that adds an airy, open quality to the fabric.
Foundation Row
With color A (Sand), chain 25.
Row 1 (Foundation): Dc in the 4th chain from the hook (the first 3 chains count as your first dc). Now, work the following sequence across the row: *skip 2 chains, work a shell (sh) in the next chain, skip 2 chains, work a v-stitch (v-st) in the next chain*. Repeat from * to * across the row, ending with a dc in the very last chain. Turn your work.
Check your count: You should have 4 shells and 4 v-sts across the row, with a dc at each end.
Row 1 (Pattern Row)
Chain 3 (this counts as your first dc). Skip the first dc of the previous row. Now, work the following sequence: *work a shell (sh) into the chain-1 space of the next v-st, then work a v-stitch (v-st) into the center dc of the next shell*. Repeat from * to * across the row, ending with a dc in the top of the turning chain (the 3rd chain from the beginning of the previous row). Turn.
Row 2
Repeat Row 1, but at the end of the row, you will change to color B (Terracotta). To do this: work the last dc of the row with color B, but do not pull the final loop through with color A. Instead, yarn over with color B and pull through the last two loops on your hook to complete the stitch. Leave a 6-inch tail of color B to weave in later. Cut color A, leaving a similar tail.
Rows 3-4
Continue repeating Row 1, now working with color B (Terracotta). Remember to chain 3 at the start of each row and end with a dc in the turning chain. At the end of Row 4, switch to color C (Olive) using the same color-change technique described above.
Rows 5-6
Repeat Row 1 with color C (Olive). At the end of Row 6, switch to color D (Mustard).
Rows 7-8
Repeat Row 1 with color D (Mustard). At the end of Row 8, switch to color E (Cream).
Rows 9-10
Repeat Row 1 with color E (Cream). At the end of Row 10, switch back to color D (Mustard).
Rows 11-12
Repeat Row 1 with color D (Mustard). At the end of Row 12, switch back to color C (Olive).
Rows 13-14
Repeat Row 1 with color C (Olive). At the end of Row 14, switch back to color B (Terracotta).
Rows 15-16
Repeat Row 1 with color B (Terracotta). At the end of Row 16, switch back to color A (Sand).
Rows 17-18
Repeat Row 1 with color A (Sand). At the end of Row 18, fasten off by cutting the yarn, leaving a 6-inch tail, and pulling it through the last loop on your hook.
Finishing Touches
Now that your main panel is complete, it's time to add the finishing details that will transform your crochet work into a stunning piece of wall art.
Weaving in Ends
Thread your tapestry needle with each yarn tail and weave it carefully through the back of your work, following the path of the stitches. Weave in at least 2-3 inches to ensure the ends are secure. Trim any excess yarn.
Mounting on the Dowel
Fold the top edge of your crochet panel over the wooden dowel or branch. The fold should be about 1 inch deep. Using your tapestry needle and a length of color A yarn (or a matching thread), sew the folded edge down securely. Work small, even stitches across the entire width of the panel, catching both the folded fabric and the back layer of the work. This will create a neat casing for the dowel.
Adding the Fringe
Cut lengths of yarn in assorted colors (A, B, C, D, E), each 12 inches long. You'll need approximately 20-25 pieces, depending on how dense you want the fringe to be.
To attach the fringe along the bottom edge of your wall hanging, use a lark's head knot:
- Fold one piece of yarn in half to create a loop at the top.
- Insert your crochet hook from front to back through the bottom edge of the fabric, right below a stitch.
- Catch the folded loop with your hook and pull it through the fabric.
- Thread the two loose ends of the yarn through the loop.
- Pull the ends gently to tighten the knot against the fabric.
Repeat this process across the entire bottom edge, alternating colors as you go. For a more organic look, you can vary the spacing slightly.
Trimming the Fringe
Once all the fringe is attached, lay your wall hanging flat. Use a sharp pair of scissors to trim the fringe evenly, creating a clean, straight line. You can also trim it at an angle for a more dynamic, modern look if you prefer.
Your Whispering Dunes Boho Wall Hanging is now complete! Hang it on a nail or hook through the dowel, and enjoy the warm, textured beauty it brings to your space. The rhythmic shells and V-stitches will catch the light beautifully, and the earthy color palette will complement any decor style. Happy crocheting!


