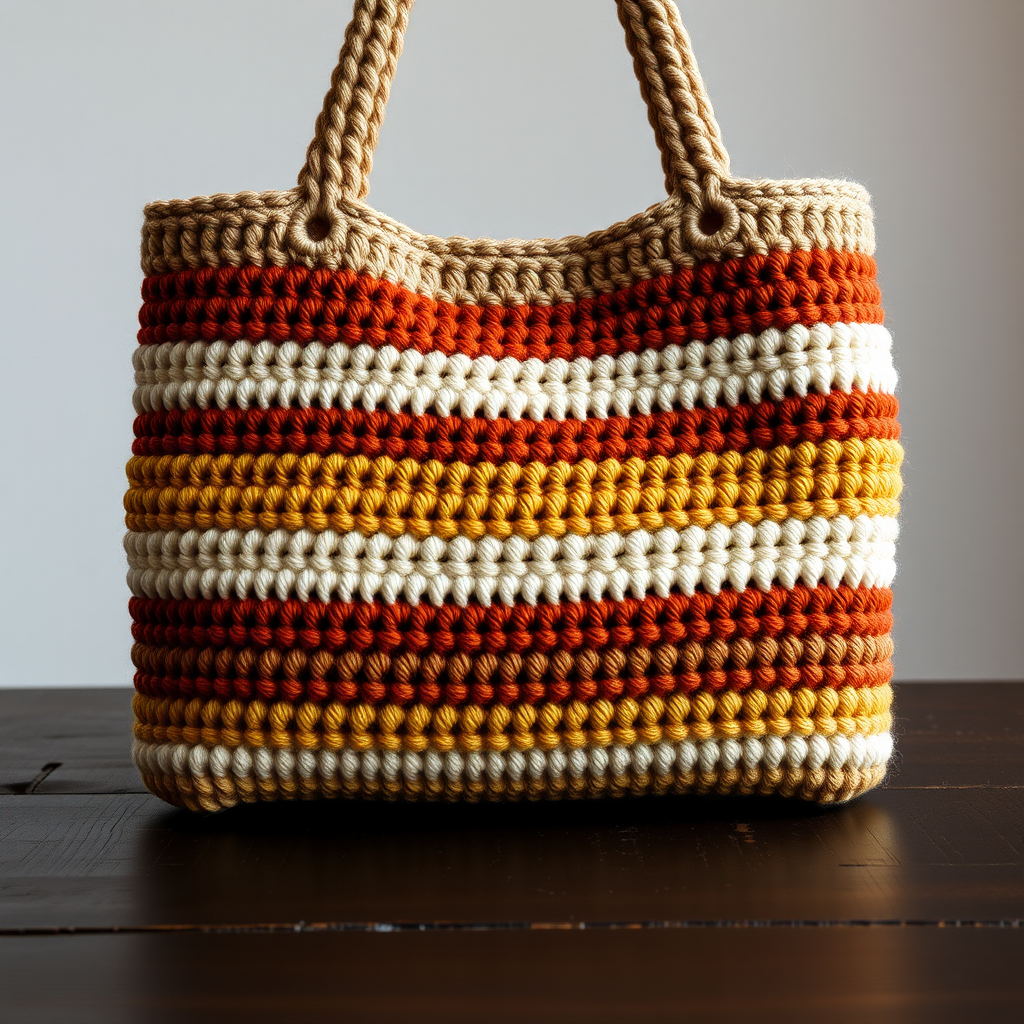
Studio Stripe Crochet Tote Free Pattern: A Mid-Century Modern Color-Block Bag

Studio Stripe Crochet Tote Free Pattern: A Mid-Century Modern Color-Block Bag
Introduction
If you have never held a crochet hook before, this is the perfect first real project for you. The Studio Stripe Tote is worked as one simple striped rectangle, then folded and sewn into a bag, so there are no tricky curves, no shaping, and no complicated stitch patterns to memorize. What makes it special is the bold mid-century color blocking: five broad horizontal bands in warm mustard, soft cream, rich teal, and burnt orange that give it a graphic, gallery-studio look. The finished bag is a sturdy little tube about 14 inches around and 13 inches tall, with a flat seamed bottom and two narrow mustard handles arching over the top. The single crochet worked through the back loop gives the surface fine horizontal ridges, so it feels a little like woven mid-century fabric, and it holds its shape beautifully for books, market finds, or your latest crochet project.
Materials Needed
- Yarn: Worsted weight (category 4) acrylic or cotton blend, approximately 380–420 yards total, divided as follows:
- Color A (warm mustard): 150 yards
- Color B (cream/oatmeal): 110 yards
- Color C (teal): 90 yards
- Color D (burnt orange): 50 yards
- Crochet hook: Size H/8 (5.0 mm), or whatever size you need to match the gauge below.
- Stitch markers: At least 4 (or use small safety pins or scrap yarn loops).
- Tapestry needle: A blunt-tipped yarn needle with an eye big enough for worsted yarn, for seaming and weaving in ends.
- Scissors for cutting yarn.
- Measuring tape for checking gauge and handle placement.
- Finished size: Body rectangle 14 inches wide x 13 inches tall before seaming. Seamed tube approximately 14 inches circumference x 13 inches tall. Handles: two straps, each about 1 inch wide x 12 inches long.
Abbreviations and Beginner Glossary
- ch – chain: Make a loop with the yarn, then pull a new loop through it. Each loop you pull through is one chain. Chains are the foundation you build on.
- sc – single crochet: Insert your hook into the stitch, yarn over (wrap the yarn around the hook), pull up a loop (you now have 2 loops on the hook), yarn over again, and pull through both loops. One single crochet made.
- st / sts – stitch / stitches: One completed single crochet, or several of them.
- blo – back loop only: Every single crochet has two little loops at its top, one closer to you (front loop) and one farther away (back loop). Working "in the back loop only" means you insert your hook under just the far loop, not both. This creates the ridged texture.
- tog – together: Used in phrases like "right sides together," meaning the pretty, outward-facing sides of the fabric are touching each other.
- turn: Flip your work over so you can crochet back across the row you just finished.
- fasten off: Cut the yarn a few inches from your work, then pull the tail all the way through the last loop to lock it. This is how you end a section.
- weave in ends: Thread a yarn tail onto a tapestry needle and sew it back and forth through the fabric so it disappears and cannot unravel.
- whipstitch: A simple sewing stitch: bring the needle up through both layers, over the edge, and back down, repeating in small even stitches along the seam.
- mattress stitch: A seaming stitch that goes back and forth between the two edges, creating an almost invisible join. You may use it instead of whipstitch for the side seam.
- yarn over: Wrap the working yarn around your hook once, from back to front.
Gauge
Gauge: 16 single crochet x 18 rows = 4 x 4 inches (10 x 10 cm) in single crochet, unblocked.
Gauge simply means how big your stitches come out. If your stitches are bigger than this, your bag will be bigger than 14 inches wide; if smaller, it will be smaller. That is why we check first. To make a gauge swatch: chain 21, then single crochet in each chain across (20 stitches). Work 20 rows of single crochet, fasten off, and lay it flat. Measure a 4-inch section in the middle. If you have more than 16 stitches in 4 inches, your stitches are too tight, so try a larger hook. If you have fewer than 16, your stitches are too loose, so try a smaller hook. The row count matters too: 18 rows should measure 4 inches tall. This pattern is written for 56 stitches and 58 rows, which is exactly 14 inches wide and 13 inches tall at this gauge.
Beginner Tips Before You Start
- Count your stitches every row. You should always have 56 stitches in the body. It is easy to accidentally skip the last stitch of a row, so count before you turn.
- Do not pull the yarn too tight. Tension should feel relaxed. If your hook squeaks or your stitches are hard to insert into, you are pulling too hard.
- Use stitch markers to track your color changes. Place a marker in the first and last stitch of a row where you change colors so you can find your place easily.
- Carry the unused colors loosely up the side edge. When you change stripes, do not cut the old color. Just let it rest along the side and pick it up again when needed. Keep it loose so the edge does not pucker.
- The chain 1 at the start of each row does not count as a stitch. Your first single crochet goes into the very first stitch, not into the chain.
- Work in good light and take breaks. Back-loop single crochet is simple but repetitive, and tired hands make mistakes.
Step-by-Step Instructions
Stripe Sequence at a Glance
- Color A (mustard): rows 1–14
- Color B (cream): rows 15–26
- Color C (teal): rows 27–38
- Color D (burnt orange): rows 39–46
- Color A (mustard): rows 47–58
Body
Work flat, turning at the end of every row. The chain 1 at the start of a row does not count as a stitch.
With Color A, chain 57.
Row 1: Sc in the 2nd ch from hook and in each ch across, turn. (56 sc)
Row 2: Ch 1, sc in the back loop only of each st across, turn. (56 sc)
Rows 3–14: Repeat Row 2 in Color A. (56 sc)
Change to Color B at the end of Row 14: work the last single crochet of the row but pull Color B through the final loop instead of Color A.
Rows 15–26: Repeat Row 2 in Color B. (56 sc)
Change to Color C at the end of Row 26.
Rows 27–38: Repeat Row 2 in Color C. (56 sc)
Change to Color D at the end of Row 38.
Rows 39–46: Repeat Row 2 in Color D. (56 sc)
Change to Color A at the end of Row 46.
Rows 47–58: Repeat Row 2 in Color A. (56 sc)
Fasten off, leaving a 30-inch tail for seaming. You now have 58 rows total, which measures about 13 inches tall.
Seaming the Tube
Fold the rectangle in half with right sides together, matching the two 13-inch side edges. Thread the 30-inch tail onto your tapestry needle. Using whipstitch or mattress stitch, sew the two side edges together to form a tube, working from the bottom edge to the top edge. Keep your stitches small and even so the seam lies flat. Fasten off and weave in the end. Turn the tube right side out.
Base (Optional Flat Bottom)
To give the tote a flat base, pinch the bottom corners of the tube so the side seam sits centered at the bottom. This creates a flat fold. With a length of Color A and your tapestry needle, whipstitch the two bottom edges together across the 14-inch width. Fasten off and weave in ends.
Handles (Make 2)
With Color A, chain 5.
Row 1: Sc in the 2nd ch from hook and in each ch across, turn. (4 sc)
Rows 2–54: Ch 1, sc in each st across, turn. (4 sc)
Fasten off, leaving a 12-inch tail. Each handle measures about 1 inch wide x 12 inches long.
Assembly and Finishing
Attaching the handles: Turn the bag so the side seam is at one side. Measure 3 inches in from each side edge along the top opening and mark those points on both the front and back of the bag with stitch markers. Pin one end of a handle to a front mark and the other end to the matching back mark, so the handle arches over the opening. Using the yarn tail and your tapestry needle, whipstitch each handle end securely to the top edge, working through both layers of the handle and the bag. Go back and forth a few times for strength. Repeat for the second handle on the opposite side.
Weaving in ends: Thread each remaining tail onto the tapestry needle and sew it back and forth through the inside of the fabric for about 2 inches, changing direction once so it cannot pull out. Trim the yarn close to the fabric.
Blocking: Lightly steam-block the bag to settle the stitches. Hold a steam iron an inch or two above the fabric (never press it directly onto acrylic, which can melt) and let the steam relax the stitches, then shape the bag flat and let it dry. Do not over-stretch the handles; just smooth them into shape.
Pro Tips and Variations
- Change the colors: Swap the palette for any four colors you love. Keep the same stripe widths, or make the middle bands wider for a bolder graphic look. Just keep the total row count at 58 so the size stays the same.
- Adjust the size: To make the bag wider, add stitches in multiples of 4 (each 4 stitches adds about 1 inch). To make it taller, add rows in multiples of 2. Remember that a bigger bag needs more yarn.
- Substitute yarn: Cotton or a cotton-acrylic blend gives a crisper, sturdier bag that holds its shape; all-acrylic is softer and lighter. Always check your gauge with the new yarn before starting.
- Make the handles longer or shorter: Add or remove rows from the handles (each 4–5 rows adds about 1 inch) so the bag fits over your shoulder or carries comfortably in your hand.