Wanderlust Woven Tote Free Pattern
Carry Your World in Style: The Wanderlust Woven Tote Free Crochet Pattern
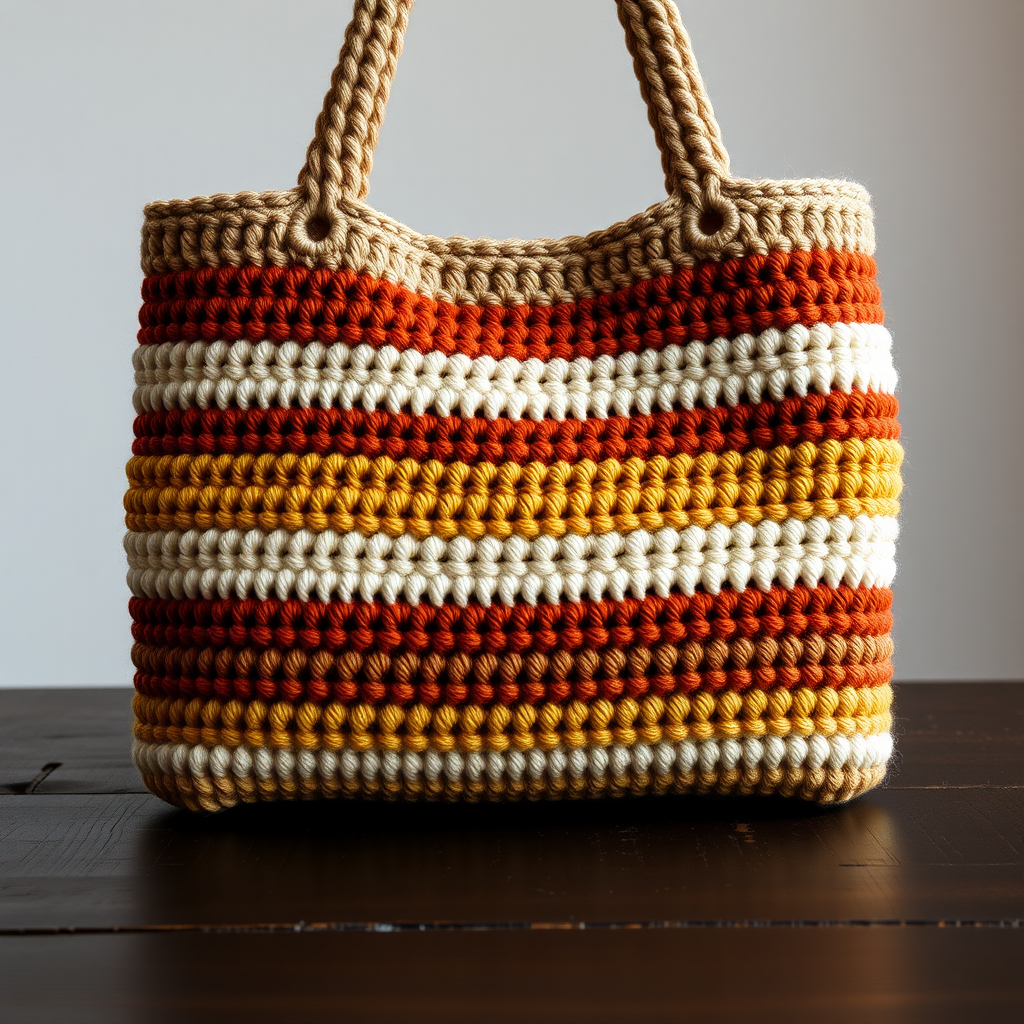
There's something magical about a handmade bag—it carries not just your belongings, but the time, care, and creativity you poured into it. Today, I'm thrilled to share a pattern that has captured my heart: the Wanderlust Woven Tote. This boho-chic accessory features a rich tapestry of earthy stripes in sand, terracotta, olive, mustard, and cream, creating a warm, sunset-inspired gradient that feels both modern and timeless.
What makes this tote truly special is its deceptive simplicity. Worked entirely in single crochet with worsted-weight cotton yarn, it creates a dense, sturdy fabric with a subtle woven appearance that looks far more complex than it actually is. Whether you're heading to the farmer's market, the beach, or your favorite coffee shop, this bag is the perfect companion for your daily adventures.
This free pattern is designed with beginners in mind, yet offers enough visual interest to satisfy experienced crocheters looking for a quick, satisfying project. The structured shape, flat bottom, and sturdy handles make it as functional as it is beautiful. Let's dive in and create something wonderful together!
Materials Needed
Before we begin our crochet journey, let's gather all the supplies you'll need. Having everything prepared beforehand ensures a smooth, enjoyable crafting experience.
Yarn
- Worsted weight cotton yarn in 5 beautiful colors:
- Color A (Sand): Approximately 300 yards
- Color B (Terracotta): Approximately 125 yards
- Color C (Olive): Approximately 125 yards
- Color D (Mustard): Approximately 125 yards
- Color E (Cream): Approximately 125 yards
- Total yarn needed: Approximately 800 yards
Pro tip: Cotton yarn is ideal for this project because it's durable, washable, and holds its shape beautifully. Look for brands like Lily Sugar'n Cream, Lion Brand 24/7 Cotton, or Paintbox Yarns Cotton Aran for excellent stitch definition.
Hook and Notions
- 5.0 mm (H) crochet hook—or size needed to obtain gauge
- Yarn needle for weaving in ends and seaming
- Scissors
- Stitch markers (optional, but helpful for keeping track of rows)
- Measuring tape
Gauge
- 16 single crochet stitches x 18 rows = 4 x 4 inches
Always check your gauge before starting! If your swatch is too small, try a larger hook. If it's too large, switch to a smaller hook. Getting the right gauge ensures your bag will be the perfect size.
Step-by-Step Instructions
Now for the exciting part—let's create your Wanderlust Woven Tote! This pattern is worked in one continuous piece, then folded and seamed to create the bag shape. Follow along carefully, and you'll have a beautiful tote in no time.
Understanding the Pattern Structure
The bag body is worked flat in rows of single crochet. You'll create a long rectangle that will be folded to form the front panel, bottom, and back panel of your tote. The color changes create beautiful horizontal stripes that give the bag its distinctive woven look.
Bag Body (Worked in One Piece, Then Folded)
Foundation and Front Panel
Foundation Chain: With Color A (Sand), make a slip knot and chain 46 stitches. Take your time to ensure your chain is not too tight—you want it to have the same tension as your regular stitches.
Row 1: Single crochet (sc) in the 2nd chain from your hook. Continue working 1 sc in each chain across. You should have 45 single crochet stitches total. Chain 1 and turn your work.
Rows 2-10: Chain 1, then work 1 sc in each stitch across. Turn at the end of each row. (45 sc)
These first 10 rows in Sand will form the top border of your front panel. Keep your tension consistent—not too tight, not too loose—for a beautiful, even fabric.
First Stripe Sequence
Row 11 (Color Change): Switch to Color B (Terracotta). To change colors cleanly, work the last stitch of Row 10 until you have 2 loops left on your hook, then yarn over with Color B and pull through both loops to complete the stitch. Chain 1 and turn. Work 1 sc in each stitch across. (45 sc)
Rows 12-14: Continue with Color B. Chain 1, sc in each stitch across. Turn. (45 sc)
Row 15 (Color Change): Switch to Color C (Olive) using the same color change technique. Chain 1, sc in each stitch across. Turn. (45 sc)
Rows 16-18: Continue with Color C. Chain 1, sc in each stitch across. Turn. (45 sc)
Row 19 (Color Change): Switch to Color D (Mustard). Chain 1, sc in each stitch across. Turn. (45 sc)
Rows 20-22: Continue with Color D. Chain 1, sc in each stitch across. Turn. (45 sc)
Row 23 (Color Change): Switch to Color E (Cream). Chain 1, sc in each stitch across. Turn. (45 sc)
Rows 24-26: Continue with Color E. Chain 1, sc in each stitch across. Turn. (45 sc)
You've now completed the front panel of your bag! The Cream section will become the bottom of your tote when we fold it later.
Bottom Section
Row 27 (Color Change): Switch back to Color A (Sand). Chain 1, sc in each stitch across. Turn. (45 sc)
Rows 28-36: Continue with Color A. Chain 1, sc in each stitch across. Turn. (45 sc)
This Sand section will form the bottom interior of your bag, providing extra durability where you need it most.
Back Panel and Second Stripe Sequence
Row 37 (Color Change): Switch to Color B (Terracotta). Chain 1, sc in each stitch across. Turn. (45 sc)
Rows 38-40: Continue with Color B. Chain 1, sc in each stitch across. Turn. (45 sc)
Row 41 (Color Change): Switch to Color C (Olive). Chain 1, sc in each stitch across. Turn. (45 sc)
Rows 42-44: Continue with Color C. Chain 1, sc in each stitch across. Turn. (45 sc)
Row 45 (Color Change): Switch to Color D (Mustard). Chain 1, sc in each stitch across. Turn. (45 sc)
Rows 46-48: Continue with Color D. Chain 1, sc in each stitch across. Turn. (45 sc)
Row 49 (Color Change): Switch to Color E (Cream). Chain 1, sc in each stitch across. Turn. (45 sc)
Rows 50-52: Continue with Color E. Chain 1, sc in each stitch across. Turn. (45 sc)
Row 53 (Color Change): Switch to Color A (Sand). Chain 1, sc in each stitch across. Turn. (45 sc)
Rows 54-62: Continue with Color A. Chain 1, sc in each stitch across. Turn. (45 sc)
After completing Row 62, fasten off your yarn, leaving a tail of about 6 inches to weave in later.
Congratulations! You've completed the entire body of your tote. Take a moment to admire your beautiful striped rectangle—it should measure approximately 11 inches wide by 31 inches long.
Seaming the Bag
Now comes the magical transformation from rectangle to tote bag. This is where your bag takes shape!
Step 1: Fold Your Work
Lay your crocheted rectangle flat with the right side facing up. Fold it in half so that the two Sand-colored sections (Rows 2-10 and Rows 54-62) meet at the top. The Cream section (Rows 23-26) should be at the bottom fold, and the Cream section (Rows 49-52) should be at the top fold.
Wait—let me clarify this folding process more carefully:
Your rectangle has this stripe sequence from top to bottom:
Sand (Rows 1-10) → Terracotta (11-14) → Olive (15-18) → Mustard (19-22) → Cream (23-26) → Sand (27-36) → Terracotta (37-40) → Olive (41-44) → Mustard (45-48) → Cream (49-52) → Sand (53-62)
Fold the rectangle so that the Sand section from Rows 1-10 meets the Sand section from Rows 53-62. This means the Cream section from Rows 23-26 will be at the bottom of your bag, and the Cream section from Rows 49-52 will be at the top of the back panel.
Step 2: Seam the Sides
With your piece folded, thread your yarn needle with Color A (Sand). Starting at the top edge of one side, whip stitch or slip stitch the side seams together, working from the top edge down to the bottom fold. Use a sturdy stitch to ensure your bag can hold its contents securely.
Repeat on the other side to close the second seam. Leave the top opening completely open—this is where you'll access your bag!
Pro tip: When seaming, match your stitches carefully to keep the stripes aligned perfectly on both sides of your bag. This attention to detail will make your tote look professionally made.
Bag Top Edging
Adding a neat edging around the top opening gives your bag a polished finish and helps it maintain its shape.
Step 1: Attach Color A (Sand) to the top edge of the front panel with a slip stitch.
Step 2: Chain 1, then work single crochet stitches evenly around the entire top opening. Work 1 sc in each row-end stitch along both the front and back panels. When you reach the side seams, work 1 sc in each seam stitch to keep the edge neat.
Step 3: When you've worked your way around the entire opening, join with a slip stitch to the first single crochet. Fasten off and weave in the end.
This edging not only looks beautiful but also reinforces the top of your bag, preventing stretching and wear over time.
Handles (Make 2)
Your tote needs sturdy, comfortable handles to carry all your essentials. These simple straps are quick to make and incredibly strong.
Handle Row 1: With Color A (Sand), chain 8 stitches. Single crochet in the 2nd chain from your hook, then work 1 sc in each remaining chain across. You should have 7 single crochet stitches. Chain 1 and turn.
Handle Rows 2-50: Chain 1, work 1 sc in each stitch across. Turn at the end of each row. (7 sc)
After completing Row 50, fasten off, leaving a long tail of approximately 12 inches for sewing the handle to the bag.
Repeat to create the second handle. Each handle should measure approximately 12-13 inches long, perfect for carrying over your shoulder or in your hand.
Attaching the Handles
Proper handle placement is crucial for a balanced, comfortable bag. Follow these steps carefully:
Step 1: Fold each handle in half to find its center point. Mark this with a stitch marker or a piece of contrasting yarn.
Step 2: Position the first handle on the front panel of your bag. Place the ends approximately 3 inches in from each side seam. The center of the handle should align with the center of the front panel.
Step 3: Using the long tail left from the handle, sew the handle ends securely to the bag. Work through both the handle and the bag fabric, creating a strong, reinforced attachment. Make several passes through each end to ensure durability.
Step 4: Repeat the process to attach the second handle to the back panel of the bag, ensuring it aligns with the first handle.
For extra security, you can reinforce the handle attachment by working a few extra stitches in a figure-eight pattern over the attachment point.
Finishing Touches
Your Wanderlust Woven Tote is almost complete! These final steps will ensure your bag looks beautiful and lasts for years to come.
Step 1: Weave in All Ends
Using your yarn needle, carefully weave in all loose ends from your color changes and seams. Work the ends through the wrong side of the fabric, following the path of your stitches to hide them completely. Trim any excess yarn.
Step 2: Block Your Bag (Optional but Recommended)
To give your bag a professional, polished look, consider blocking it. Gently wet your bag with cool water, squeeze out excess moisture (don't wring!), and lay it flat on a towel. Shape it to your desired dimensions and allow it to dry completely. This will help even out your stitches and give the bag a beautiful, structured shape.
Step 3: Add a Fabric Lining (Optional)
While this cotton bag is sturdy on its own, adding a fabric lining can provide extra durability and prevent small items from slipping through the stitches. Cut a piece of cotton fabric to fit the interior of your bag, leaving a seam allowance. Sew the lining, insert it into the bag, and hand-stitch it to the top edging.
Care Instructions
To keep your Wanderlust Woven Tote looking its best:
- Hand wash in cool water with mild detergent
- Lay flat to dry, reshaping as needed
- Do not machine wash or tumble dry
- Iron on low heat if needed, using a pressing cloth
Customization Ideas
One of the joys of crochet is making a pattern your own. Here are some ways to personalize your tote:
- Change the color palette: Swap the earthy tones for ocean blues, pastel pinks, or bold jewel tones to match your personal style
- Adjust the size: Chain more or fewer stitches to make a wider or narrower bag, or work more rows for a taller tote
- Add a pocket: Crochet a small rectangle and sew it to the front or interior for extra organization
- Try different handles: Make longer handles for shoulder carry, or work a continuous round handle for a different look
- Embellish: Add tassels, wooden beads, or embroidery to make your bag truly unique
Final Thoughts
I hope you've enjoyed creating your very own Wanderlust Woven Tote! This pattern is more than just instructions—it's an invitation to slow down, enjoy the rhythmic motion of crochet, and create something beautiful with your own two hands. The earthy stripes and sturdy construction make this bag a versatile accessory you'll reach for again and again.
Remember, every stitch you make carries your unique energy and intention. Whether this is your first crochet bag or your fiftieth, take pride in your creation. Share your finished tote with our crafting community—we'd love to see your color choices and any creative modifications you've made!
Happy crocheting, and may your new tote carry you on many wonderful