Luminous Lotus Evening Bag Free Crochet Pattern
Luminous Lotus Evening Bag: A Free Crochet Pattern for a Show-Stopping Clutch
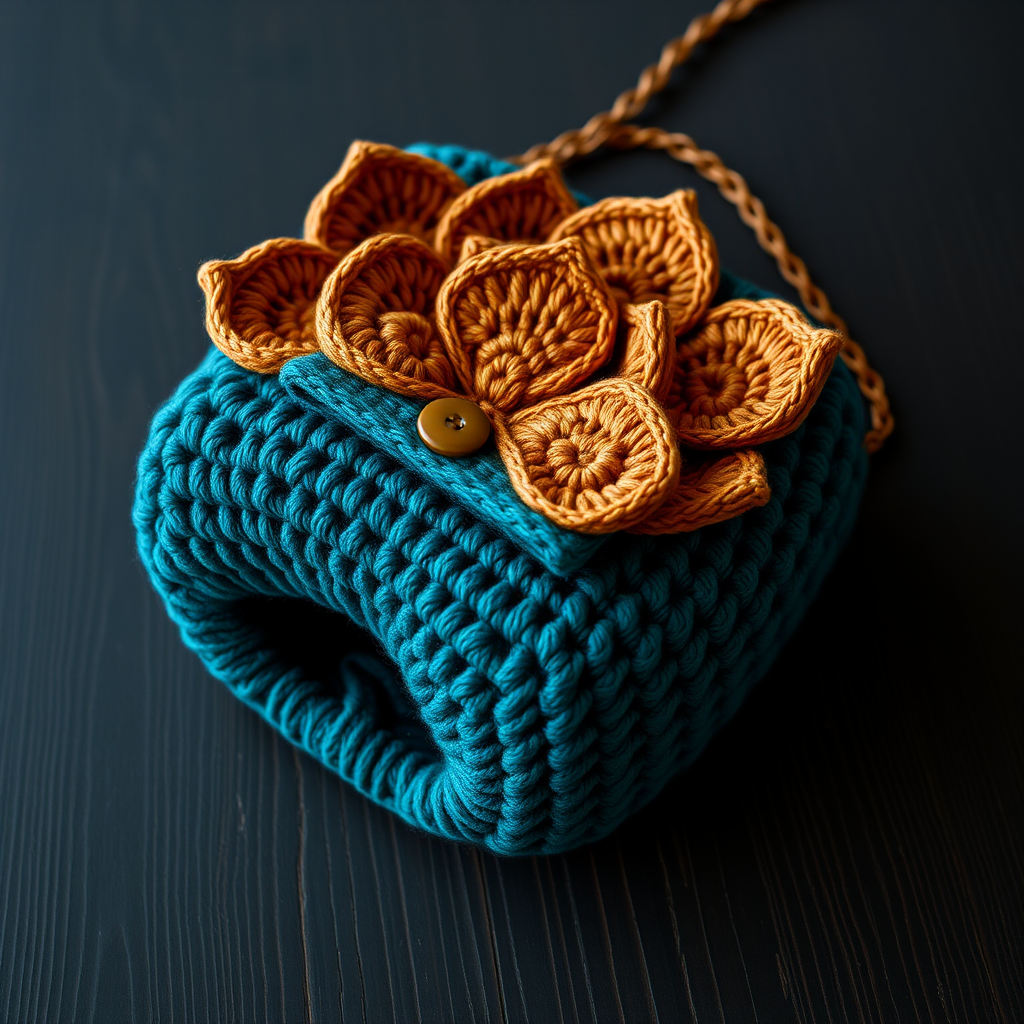
Imagine carrying a piece of twilight in your hands—a rich, deep teal clutch that blooms with dimensional, shimmering petals. That's the magic of the Luminous Lotus Evening Bag. This free crochet pattern is designed to guide you through creating a structured yet soft accessory that will elevate any outfit, from a casual dinner to a formal gala. With its textured lotus petals and elegant color contrast, this handmade bag is more than an accessory; it's a statement of artistry and craftsmanship. Whether you're a seasoned crocheter looking for a unique project or a confident beginner ready for a challenge, this pattern offers a rewarding journey and a stunning result.
Materials Needed: Gathering Your Twilight Palette
Before you begin, ensure you have all the necessary supplies. The quality of your materials will directly impact the final look and durability of your bag. Here’s what you'll need:
- Yarn: Worsted weight cotton or cotton-blend yarn. You will need approximately 200 yards in a deep teal (main color) and 50 yards in gold or copper (accent color). The cotton content provides structure and stitch definition, perfect for a bag.
- Crochet Hook: A D/3 (3.25 mm) crochet hook. This smaller hook size ensures a tight, dense fabric that holds its shape well.
- Notions: A yarn needle for weaving in ends and sewing pieces together, a stitch marker to track your rounds, and a decorative button or snap for the closure.
- Optional: Blocking mats and pins to shape the final piece.
Gauge: For best results, match the gauge: 4 double crochets (dc) = 1 inch; 2 rows of dc = 1 inch. While gauge isn't critical for a bag's fit, it affects the overall size and drape.
Step-by-Step Instructions: Crafting Your Lotus
This pattern is broken down into three main parts: the base and body, the decorative petals, and the final assembly. Follow each step carefully, and you'll have a beautiful bag in no time.
Part 1: The Base and Body (Worked in Continuous Rounds)
We'll start by creating the circular base of the bag, which will then flare up to form the body. Note: Rounds 1-8 are worked in a spiral without joining, so use a stitch marker to mark the beginning of each round.
- Round 1: With your main color (deep teal), make a magic ring. Work 6 single crochets (sc) into the ring. Pull the tail tight to close the ring. (6 stitches)
- Round 2: Work 2 sc in each stitch around. (12 stitches)
- Round 3: *Sc in the next stitch, 2 sc in the next stitch*; repeat from * to * around. (18 stitches)
- Round 4: *Sc in the next 2 stitches, 2 sc in the next stitch*; repeat around. (24 stitches)
- Round 5: *Sc in the next 3 stitches, 2 sc in the next stitch*; repeat around. (30 stitches)
- Round 6: *Sc in the next 4 stitches, 2 sc in the next stitch*; repeat around. (36 stitches)
- Round 7: *Sc in the next 5 stitches, 2 sc in the next stitch*; repeat around. (42 stitches)
- Round 8: *Sc in the next 6 stitches, 2 sc in the next stitch*; repeat around. (48 stitches) – This completes the flat base.
- Round 9: Now we create a crisp edge. Working in the back loops only, sc in each stitch around. (48 stitches) This helps the bag stand up straight.
- Rounds 10-20: Sc in each stitch around for 11 rounds. (48 stitches each round) The fabric will naturally curl upward to form the cylindrical body of the bag. Keep your stitch marker in place.
Part 2: Creating the Flap (Worked in Rows)
Now we will work back and forth to create the flap that folds over the top of the bag.
- Round 21: Chain 1 and turn your work. Sc in the next 24 stitches. Chain 1 and turn. (24 stitches) You are now working on a flat panel.
- Rows 22-30: Sc in each stitch across (24 stitches). Chain 1 and turn at the end of each row. Repeat this for 9 more rows. After Row 30, fasten off and weave in the yarn end securely.
Part 3: The Luminous Lotus Petals (Make 5)
These petals are the heart of the design, adding texture and shimmer. Switch to your accent color (gold/copper).
- Round 1: Make a magic ring. Work 6 sc into the ring. Pull tight. (6 stitches)
- Round 2: 2 sc in each stitch around. (12 stitches)
- Round 3: *Sc in the next stitch, 2 sc in the next stitch*; repeat around. (18 stitches)
- Round 4: *Sc in the next 2 stitches, 2 sc in the next stitch*; repeat around. (24 stitches)
- Round 5: *Sc in the next 3 stitches, 2 sc in the next stitch*; repeat around. (30 stitches)
- Round 6: *Sc in the next 4 stitches, 2 sc in the next stitch*; repeat around. (36 stitches)
- Round 7 (Shaping): Sc in the next 6 stitches, half double crochet (hdc) in the next 6 stitches, double crochet (dc) in the next 12 stitches, hdc in the next 6 stitches, sc in the next 6 stitches. (36 stitches) This creates the rounded petal shape.
- Round 8 (Adding Width): Sc in the next 6 stitches, hdc in the next 6 stitches, *2 dc in the next stitch, dc in the next stitch*; repeat from * to * 6 times (this covers the center 12 stitches), hdc in the next 6 stitches, sc in the next 6 stitches. (42 stitches)
- Round 9 (Final Shaping): Sc in the next 6 stitches, hdc in the next 6 stitches, *2 dc in the next stitch, dc in the next 2 stitches*; repeat from * to * 6 times, hdc in the next 6 stitches, sc in the next 6 stitches. (48 stitches) Fasten off, leaving a long tail (approx. 12 inches) for sewing.
Part 4: Assembly and Finishing Touches
This is where your bag comes to life. Take your time to position the petals beautifully.
- Attaching the Petals: Position the 5 lotus petals on the front of the bag (opposite the flap). Arrange them in a fan shape, slightly overlapping each other, with the rounded edges pointing downward. The petals should cover the front from the base up to about 2 inches below the top edge. Using the long tails and a yarn needle, sew each petal securely to the bag body.
- Adding the Closure: Sew a decorative button or snap to the center of the flap. On the front of the bag (underneath the top edge of the petals), create a corresponding loop or sew on the other half of the snap so the flap can be secured neatly.
- Creating the Strap (Optional): For a simple, elegant strap, use your accent color to chain 120. Then, slip stitch into the second chain from the hook and into each chain across. Fasten off. Securely attach the ends of the strap to the inside edges of the bag at the sides.
- Final Steps: Weave in all remaining yarn ends carefully. If desired, lightly block the bag to help it hold its shape. To do this, mist it with water and shape it gently, allowing it to dry completely.
Your Luminous Lotus Evening Bag is now complete! This project is a beautiful way to practice shaping and seaming while creating a unique, wearable piece of art. The combination of the deep teal and shimmering gold creates an accessory that truly captures the essence of a blooming lotus at dusk. Enjoy your new handmade treasure, and don't be surprised if it becomes your new favorite conversation starter.