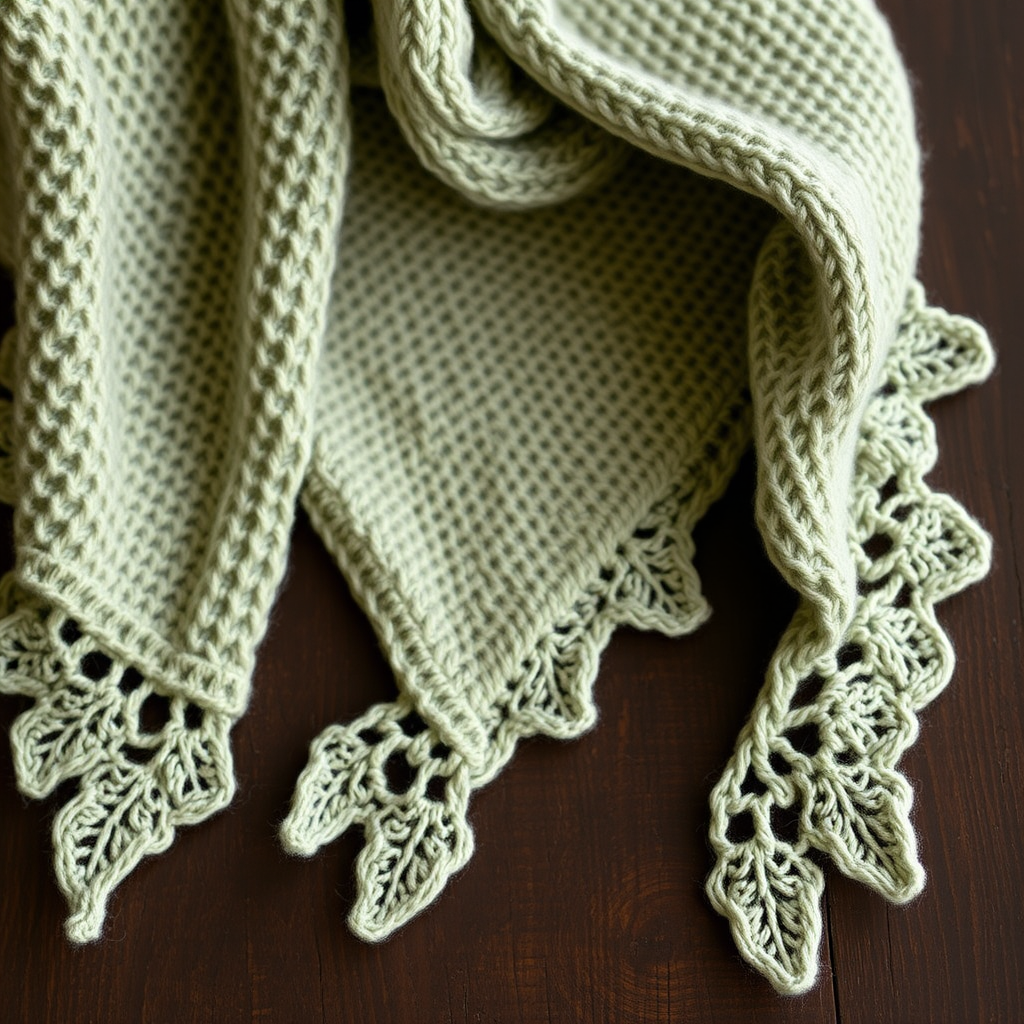
Serenity Stonewash Healing Shawl Wrap Free Pattern – A Knitted River Stone Embrace

Serenity Stonewash Healing Shawl Wrap Free Pattern – A Knitted River Stone Embrace
Wrap yourself in the calming embrace of smooth, river-washed stones with this uniquely textured healing shawl. The soothing, meditative rhythm of the stitch pattern makes this wrap as therapeutic to create as it is to wear. Whether you're seeking a mindful knitting project or a cozy, organic accessory for cool evenings, this crescent-shaped shawl delivers both beauty and tranquility. The subtle pebbled texture and delicate eyelet holes evoke the serenity of a peaceful riverbed, while the gradient color transition from soft sage green to misty blue-grey and warm sand creates a stunning, earthy aesthetic.
This free knitting pattern is perfect for intermediate beginners who have mastered basic stitches and are ready to explore increases, decreases, and a repeating lace-like texture. The rhythmic 4-row repeat is meditative once established, making it an ideal project for relaxation and mindfulness. Let's dive into creating your very own Serenity Stonewash Healing Shawl.
Materials Needed
Before you begin, gather the following materials to ensure a smooth knitting experience:
Yarn
- Worsted weight yarn in 3 complementary colors:
- Color A (Soft Sage Green): 400 yards (366 meters)
- Color B (Misty Blue-Grey): 350 yards (320 meters)
- Color C (Warm Sand): 300 yards (274 meters)
- Suggested yarn: Lion Brand Wool-Ease Worsted or similar worsted weight yarn that provides good stitch definition and softness.
Needles
- US Size 8 (5.0 mm) circular knitting needle, 32 inches (80 cm) or longer, to accommodate the increasing number of stitches as the shawl grows.
- Alternatively, use the needle size needed to obtain the correct gauge.
Additional Supplies
- Stitch markers (at least 2)
- Yarn needle for weaving in ends
- Scissors
- Blocking mats and pins (for finishing)
- Gentle wool wash (for blocking)
Gauge
- 18 stitches and 24 rows = 4 inches (10 cm) in stockinette stitch (after blocking).
- Gauge is important for achieving the correct drape and size. Always knit a swatch first to ensure your tension matches.
Step-by-Step Instructions
This shawl is worked from the top center down, increasing on each side to create a gentle, crescent-shaped drape. The stitch pattern mimics the smooth, rippled texture of stones worn by water. Follow these detailed instructions carefully, and you'll have a beautiful, textured wrap in no time.
Abbreviations
- CO: Cast on
- K: Knit
- P: Purl
- K2tog: Knit two stitches together (right-leaning decrease)
- SSK: Slip, slip, knit (slip two stitches knitwise, one at a time, then knit them together through the back loop – left-leaning decrease)
- YO: Yarn over (creates an eyelet hole and increases stitch count)
- PM: Place marker
- SM: Slip marker
- RS: Right side (the front of the work)
- WS: Wrong side (the back of the work)
Pattern Notes
- The shawl is worked flat, back and forth, on a circular needle to accommodate the increasing number of stitches.
- The center stitch is marked with a marker; increases are made on both sides of this marker on every RS row.
- The 'Stonewash Stitch' is a 4-row repeat that creates a subtle, pebbled texture with delicate eyelet holes.
- Always maintain the first and last stitch as a knit stitch (edge stitch) for a clean, finished edge.
- On WS rows, you will always knit the first and last stitch and purl all stitches in between.
Setup Rows
CO 3 stitches.
Row 1 (RS): K1, YO, K1, YO, K1. (5 stitches)
Explanation: This row creates the initial increases that will form the top edge of the shawl. The yarn overs add two stitches, bringing your total to 5.
Row 2 (WS): K1, P to last stitch, K1. (5 stitches)
Explanation: Knit the first stitch (edge), purl all stitches until the last stitch, then knit the last stitch (edge). This establishes the edge stitch pattern.
Row 3 (RS): K1, YO, K1, YO, PM, K1, YO, K1, YO, K1. (9 stitches)
Explanation: This row sets up the center marker. You'll knit the edge stitch, then work increases around the center stitch. Place a marker before the center stitch. After the marker, knit the center stitch, then work the remaining increases and edge stitch.
Row 4 (WS): K1, P to last stitch, K1. (9 stitches)
Explanation: Same as Row 2 – knit edge, purl all, knit edge.
Row 5 (RS): K1, YO, K to marker, YO, SM, K1, YO, K to last stitch, YO, K1. (13 stitches)
Explanation: This row establishes the increase pattern that will continue throughout the shawl. Knit edge, yarn over, knit to the marker, yarn over, slip marker, knit the center stitch, yarn over, knit to the last stitch, yarn over, knit edge. You've increased 4 stitches total (2 on each side of the center).
Row 6 (WS): K1, P to last stitch, K1. (13 stitches)
Explanation: Same as Row 2.
Begin Stonewash Stitch Pattern
Now you'll begin the main body of the shawl with the Stonewash Stitch pattern. This is a 4-row repeat (Rows 7-14) that creates the beautiful pebbled texture. Each RS row increases 4 stitches (2 on each side of the center marker).
Row 7 (RS): K1, YO, *K2, K2tog, YO, K1, YO, SSK, K1*; repeat from * to * until 2 stitches before marker, K2, YO, SM, K1, YO, *K2, K2tog, YO, K1, YO, SSK, K1*; repeat from * to * until 2 stitches before last stitch, K2, YO, K1. (Increase 4 stitches: 2 on each side)
Explanation: This row introduces the eyelet pattern. The sequence *K2, K2tog, YO, K1, YO, SSK, K1* creates a balanced pattern with decreases and yarn overs that form small holes. Work this sequence across the row, maintaining the edge stitches and center increases. The yarn overs before and after the marker add the necessary increases.
Row 8 (WS): K1, P to last stitch, K1.
Explanation: Standard WS row – knit edge, purl all, knit edge.
Row 9 (RS): K1, YO, *K1, YO, SSK, K1, K2tog, YO*; repeat from * to * until 1 stitch before marker, K1, YO, SM, K1, YO, *K1, YO, SSK, K1, K2tog, YO*; repeat from * to * until 1 stitch before last stitch, K1, YO, K1. (Increase 4 stitches)
Explanation: This row shifts the pattern slightly, creating the staggered pebble effect. The sequence *K1, YO, SSK, K1, K2tog, YO* is worked across. Notice how the decreases and yarn overs are positioned differently than Row 7, which creates the organic, stone-like texture.
Row 10 (WS): K1, P to last stitch, K1.
Explanation: Standard WS row.
Row 11 (RS): K1, YO, *K2tog, YO, K3, YO, SSK*; repeat from * to * until 2 stitches before marker, K2, YO, SM, K1, YO, *K2tog, YO, K3, YO, SSK*; repeat from * to * until 2 stitches before last stitch, K2, YO, K1. (Increase 4 stitches)
Explanation: This row features a different arrangement with K3 in the center of the sequence. The pattern *K2tog, YO, K3, YO, SSK* creates a wider eyelet opening. Work this across, maintaining the edge and center increases.
Row 12 (WS): K1, P to last stitch, K1.
Explanation: Standard WS row.
Row 13 (RS): K1, YO, *K3, YO, SSK, K2tog, YO*; repeat from * to * until 3 stitches before marker, K3, YO, SM, K1, YO, *K3, YO, SSK, K2tog, YO*; repeat from * to * until 3 stitches before last stitch, K3, YO, K1. (Increase 4 stitches)
Explanation: This row completes the 4-row pattern cycle. The sequence *K3, YO, SSK, K2tog, YO* mirrors Row 11 but with the decreases positioned differently. This completes one full repeat of the Stonewash Stitch.
Row 14 (WS): K1, P to last stitch, K1.
Explanation: Standard WS row.
Repeating the Pattern
Repeat Rows 7-14 for the Stonewash Stitch pattern, continuing to increase 4 stitches every RS row. Work in this pattern for approximately 12 inches (30 cm) from the cast-on edge, or until the shawl measures your desired width, ending with a WS row.
Pro Tip: As the shawl grows, the stitch count will increase significantly. The circular needle allows you to accommodate all stitches comfortably. Take breaks to admire your progress – the texture develops beautifully with each repeat!
Color Transitions
To achieve the beautiful gradient effect of the Serenity Stonewash Shawl, follow this color sequence:
- First 4 inches (10 cm): Work in Color A (Soft Sage Green).
- Next 4 inches (10 cm): Switch to Color B (Misty Blue-Grey).
- Final 4 inches (10 cm): Switch to Color C (Warm Sand).
For a smooth, gradient-like transition: Instead of switching colors abruptly, you can alternate colors for a few rows before fully switching. For example:
- Knit 2 rows with Color A, then 2 rows with Color B, then 2 rows with Color B, 2 rows with Color C before fully committing to the new color.
- This creates a subtle blending effect that mimics the natural transition of colors in a riverbed.
When changing colors: Leave a tail of about 6 inches (15 cm) when joining a new color. Weave in ends later during finishing.
Edging
After completing the main body of the shawl, work the following delicate eyelet edging:
Row 1 (RS): K1, *YO, K2tog*; repeat from * to * until last stitch, K1.
Explanation: This row creates a beautiful, lacy edge. Knit the edge stitch, then repeat (yarn over, knit two together) across the row. This creates a series of eyelet holes along the edge. End with the final edge stitch.
Row 2 (WS): K1, P to last stitch, K1.
Explanation: Standard WS row – knit edge, purl all, knit edge.
Row 3 (RS): Bind off loosely knitwise. Weave in all ends.
Explanation: Bind off all stitches knitwise, being careful not to bind off too tightly – this ensures the edge remains stretchy and drapes beautifully. Use a yarn needle to weave in all loose ends securely.
Blocking
Blocking is essential for this shawl to open up the stitch pattern and achieve the proper drape and shape. Follow these steps:
- Soak: Submerge the shawl in lukewarm water with a gentle wool wash for 20 minutes. This allows the fibers to relax and the stitches to even out.
- Gently squeeze: Carefully squeeze out excess water. Do not wring or twist – this can felt or distort the yarn.
- Roll in towel: Lay the shawl flat on a clean, dry towel and roll it up. Press gently to remove additional water.
- Pin out to shape: Lay the shawl on blocking mats. Pin out the shape, stretching the points gently to accentuate the crescent shape. Pay special attention to the top edge and the bottom curve.
- Allow to dry completely: Leave the shawl pinned until it is completely dry, typically 24-48 hours depending on humidity.
Once dry, unpin and enjoy your beautiful Serenity Stonewash Healing Shawl Wrap!
Final Thoughts
This shawl is more than just a knitting project – it's a journey of mindfulness and creativity. The rhythmic stitch pattern, the soothing color transitions, and the organic texture all come together to create a piece that feels like a gentle embrace. Whether you're knitting it for yourself or as a gift for someone special, the Serenity Stonewash Healing Shawl is sure to bring warmth and calm to any moment.
Happy knitting, and may your stitches bring you peace and serenity!