Retro Pumpkin Patch Cocoon: Free Crochet Pattern with Join-As-You-Go Collar
Retro Pumpkin Patch Cocoon: A Beginner-Friendly Photo Prop
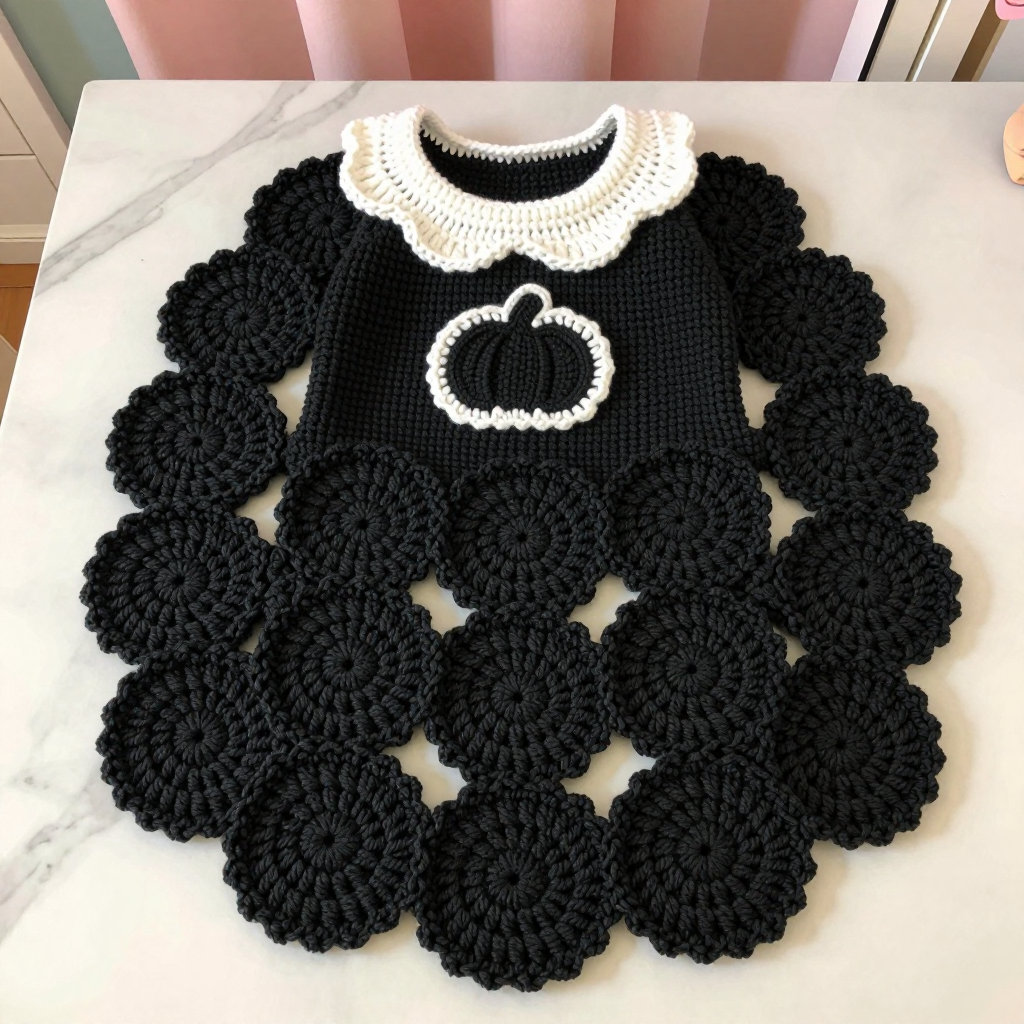
If you have never held a crochet hook before, this is the perfect first big project for you. The Retro Pumpkin Patch Cocoon is built from one simple circular motif that you repeat over and over, then join together as you go into a soft, stretchy tube. It is special because every single piece is small and finishable, so you get a little win every time you complete a motif, and the finished cocoon looks like a cozy black-and-white pumpkin patch keepsake. The finished cocoon is a snug 18-inch tube made of matte sport-weight cotton, with interlocking petal edges that feel soft and slightly bumpy in the loveliest way, a crisp white collar band at the top, and a flat little pumpkin badge sewn at the front. It is made for laying a newborn in for photos, not for wearing, so it stays simple, safe, and sweet.
Materials Needed
- Yarn: Sport weight cotton yarn (CYC category 2 / fine), approximately 350 yards total: 250 yards black (Color A) and 100 yards white (Color B).
- Hook: 3.5 mm (US E/4) crochet hook.
- Stitch marker (one or more) to mark your first stitch or your join points.
- Tapestry needle (a big blunt needle with a large eye) for weaving in ends and sewing on the badge.
- Scissors for cutting yarn.
- Finished size: approximately 18 in (46 cm) long and 11 in (28 cm) around the body, with a 9 in (23 cm) collar opening. This is a newborn photo prop size.
Abbreviations and Beginner Glossary
Every abbreviation used in this pattern is listed here in plain English. Read this once before you start, and come back any time you feel stuck.
- ch – chain. Make a loop of yarn on your hook, wrap yarn over the hook, and pull it through the loop. That is one chain.
- sl st – slip stitch. Insert your hook into the stitch, wrap yarn over, and pull it through both the stitch and the loop on your hook at the same time. It makes a tiny, flat join.
- sc – single crochet. Insert hook into stitch, pull up a loop (2 loops on hook), yarn over, pull through both loops. One loop remains.
- hdc – half double crochet. Yarn over first, insert hook into stitch, pull up a loop (3 loops on hook), yarn over, pull through all 3 loops at once.
- dc – double crochet. Yarn over first, insert hook into stitch, pull up a loop (3 loops on hook), yarn over, pull through 2 loops, yarn over again, pull through the last 2 loops.
- tr – treble crochet. Yarn over twice, insert hook, pull up a loop, then pull through 2 loops three times. (This pattern does not use tr, but it is good to know.)
- sp – space. The little gap between stitches, usually made by a chain.
- st / sts – stitch / stitches. One completed loop-and-post in your fabric.
- beg – beginning. The start of a round.
- rep – repeat. Do the same thing again.
- yo – yarn over. Wrap the working yarn over your hook from back to front.
- magic ring – an adjustable loop you make with yarn, then crochet into, then pull tight so there is no hole in the center.
- join – connect the last stitch of a round to the first stitch with a slip stitch so the round closes into a circle.
- fasten off – cut the yarn, pull the tail all the way through the last loop, and tighten.
- weave in ends – thread a yarn tail onto a tapestry needle and sew it back and forth through the back of the fabric so it disappears.
Gauge
Gauge: One finished circular motif = 2.75 in (7 cm) in diameter. Four rounds of the motif = 1 in (2.5 cm).
Gauge matters because it tells you whether your cocoon will come out the size written here. If your motifs are bigger than 2.75 inches, the cocoon will be too large; if they are smaller, it will be too tight. To check your gauge, crochet one complete motif (Rounds 1–4) and lay it flat. Measure straight across the widest point. If it measures 2.75 inches, you are perfect. If it is too big, try a smaller hook (3.0 mm); if it is too small, try a larger hook (4.0 mm). Always make the swatch motif in the same yarn and hook you plan to use for the real thing.
Beginner Tips Before You Start
- Count out loud. Every round in this pattern has a stitch count in parentheses. Say the number as you finish each round so you never drift.
- Use a stitch marker. Place it in the first stitch of each round, or on the join point, so you always know where the round began.
- Do not pull your yarn too tight. Keep your loops relaxed and even. Tight tension makes the petals curl and the tube stiff.
- Make one practice motif first. Do a single motif in any scrap yarn before you commit to the black cotton. It teaches your hands the four rounds.
- Keep your tails long. Leave a 4-inch tail on every motif. Short tails are impossible to weave in later.
- Join as you go, one motif at a time. Do not make all 30 motifs loose and then try to sew them. Join each new motif to the previous ones as you finish Round 4.
Step-by-Step Instructions
Part 1: The Motif (make 24 in black, plus 6 in white)
Each motif is worked in the round from the center outward. You will make 24 black motifs for the body and 6 white motifs for the collar round.
Set up: With black (A) for body motifs, or white (B) for collar motifs, make a magic ring.
Rnd 1: Ch 3 (this counts as your first dc), then work 11 dc into the ring. Join with a sl st to the top of the beginning ch-3. (12 dc)
Rnd 2: Ch 3, dc in the same stitch, then 2 dc in each stitch around. Join with a sl st to the top of the beginning ch-3. (24 dc)
Rnd 3: Ch 1, sc in the same stitch, then [ch 2, skip 1 stitch, sc in the next stitch] 11 times, ch 2, join with a sl st to the first sc. (12 ch-2 spaces)
Rnd 4 (petal edging): Ch 1, then work [sc, hdc, dc, hdc, sc] into each ch-2 space around. Join with a sl st to the first sc. Fasten off, leaving a 4-inch tail. (12 petals)
Each motif measures approximately 2.75 in (7 cm) across. Make 24 black motifs and 6 white motifs.
Part 2: Join-As-You-Go Body Tube
The body is a tube of 4 motifs around by 6 rounds tall = 24 black motifs. You build it bottom-up, joining each new motif to its neighbors on Round 4 as you work the petals.
How to join a petal: When you reach a petal that touches a neighboring motif, work the petal as [sc, hdc, then instead of the center dc, work a sl st into the matching center dc of the neighboring motif's petal, then hdc, sc]. This replaces the center dc with a slip stitch join, so the petals lock together.
Round 1 of the tube: Join 4 black motifs into a ring, joining each motif to the one before it on Round 4 as described. Close the ring by joining the fourth motif to the first. (4 motifs joined)
Rounds 2–6 of the tube: For each new round, work 4 new black motifs and join each one to the round below, offsetting the joins so the petals interlock (place each new motif so its petals sit between the petals of the motif below). Join each motif to its left and right neighbor in the same round as well. (4 motifs per round; 24 black motifs total after Round 6)
Collar round (white): Join the 6 white motifs as the final top round, spacing them evenly around the 24-petal opening so that one white motif spans about 4 black petals. Join each white motif to the black round below and to its white neighbors. (6 white motifs; 30 motifs total)
Part 3: Collar Band (white)
With white (B), join yarn at any white motif join on the top edge.
Rnd 1: Ch 1, sc evenly around the top opening, working 1 sc in each petal tip and 1 sc in each join. Join with a sl st to the first sc. (approx. 60 sc)
Rnd 2: Ch 1, sc in each stitch around. Join with a sl st to the first sc. (60 sc)
Rnd 3: Ch 1, sc in each stitch around. Join with a sl st to the first sc. Fasten off and weave in ends. (60 sc) The collar opening measures approximately 9 in (23 cm) around.
Part 4: Pumpkin Badge (flat appliqué)
With black (A), make a magic ring.
Rnd 1: Ch 2, work 9 hdc into the ring. Join with a sl st to the top of the beginning ch-2. (10 hdc)
Rnd 2: Ch 2, hdc in the same stitch, then 2 hdc in each stitch around. Join with a sl st. (20 hdc)
Rnd 3: Ch 1, sc in each stitch around. Join with a sl st. (20 sc)
Rnd 4 (white edge): Change to white (B), ch 1, then work [sc, ch 2, sc] in each stitch around to form a scalloped white edge. Join with a sl st. Fasten off. (20 scallops)
Stem: With black (A), ch 4, sl st in the 2nd ch from hook, sc in the next ch, sl st in the last ch. Fasten off. Sew the stem to the top center of the pumpkin. The badge measures approximately 3 in (7.5 cm) across.
Assembly and Finishing
Sewing on the badge: Pin the pumpkin badge to the front center of the cocoon, about 4 in (10 cm) below the collar. Thread a tapestry needle with black thread or a strand of black yarn and sew through the back of the badge only, catching the cocoon fabric underneath. Do not sew through the front of the badge, so the stitches stay hidden.
Weaving in ends: Thread each yarn tail onto your tapestry needle and sew it back and forth through the back of the fabric for about 1 inch, then snip close. Never knot your ends; weaving hides them better and feels smoother against baby.
Blocking: Gently steam-block the cocoon to open the petals. Hold a steam iron about 2 inches above the fabric and let the steam relax the cotton, then pat the petals flat with your fingers and let it dry completely. Do not use a hot iron directly on cotton motifs — it will flatten the texture and can scorch the yarn.
Pro Tips and Variations
- Change the colors: Swap the black body for deep purple or forest green and keep the white collar for a different seasonal look. The pumpkin badge can become an apple or a ghost with the same circle shape.
- Adjust the size: For a larger cocoon, add one more round of 4 motifs to the body (28 motifs total) and add 4 more white collar motifs. For a smaller prop, remove one body round.
- Substitute yarn: Any sport-weight cotton works. Avoid fuzzy or slippery yarns for your first try, because they make the join-as-you-go petals harder to see.
- Make it a set: Work a matching small pumpkin badge as a separate photo prop, or make a second cocoon in cream and white for a soft neutral option.