Chevron Cube Cuddle Cocoon Free Crochet Pattern
Introduction
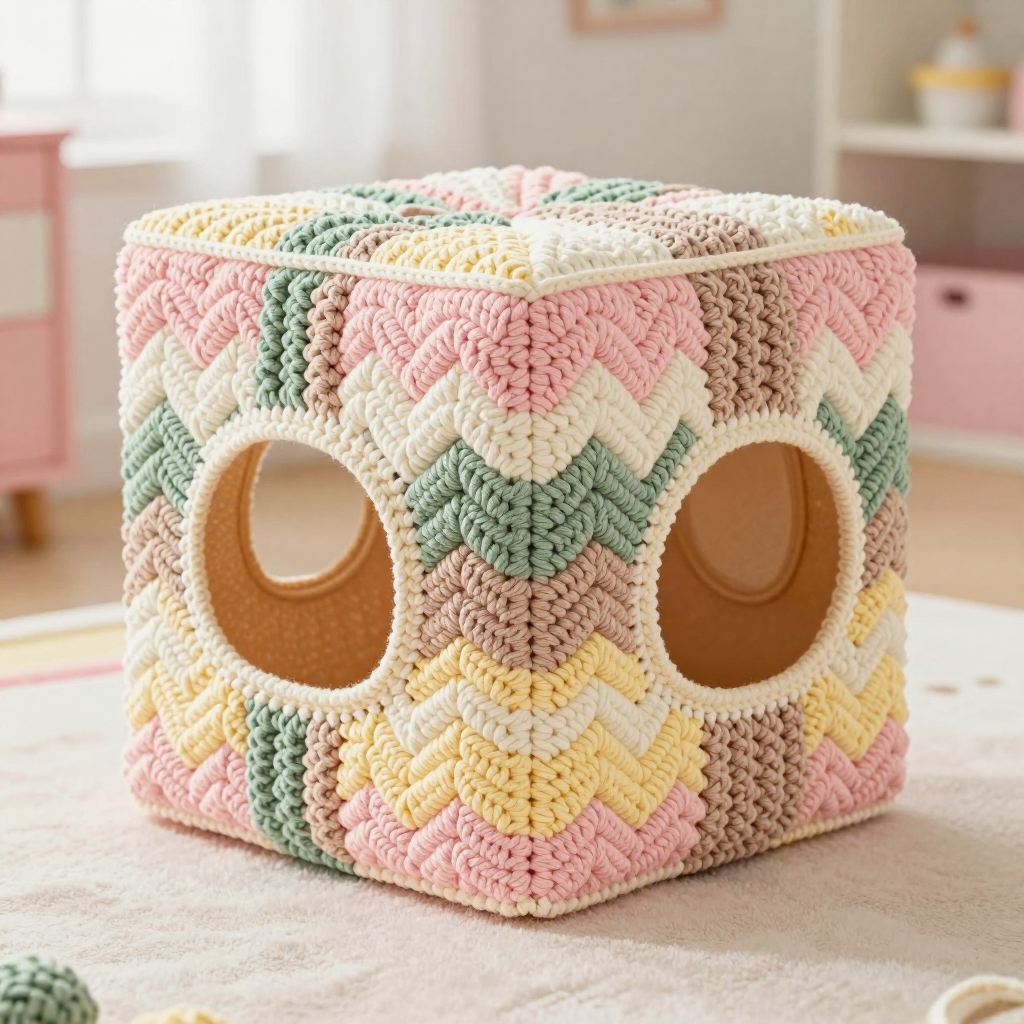
Welcome to the Chevron Cube Cuddle Cocoon — a soft, squishy, cube-shaped hug for a baby or toddler. If you have never crocheted before, this is a wonderful first "big" project because it is built from six identical flat panels. You will learn one repeating zigzag stitch, make it six times, and then join the pieces into a cube. The finished cocoon measures about 30 cm (12 in) on every side, with two open faces: one for the face and two small side openings for little hands. Made in DK merino stripes of blush, cream, sage, oatmeal and butter yellow, it feels like a cloud and looks like a modern photo prop or a cozy cuddle sack.
Materials Needed
- Yarn: DK weight (light worsted) merino wool, approx. 100 g / 220 m per skein. Total approx. 380–420 g.
- Colors: A = pale blush pink (1 skein), B = soft cream (1 skein), C = muted sage green (1 skein), D = warm oatmeal beige (1 skein), E = pale butter yellow (1 skein).
- Main hook: 4.0 mm (US G/6) crochet hook.
- Edging hook: 3.5 mm (US E/4) crochet hook.
- Stitch markers (at least 8) to mark peaks, valleys and openings.
- Tapestry needle (blunt, large eye) for weaving in ends.
- Scissors.
- Finished size: cube approx. 30 cm x 30 cm x 30 cm (12 in x 12 in x 12 in); each panel approx. 30 cm x 30 cm (12 in x 12 in).
Abbreviations and Beginner Glossary
- ch – chain: yarn over the hook, pull the loop through the loop on your hook. This makes a small loop.
- st(s) – stitch(es): one completed loop/unit in your work.
- sc – single crochet: insert hook into stitch, yarn over, pull up a loop (2 loops on hook), yarn over, pull through both loops.
- dc – double crochet: yarn over, insert hook into stitch, yarn over, pull up a loop (3 loops on hook), yarn over, pull through 2 loops, yarn over, pull through last 2 loops.
- hdc – half double crochet: yarn over, insert hook, pull up a loop (3 loops), yarn over, pull through all 3 loops.
- sl st – slip stitch: insert hook, yarn over, pull through the stitch and the loop on your hook at the same time.
- yo – yarn over: wrap the yarn from back to front over your hook.
- sc2tog – single crochet 2 together (a decrease): insert hook into first stitch, pull up a loop, insert hook into next stitch, pull up a loop, yarn over, pull through all 3 loops.
- dc2tog – double crochet 2 together (a decrease): yarn over, insert hook into first stitch, pull up a loop, pull through 2 loops, yarn over, insert hook into next stitch, pull up a loop, pull through 2 loops, yarn over, pull through all 3 loops.
- ch-1 sp – chain-1 space: the small gap made by a chain stitch.
- RS / WS – right side (the front, public side) / wrong side (the back).
- reverse sc (crab stitch) – single crochet worked backwards (right to left if you are right-handed): insert hook into the stitch to the right of your hook, pull up a loop, yarn over, pull through both loops.
Gauge
Gauge: In chevron pattern on the 4.0 mm hook, 18 sts and 9 rows = 10 cm (4 in) measured across the ripple repeat. Each finished panel measures approx. 30 cm x 30 cm (12 in x 12 in).
Why gauge matters: If your stitches are bigger than the pattern's, your cube will be too large and the openings will not line up. If they are smaller, the cocoon will be too tight. How to swatch: With color A and the 4.0 mm hook, ch 25. Work the chevron rows as written below for about 10 rows. Lay the swatch flat, measure 10 cm across the middle and count stitches; measure 10 cm up and count rows. If you have more stitches than 18, go up a hook size; if fewer, go down a hook size.
Beginner Tips Before You Start
- Count your peaks. Every row should have 5 peaks (each peak is 3 sc in one stitch). Place a stitch marker in the middle stitch of each peak so you never lose your place.
- Do not pull the yarn too tight. Keep your loops relaxed and even; tight tension makes the chevron ridges stiff and the cube smaller than 30 cm.
- Carry colors up the side edge. When you change color every 2 rows, simply drop the old color and pick up the new one at the end of the row — do not cut the yarn each time.
- Make all six panels before seaming. Stack them and check that each measures 30 cm x 30 cm; trim nothing, just block lightly.
- Mark your openings first. Before seaming the Front and side panels, place stitch markers where the face opening (14 cm) and hand openings (10 cm x 8 cm) will go.
- Work the edging with the smaller 3.5 mm hook so the openings stay neat and do not stretch.
Step-by-Step Instructions
Chevron Ripple Stitch (the one pattern you will repeat)
This stitch is worked flat and needs a multiple of 12 sts + 1. The "peak" is 3 sc in one stitch; the "valley" is a dc2tog.
Row 1 (RS): Ch 1 (does not count as a stitch), sc in first st, *sc in next 4 sts, dc in next 2 sts, dc2tog over next 2 sts (valley), dc in next 2 sts, sc in next 4 sts, 3 sc in next st (peak)*; repeat from * to * to last st, sc in last st. Turn.
Row 2 (WS): Ch 1, sc in first st, *sc in next 4 sts, dc in next 2 sts, dc2tog over next 2 sts, dc in next 2 sts, sc in next 4 sts, 3 sc in next st*; repeat to last st, sc in last st. Turn.
Repeat Row 2 for the pattern, changing color as directed. The 3-sc peak and dc2tog valley create the zigzag ripple.
Color Sequence
Work 2 rows each of: A (blush), B (cream), C (sage), D (oatmeal), E (butter). Then repeat this 5-color sequence. Carry colors up the side edge; do not cut unless you are finishing a panel.
Panel (make 6 identical panels)
With the 4.0 mm hook and color A, ch 61 (multiple of 12 + 1).
Row 1 (RS): Work Chevron Row 1 as above. (61 sts — 5 peaks, 4 valleys, plus edge sts)
Rows 2–27: Work Chevron Row 2, changing color every 2 rows following the color sequence. (61 sts each row) You will work 27 rows total (Row 1 plus Rows 2–27). At 9 rows per 10 cm, 27 rows = 30 cm tall. Fasten off, leaving a 40 cm tail.
Check: each panel should measure approx. 30 cm x 30 cm. Block lightly to square. Repeat to make 6 panels total.
Assembly (cube = 6 faces)
Label your panels: Front (open face), Back (open face), Top, Bottom, Left, Right.
Step 1 — Make the tube: With RS facing and color D, join Top to Left, Left to Bottom, Bottom to Right, and Right to Top along the 30 cm edges using sc through both layers (or whipstitch with the tapestry needle). You now have a 4-sided tube.
Step 2 — Close the Back: Attach the Back panel to one open end of the tube by sc-seaming all 4 edges of the Back panel to the tube opening. This closes one face.
Step 3 — Attach the Front with a face opening: Seam only 3 edges of the Front panel fully. On the 4th edge, seam the two outer 8 cm sections and leave the center 14 cm unseamed as the FACE opening.
Step 4 — Hand openings: On the Left and Right panels, measure 10 cm up from the bottom seam and 10 cm in from the front edge. Leave a 10 cm x 8 cm oval unseamed on each side panel (or seam the side panels only around a marked 10 cm x 8 cm opening). This creates two hand openings.
Edging
With the 3.5 mm hook and color B, work 1 round of sc evenly around the face opening and around each hand opening. Then work 1 round of reverse sc (crab stitch) for a neat finish. Join with sl st. Fasten off and weave in ends.
Assembly and Finishing
Seaming: Hold two panels with right sides together (or right sides facing out if you prefer a visible sc seam, as in the photo). Insert the hook through both layers at the same time and work sc along the edge, keeping the stitches even — about 1 sc per row. Pull the yarn gently; the seam should lie flat, not pucker.
Weaving in ends: Thread each tail onto the tapestry needle and run it through the back of 5–6 stitches, then back through 2 stitches in the opposite direction to lock it. Trim close to the work.
Blocking: Lightly steam-block the cube: pin each face to a 30 cm square, hold a steam iron 2–3 cm above the fabric (never touch the wool), let it cool, then unpin. This sets the chevron ridges and helps the cube hold its shape.
Final check: The cocoon should hold a soft cube shape with two open faces (face and hands) and four closed chevron-striped faces.
Pro Tips and Variations
- Change the palette: Swap the pastel stripes for a single color plus one contrast stripe, or use a self-striping DK yarn to avoid color changes entirely.
- Adjust the size: For a smaller newborn prop, use a 3.5 mm hook and ch 49 (4 peaks); for a larger toddler sack, use a 4.5 mm hook and ch 73 (6 peaks). Keep the 12 + 1 multiple.
- Yarn substitution: Any DK or light worsted yarn works — cotton gives a crisper cube, acrylic is easy to wash, and a merino blend stays soft. Always swatch to confirm 18 sts and 9 rows = 10 cm.
- Make the openings bigger or smaller: Widen the face opening to 16 cm for older toddlers, or narrow it to 12 cm for a snugger photo prop — just keep the outer seams equal on both sides.