Bubblegum Tape Deck Cocoon: Free Crochet Boombox Baby Cocoon Pattern
Bubblegum Tape Deck Cocoon: Free Crochet Boombox Baby Cocoon Pattern
Introduction
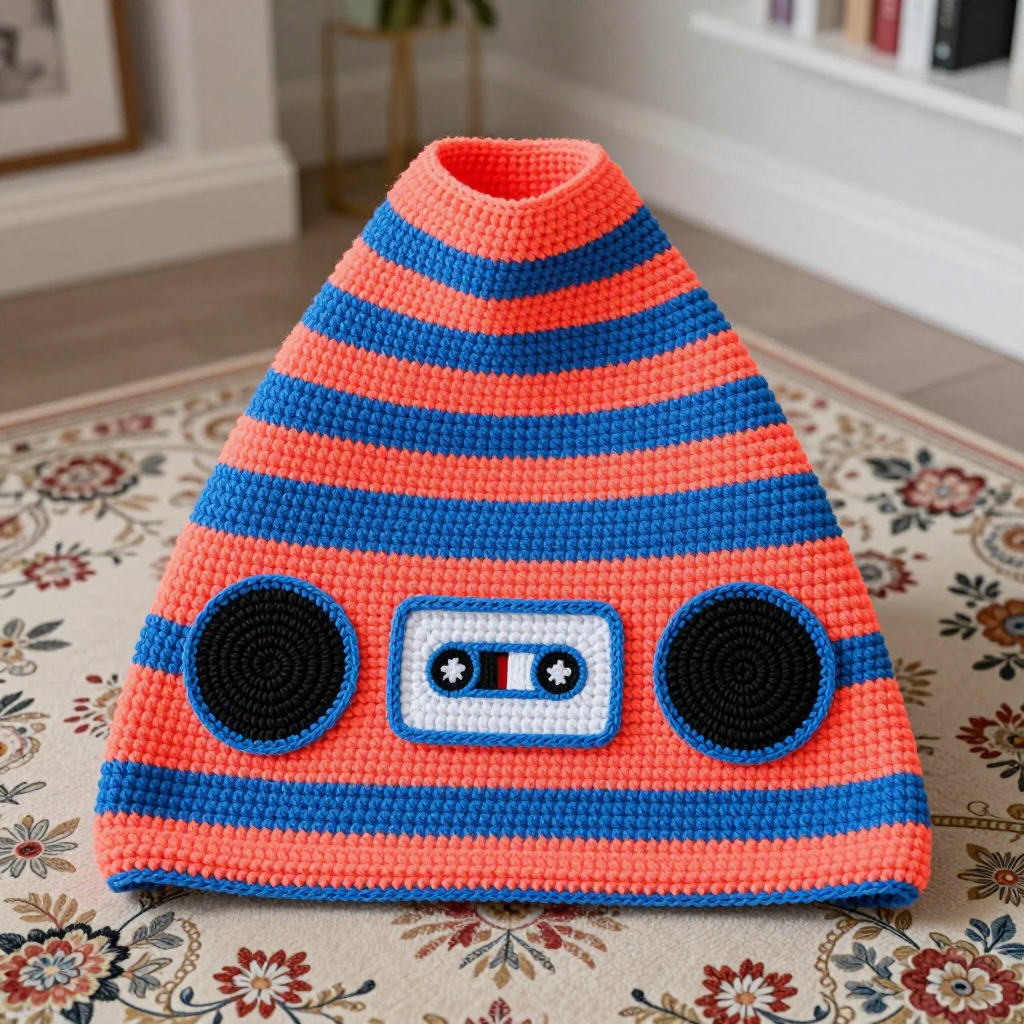
Welcome to the Bubblegum Tape Deck Cocoon, a free crochet pattern that turns a simple baby sack into a full-on 90s boombox, complete with circular speaker grilles, a cassette window, and bold neon stripes. This project is perfect for a complete beginner who has already learned the single crochet stitch and wants a fun, confidence-building project that looks far more impressive than the skills it requires. Every stitch in the body is a plain single crochet, so all the personality comes from color changes and a few easy sewn-on shapes. When finished, you will have a soft, dense, tapered cocoon about 20 inches long and 11 inches wide at the base, narrowing to an 8-inch opening at the top, made from squishy bulky yarn that feels cozy and photographs like a dream. It makes a show-stopping baby shower gift or a nostalgic newborn photo prop that will have everyone asking where you bought it.
Materials Needed
- Yarn: Bulky weight yarn (weight category 5), acrylic or acrylic-cotton blend. You will need approximately 220 yards neon coral (Color A), 180 yards electric blue (Color B), 50 yards black, and 30 yards white.
- Crochet hook: Size H/8 (5.0 mm).
- Stitch marker: At least one, to mark the first stitch of each round. A scrap of contrasting yarn works too.
- Tapestry needle: A large-eye blunt needle for sewing on the motifs and weaving in ends.
- Scissors: Sharp scissors for cutting yarn.
- Finished size: Approximately 20 inches long and 11 inches wide at the base, tapering to an 8-inch opening at the top. Fits babies 0 to 3 months.
Abbreviations and Beginner Glossary
- ch - chain. Make a loop with the yarn, pull the working yarn through the loop on your hook. That is one chain.
- sc - single crochet. Insert your hook into the stitch, yarn over (wrap the yarn around the hook), pull up a loop (you now have 2 loops on the hook), yarn over again, and pull through both loops. One single crochet made.
- sc2tog - single crochet 2 together. This is a decrease that turns 2 stitches into 1. Insert your hook into the first stitch, yarn over, pull up a loop (2 loops on hook). Insert your hook into the next stitch, yarn over, pull up a loop (3 loops on hook). Yarn over and pull through all 3 loops. One stitch is now where two used to be.
- sl st - slip stitch. Insert your hook into the stitch, yarn over, and pull the yarn through both the stitch and the loop on your hook at the same time. This makes a very short, flat stitch used for joining.
- st(s) - stitch or stitches.
- rnd - round. One complete circle of stitches worked in the round.
- yarn over - wrapping the working yarn around your hook from back to front.
- fasten off - cut the yarn a few inches from your work, then pull the tail all the way through the last loop on your hook to lock it.
- continuous rounds - working in a spiral without joining at the end of each round. You simply keep going into the next stitch, which is why a stitch marker is essential.
- whipstitch - a simple sewing stitch. Bring the needle up through both layers, then over the edge and back up, making small slanted stitches all the way around.
Gauge
Gauge: 12 sc x 14 rounds = 4 inches (10 cm) in single crochet worked in the round.
Gauge matters because it tells you whether your finished cocoon will match the stated size. If your stitches are bigger than the gauge, your cocoon will come out too large and loose; if they are smaller, it will be too tight. To check, crochet a flat swatch of single crochet about 5 inches square, then lay a ruler across the middle and count how many stitches fit in 4 inches and how many rows fit in 4 inches. If you have more stitches than 12, try a larger hook; if you have fewer, try a smaller hook. Because this pattern is worked in the round, you can also simply measure your base disc after Round 18: it should be approximately 11 inches across.
Beginner Tips Before You Start
- Use a stitch marker every single round. Because you are working in a spiral, there is no seam to tell you where a round begins. Place the marker in the first stitch of each round and move it up as you go.
- Do not pull your yarn too tight. Tension is the number one beginner struggle. Keep your loops relaxed so the hook slides easily; tight stitches make the cocoon stiff and hard to work.
- Change colors on the last yarn-over of the final stitch. When you finish the last stitch of a round, complete that stitch using the new color. This hides the change neatly.
- Carry the unused color loosely up the inside. Do not pull the carried strand tight or the cocoon will pucker. Let it rest gently against the inside of the work.
- Count your stitches at the end of every increase round. The base grows quickly, and one missed stitch will throw off every round after it.
- Keep your sewn-on motifs for last. Finish the whole cocoon body first, then sew on the grilles and cassette panel so you can position them evenly.
Step-by-Step Instructions
Pattern notes: The cocoon is worked in continuous rounds (do not join unless instructed). Use a stitch marker to mark the first stitch of each round. Color changes are made on the last yarn-over of the final stitch of a round. Carry unused color loosely up the inside of the cocoon. All stitches are US crochet terms.
Color sequence for the body: 4 rounds neon coral (A), 3 rounds electric blue (B), 2 rounds neon coral (A), 3 rounds electric blue (B). This 12-round sequence repeats throughout the body.
Base
With neon coral (A), ch 2.
Rnd 1: 6 sc in second ch from hook. Do not join. (6 sc)
Rnd 2: 2 sc in each st around. (12 sc)
Rnd 3: [Sc in next st, 2 sc in next st] around. (18 sc)
Rnd 4: [Sc in next 2 sts, 2 sc in next st] around. (24 sc)
Rnd 5: [Sc in next 3 sts, 2 sc in next st] around. (30 sc)
Rnd 6: [Sc in next 4 sts, 2 sc in next st] around. (36 sc)
Rnd 7: [Sc in next 5 sts, 2 sc in next st] around. (42 sc)
Rnd 8: [Sc in next 6 sts, 2 sc in next st] around. (48 sc)
Rnd 9: [Sc in next 7 sts, 2 sc in next st] around. (54 sc)
Rnd 10: [Sc in next 8 sts, 2 sc in next st] around. (60 sc)
Rnd 11: [Sc in next 9 sts, 2 sc in next st] around. (66 sc)
Rnd 12: [Sc in next 10 sts, 2 sc in next st] around. (72 sc)
Rnd 13: [Sc in next 11 sts, 2 sc in next st] around. (78 sc)
Rnd 14: [Sc in next 12 sts, 2 sc in next st] around. (84 sc)
Rnd 15: [Sc in next 13 sts, 2 sc in next st] around. (90 sc)
Rnd 16: [Sc in next 14 sts, 2 sc in next st] around. (96 sc)
Rnd 17: [Sc in next 15 sts, 2 sc in next st] around. (102 sc)
Rnd 18: [Sc in next 16 sts, 2 sc in next st] around. (108 sc)
Do not fasten off. The base should measure approximately 11 inches in diameter. The work now forms a flat disc; continue directly into the body rounds, working into the stitches of the last round to create a tube.
Body
Rnd 19: Sc in each st around. (108 sc)
Rnd 20: Sc in each st around. (108 sc)
Rnd 21: Sc in each st around. (108 sc)
Rnd 22: Sc in each st around. (108 sc)
Change to electric blue (B).
Rnd 23: Sc in each st around. (108 sc)
Rnd 24: Sc in each st around. (108 sc)
Rnd 25: Sc in each st around. (108 sc)
Change to neon coral (A).
Rnd 26: Sc in each st around. (108 sc)
Rnd 27: Sc in each st around. (108 sc)
Change to electric blue (B).
Rnd 28: Sc in each st around. (108 sc)
Rnd 29: Sc in each st around. (108 sc)
Rnd 30: Sc in each st around. (108 sc)
Change to neon coral (A).
Rnds 31-34: Sc in each st around. (108 sc)
Change to electric blue (B).
Rnds 35-37: Sc in each st around. (108 sc)
Change to neon coral (A).
Rnds 38-39: Sc in each st around. (108 sc)
Change to electric blue (B).
Rnds 40-42: Sc in each st around. (108 sc)
Change to neon coral (A).
Rnds 43-46: Sc in each st around. (108 sc)
Change to electric blue (B).
Rnds 47-49: Sc in each st around. (108 sc)
Change to neon coral (A).
Rnds 50-51: Sc in each st around. (108 sc)
Change to electric blue (B).
Rnds 52-54: Sc in each st around. (108 sc)
Change to neon coral (A).
Rnds 55-58: Sc in each st around. (108 sc)
Change to electric blue (B).
Rnds 59-61: Sc in each st around. (108 sc)
Change to neon coral (A).
Rnds 62-63: Sc in each st around. (108 sc)
Change to electric blue (B).
Rnds 64-66: Sc in each st around. (108 sc)
Change to neon coral (A).
Rnds 67-70: Sc in each st around. (108 sc)
Shaping the Top Opening
Change to electric blue (B).
Rnd 71: [Sc in next 16 sts, sc2tog] around. (102 sc)
Rnd 72: [Sc in next 15 sts, sc2tog] around. (96 sc)
Rnd 73: [Sc in next 14 sts, sc2tog] around. (90 sc)
Change to neon coral (A).
Rnd 74: [Sc in next 13 sts, sc2tog] around. (84 sc)
Rnd 75: [Sc in next 12 sts, sc2tog] around. (78 sc)
Rnd 76: [Sc in next 11 sts, sc2tog] around. (72 sc)
Change to electric blue (B).
Rnd 77: [Sc in next 10 sts, sc2tog] around. (66 sc)
Rnd 78: [Sc in next 9 sts, sc2tog] around. (60 sc)
Rnd 79: Sc in each st around. (60 sc)
Rnd 80: Sc in each st around. (60 sc)
Fasten off, weave in ends.
Speaker Grille Motifs (make 2)
With black yarn, ch 2.
Rnd 1: 6 sc in second ch from hook. (6 sc)
Rnd 2: 2 sc in each st around. (12 sc)
Rnd 3: [Sc in next st, 2 sc in next st] around. (18 sc)
Rnd 4: [Sc in next 2 sts, 2 sc in next st] around. (24 sc)
Rnd 5: [Sc in next 3 sts, 2 sc in next st] around. (30 sc)
Rnd 6: [Sc in next 4 sts, 2 sc in next st] around. (36 sc)
Rnd 7: [Sc in next 5 sts, 2 sc in next st] around. (42 sc)
Rnd 8: Sc in each st around. (42 sc)
Rnd 9: Sc in each st around. (42 sc)
Fasten off, leaving a 24-inch tail for sewing.
Speaker Grille Rings (make 2)
With electric blue yarn, ch 2.
Rnd 1: 6 sc in second ch from hook. (6 sc)
Rnd 2: 2 sc in each st around. (12 sc)
Rnd 3: [Sc in next st, 2 sc in next st] around. (18 sc)
Rnd 4: [Sc in next 2 sts, 2 sc in next st] around. (24 sc)
Rnd 5: [Sc in next 3 sts, 2 sc in next st] around. (30 sc)
Rnd 6: [Sc in next 4 sts, 2 sc in next st] around. (36 sc)
Rnd 7: [Sc in next 5 sts, 2 sc in next st] around. (42 sc)
Rnd 8: [Sc in next 6 sts, 2 sc in next st] around. (48 sc)
Rnd 9: Sc in each st around. (48 sc)
Fasten off, leaving a 24-inch tail for sewing.
Cassette Window Panel
With white yarn, ch 21.
Row 1: Sc in second ch from hook and in each ch across. (20 sc)
Rows 2-14: Ch 1, turn. Sc in each st across. (20 sc)
Fasten off, leaving a 24-inch tail for sewing.
Cassette Window Frame
With electric blue yarn, ch 23.
Row 1: Sc in second ch from hook and in each ch across. (22 sc)
Rows 2-16: Ch 1, turn. Sc in each st across. (22 sc)
Fasten off, leaving a 24-inch tail for sewing.
Cassette Reels (make 2)
With black yarn, ch 2.
Rnd 1: 6 sc in second ch from hook. (6 sc)
Rnd 2: 2 sc in each st around. (12 sc)
Rnd 3: Sc in each st around. (12 sc)
Fasten off, leaving a 12-inch tail for sewing.
Assembly and Finishing
Step 1 - Speaker grilles: Center one black grille circle on the front of the cocoon, approximately 3 inches from the top opening and 2 inches from the left side. Thread the black tail onto your tapestry needle and whipstitch the grille in place: bring the needle up through both the grille and the cocoon, then over the edge and back up, making small slanted stitches all the way around the circle. Repeat with the second grille on the right side, mirroring the placement. Sew one electric blue ring around the outer edge of each black grille, aligning the inner edge of the ring with the outer edge of the black circle so the blue forms a visible border.
Step 2 - Cassette window: Center the white panel on the front of the cocoon between the two speaker grilles, approximately 4 inches below the top opening. Whipstitch it in place the same way you sewed the grilles. Sew the electric blue frame around the outer edge of the white panel, aligning the inner edge of the frame with the outer edge of the white panel so the blue forms a visible border.
Step 3 - Cassette reels: Sew one black reel circle centered in the left half of the white panel and one in the right half, approximately 1 inch apart and centered vertically.
Step 4 - Weave in ends: Thread each remaining yarn tail onto the tapestry needle and run it through the inside of the cocoon for about 2 inches, then trim close to the work so it does not show on the outside.
Step 5 - Blocking (optional): Lightly steam the cocoon to settle the stitches and even out the stripes. Hold a steam iron a few inches above the fabric (never press it directly onto the yarn) and let the steam relax the stitches, then shape the cocoon flat and let it dry completely.
Pro Tips and Variations
- Change the color story: Swap the neon coral and electric blue for any two contrasting bulky yarns. A mint-and-lavender combo gives a softer retro look, while black and hot pink makes a bolder statement.
- Adjust the size: For a larger cocoon, add extra increase rounds to the base (each round adds 6 stitches) and work more plain body rounds before shaping the top. For a smaller newborn size, stop the base at Round 16 (96 sc) and shorten the body by a few rounds.
- Substitute yarn: Two strands of worsted weight yarn held together can substitute for bulky weight. Always crochet a gauge swatch first, since the finished size depends entirely on matching the gauge.
- Add texture to the grilles: Work the black speaker grille circles in a slightly darker shade or add a surface slip stitch spiral across each one to mimic real speaker mesh.