Mint Pineapple Cylinder Chime: Free Crochet Star Stitch Baby Mobile Pattern
Mint Pineapple Cylinder Chime: Free Crochet Star Stitch Baby Mobile Pattern
Introduction
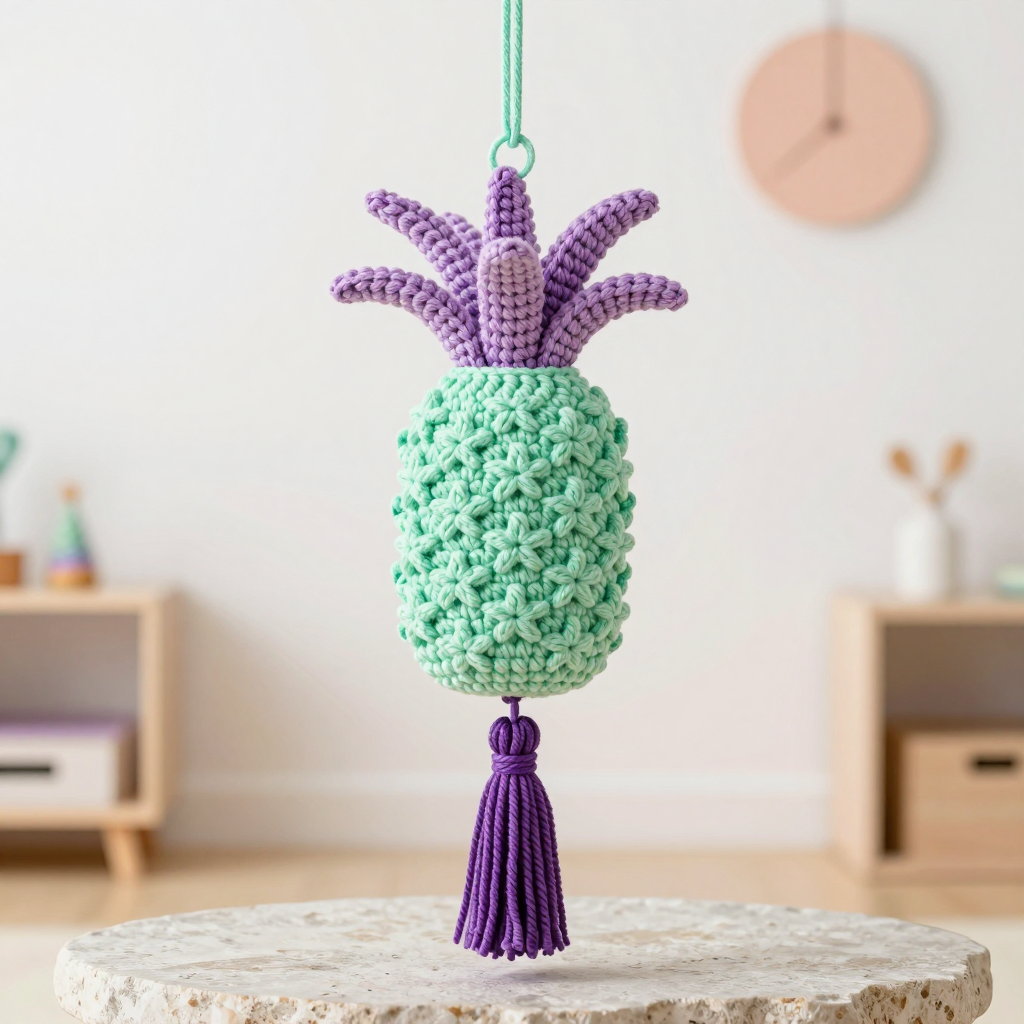
This little mint pineapple chime is the perfect first "grown-up" project for a brand-new crocheter who has already learned a few basic stitches and wants to make something truly special. It is a small, quiet, dark-academia-inspired mobile that brings a calm, scholarly charm to a newborn's nursery, and because it is only about 9 inches (23 cm) long from top to bottom, it works up quickly enough to finish in a weekend. The finished piece is a soft mint-green cylinder covered in raised star-stitch texture, topped with five pointed lavender leaves that fan out like a pineapple crown, with a dark lavender yarn tassel swinging gently from the bottom. It feels dense and squishy in the hand, and the star stitch gives it a lovely bumpy, hand-made texture that catches the light. If you can make a single crochet and a chain, you can absolutely make this chime — we will walk through every single stitch together.
Materials Needed
- Yarn: Sport weight (fine, CYC 2) cotton yarn. You will need approximately 60 yards of mint, 25 yards of lavender, and 15 yards of dark lavender. Cotton is recommended because it holds the star texture crisply and does not pill easily.
- Crochet hook: 2.75 mm (US size C-2).
- Stitch marker: 1, to mark the first stitch of each round.
- Tapestry needle: A blunt-tipped needle with a large eye, for sewing leaves and weaving in ends.
- Scissors: Any small sharp pair.
- Stuffing: A small amount of polyester fiberfill (about a handful).
- Optional hanging hardware: A 6 in (15 cm) wooden ring or dowel, or a ceiling hook, to hang the finished chime.
Finished size: Body is 2.5 in (6.5 cm) in diameter and 4 in (10 cm) tall. The leaf crown adds about 1.5 in (4 cm). The tassel hangs 2.5 in (6.5 cm). Total hanging length is approximately 9 in (23 cm).
Abbreviations and Beginner Glossary
- ch – chain: yarn over the hook and pull the loop through the loop already on your hook. This makes a small "V" shape.
- sc – single crochet: insert your hook into the stitch, yarn over, pull up a loop (2 loops on hook), yarn over again, and pull through both loops. One loop remains.
- hdc – half double crochet: yarn over first, insert hook into stitch, yarn over, pull up a loop (3 loops on hook), yarn over, pull through all 3 loops at once.
- dc – double crochet: yarn over, insert hook into stitch, yarn over, pull up a loop (3 loops on hook), yarn over and pull through 2 loops, yarn over and pull through the last 2 loops.
- dc2tog – double crochet 2 together: a decrease that turns two stitches into one. (Note: this pattern uses sc2tog for shaping; see below.)
- sc2tog – single crochet 2 together: insert hook into first stitch, yarn over, pull up a loop; insert hook into next stitch, yarn over, pull up a loop (3 loops on hook); yarn over and pull through all 3 loops. This makes two stitches become one.
- sl st – slip stitch: insert hook into stitch, yarn over, and pull the loop straight through both the stitch and the loop on your hook. It joins rounds without adding height.
- st(s) – stitch(es).
- sp – space (the gap between stitches).
- FLO – front loop only: work into just the loop of the stitch closest to you.
- BLO – back loop only: work into just the loop of the stitch farthest from you.
- MR – magic ring: a loop of yarn you wrap around your fingers and crochet into, then pull tight so there is no hole in the center.
- Star stitch – a textured stitch worked in two passes (explained fully in the instructions below). Each star uses 5 loops on the hook and leaves a raised star shape on the right side of the fabric.
Gauge
Star stitch pattern: 6 star stitches and 6 rounds = 2 inches (5 cm) square.
Single crochet: 24 sc and 24 rounds = 4 inches (10 cm).
Why gauge matters: Gauge is simply how big your stitches turn out. If your stitches are looser than the pattern's, your pineapple will be bigger than 4 inches tall and the leaves may not fit the top. If they are tighter, it will be smaller and the stuffing may show through. Matching gauge keeps the finished size correct.
How to make a gauge swatch: With your mint yarn and 2.75 mm hook, chain 13. Work 12 single crochet stitches across, then work 12 rows of single crochet. Lay the swatch flat and measure a 4-inch (10 cm) square in the middle. Count how many stitches and rows fit inside that square. If you have more than 24 stitches, try a slightly larger hook; if you have fewer, try a slightly smaller hook. Always swatch before starting — it takes ten minutes and saves hours.
Beginner Tips Before You Start
- Use a stitch marker. Place it in the first stitch of every round so you never lose your place. Move it up as you go.
- Do not pull your yarn too tight. Star stitch needs a little slack to pull up those 5 loops. If your loops are tight, the star will be tiny and hard to work into.
- Count your stars out loud. Each star round should have exactly 12 stars. Counting as you go catches mistakes immediately.
- Keep the star side facing you. The raised star texture is the outside of the pineapple. If you find yourself looking at a smooth surface, you have turned your work by accident.
- Stuff gently. Overstuffing flattens the star texture. Add small pinches of fiberfill until the cylinder holds its shape but still feels soft.
- Work in good light. Sport weight cotton and a 2.75 mm hook are small; bright light makes the stitches much easier to see.
Step-by-Step Instructions
Body (worked in the round from the bottom up)
With mint yarn, make a magic ring.
Rnd 1: 6 sc in MR. Join with sl st to first sc. (6 sts)
Rnd 2: Ch 1, 2 sc in each st around. Join. (12 sts)
Rnd 3: Ch 1, [sc in next st, 2 sc in next st] 6 times. Join. (18 sts)
Rnd 4: Ch 1, [sc in next 2 sts, 2 sc in next st] 6 times. Join. (24 sts)
Rnd 5: Ch 1, [sc in next 3 sts, 2 sc in next st] 6 times. Join. (30 sts)
Rnd 6: Ch 1, [sc in next 4 sts, 2 sc in next st] 6 times. Join. (36 sts)
Rnd 7: Ch 1, sc in each st around. Join. (36 sts)
Do not fasten off. You are now ready to begin the star stitch section.
Star Stitch Section
How the star stitch works: Each star is made in two passes. In the first pass you pull up 5 loops onto your hook, then pull your yarn through all of them at once and chain 1 to "close" the star. That chain-1 is called the eye of the star. In the second pass you work single crochets into the eyes.
Rnd 8 (first star round): Ch 3 (counts as first hdc). Pull up a loop in the 2nd ch from hook and in the next ch (3 loops on hook). Pull up a loop in the first st of Rnd 7, pull up a loop in the next st, pull up a loop in the next st (6 loops on hook). Yarn over, pull through all 6 loops. Ch 1 (eye of first star). *Pull up a loop in the eye of the previous star, pull up a loop in the last st of the previous star, pull up a loop in the next st, pull up a loop in the next st, pull up a loop in the next st (6 loops on hook). Yarn over, pull through all 6 loops. Ch 1. Repeat from * around, working the last star into the starting ch-3 space. Join with sl st to top of beginning ch-3. (12 stars)
Rnd 9: Ch 1, 2 sc in each star eye around. Join. (24 sc)
Rnd 10: Ch 3, work first star as in Rnd 8 starting in the first sc, then work stars around as established, ending with the last star in the join. Join. (12 stars)
Rnd 11: Ch 1, 2 sc in each star eye around. Join. (24 sc)
Rnds 12, 14, 16, 18: Repeat Rnd 10. (12 stars each)
Rnds 13, 15, 17: Repeat Rnd 11. (24 sc each)
Rnd 19: Ch 1, sc in each st around. Join. (24 sc)
Body now measures approximately 4 in (10 cm) from the base. Do not fasten off.
Top Shaping
Rnd 20: Ch 1, [sc in next 2 sts, sc2tog] 6 times. Join. (18 sts)
Rnd 21: Ch 1, [sc in next st, sc2tog] 6 times. Join. (12 sts)
Stuff the body firmly with fiberfill, shaping it into a cylinder as you go. Do not overstuff — the star texture should stay visible.
Rnd 22: Ch 1, [sc2tog] 6 times. Join. (6 sts)
Fasten off, leaving a 6 in (15 cm) tail. Thread the tail through the remaining 6 sts with your tapestry needle and pull tight to close the top. Weave in the end.
Leaf Crown (make 5 leaves)
With lavender yarn, ch 7.
Row 1: Sc in 2nd ch from hook and in each ch across. (6 sc)
Row 2: Ch 1, turn. Sc in first 2 sts, hdc in next 2 sts, dc in next st, 3 dc in last st. Do not turn. Now work along the opposite side of the foundation chain: 3 dc in first ch, dc in next ch, hdc in next 2 ch, sc in last 2 ch. Join with sl st to first sc of Row 1. (14 sts)
Row 3: Ch 1, sc in each st around the edge, working 2 sc in each point of the leaf tip. Join. Fasten off, leaving a 4 in (10 cm) tail.
Shape each leaf by gently stretching it and pinning the tip to a point. Do not block aggressively — the leaves should stay slightly cupped.
Attaching the Leaves
Using your tapestry needle and the lavender tails, sew the base of each leaf to the top of the body at Rnd 22, spacing the 5 leaves evenly around the closing circle. Angle each leaf upward and slightly outward so the crown looks like a pineapple top. Secure each leaf with 3–4 small stitches through its base. Weave in the ends.
Hanging Loop
With mint yarn, ch 20. Sl st in each ch across. Fasten off. Sew one end to the center top of the leaf crown, passing the needle through the closed top of the body for strength. Sew the other end to the same point to form a loop. Reinforce with a second pass of thread.
Tassel
Cut 12 strands of dark lavender, each 5 in (12.5 cm) long. Fold the strands in half and tie a 6 in (15 cm) length of dark lavender tightly around the folded bundle, about 0.5 in (1.25 cm) below the fold, to create the tassel head. Wrap the tie 3–4 times and knot securely. Trim the bottom ends evenly. Using the tapestry needle, thread the tassel head tie through the bottom center of the body (at Rnd 1) and secure with a knot inside the body. Trim the tassel to 2.5 in (6.5 cm).
Assembly and Finishing
Seaming: All seaming in this project is done with the tapestry needle and the yarn tails already attached to your pieces. To sew a leaf on, bring the needle up through the body, pass through the base of the leaf, and go back down into the body. Repeat 3–4 times per leaf, pulling gently but firmly so the leaf sits flat against the top.
Weaving in ends: Thread each loose tail onto the tapestry needle and run it through the inside of the body for about 1 inch (2.5 cm), then back the other way for another inch. This "back-and-forth" method locks the end so it will not work loose. Trim close to the fabric.
Blocking: Gently steam the star stitch section by holding a steam iron a few inches above the fabric (never touching it) for a few seconds. This relaxes the cotton without flattening the raised stars. Let the piece dry completely before hanging.
Final check: Tug each leaf and the tassel gently to confirm they are secure. Inspect for any loose strands. Your chime is now ready to hang.
Pro Tips and Variations
- Change the colors: Swap mint for sage green and lavender for dusty rose for a warmer, vintage look. Keep the tassel one shade darker than the leaves so it stands out.
- Adjust the size: To make a larger pineapple, add one more increase round before Rnd 7 (working to 42 sts) and add two extra star rounds. To make a smaller one, stop increasing at Rnd 5 (30 sts) and work two fewer star rounds.
- Substitute yarn: DK weight cotton also works well with a 3.0 mm hook — just check your gauge first, since a thicker yarn will make the pineapple larger.
- Add a gentle chime: If you want a soft sound, place a small metal chime or a tiny bell inside the stuffing before closing the top. Secure it well so it cannot shift, and remember this is a decorative mobile, not a toy.
Safety note for newborns: This is a decorative mobile, not a toy. Hang it well out of reach of the baby. Secure the hanging loop to a mobile arm or ceiling hook with a knot or clasp, and inspect it regularly for loose strands.