Avocado Green Pineapple Lace Crochet Doily Free Pattern
Avocado Green Pineapple Lace Crochet Doily – Free Pattern
Introduction
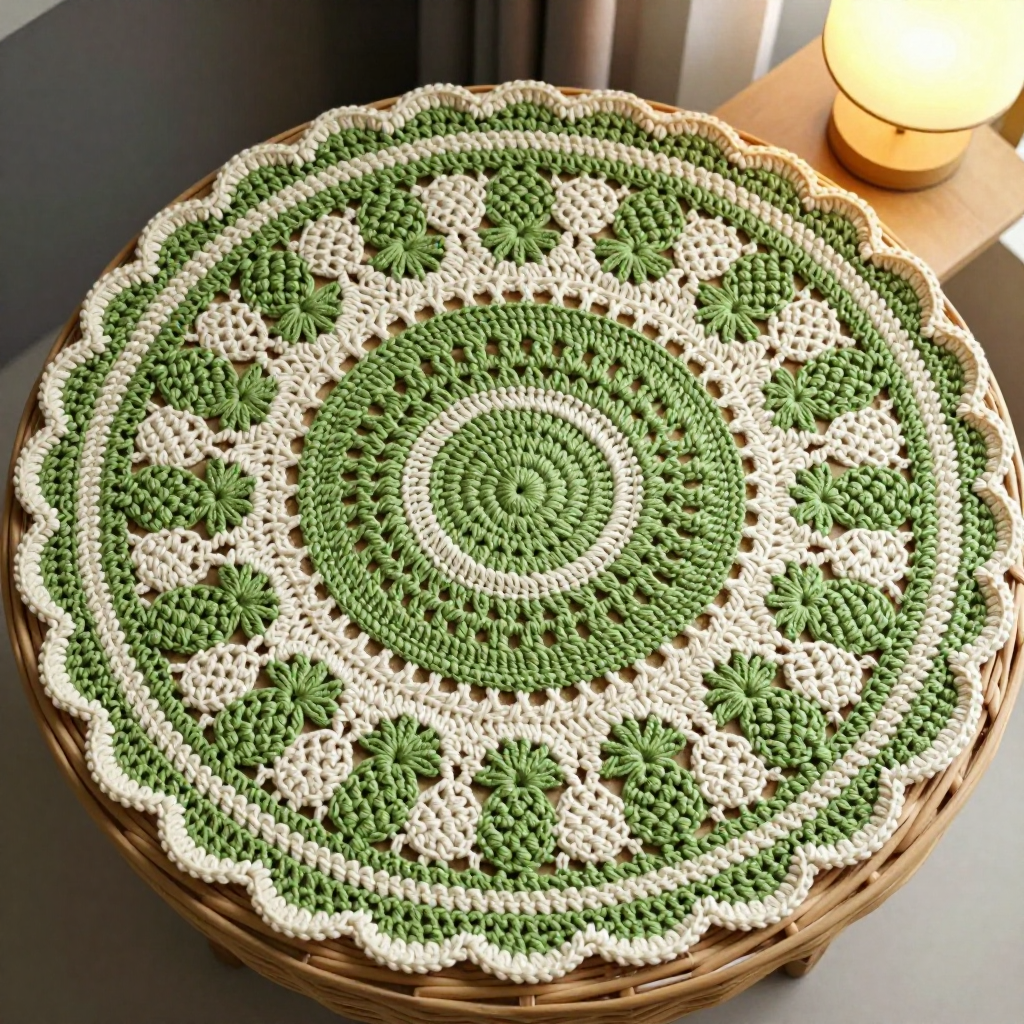
If you have ever admired a vintage doily in a thrift store window and thought, "I could never make that," this pattern is for you. This avocado green and cream pineapple lace doily is a love letter to 1970s home decor, and it is built entirely from simple stitches you already know (or are about to learn): chain, slip stitch, single crochet, double crochet, and treble crochet. It is perfect for a crocheter who has finished a few practice swatches and is ready for a real, show-stopping project that grows outward round by round. The finished piece is a flat, 13-inch circular centerpiece with a solid green medallion at its heart, a ring of cream pineapple motifs, and a lacy green border finished with delicate picot scallops. Worked in crisp cotton, it feels light and airy in the hand and looks stunning under a vase, on a side table, or framed on a wall.
Materials Needed
- Yarn: DK / Light (3) weight cotton yarn — approximately 150 yards avocado green (Color A) and 60 yards cream (Color B). Cotton gives the best stitch definition and blocks flat.
- Hook: 4.5 mm (US 7) crochet hook.
- Stitch marker (one is enough, but a few help).
- Tapestry needle (blunt tip, large eye) for weaving in ends.
- Scissors.
- Blocking supplies: padded blocking mat and rust-proof blocking pins (needed to open the lace and reach the final size).
- Finished size: approximately 13 inches (33 cm) in diameter after blocking. The doily is flat and circular; you do not turn your work at the end of rounds unless the pattern says so.
Abbreviations and Beginner Glossary
All terms are US crochet terms. Read this list once before you begin — every abbreviation in the pattern appears here.
- ch – chain: yarn over the hook, pull the loop through the loop on your hook. One chain made.
- sl st – slip stitch: insert hook into the stitch, yarn over, pull the loop through both the stitch and the loop on your hook at once. Makes an almost invisible join.
- sc – single crochet: insert hook into stitch, yarn over, pull up a loop (2 loops on hook), yarn over, pull through both loops.
- dc – double crochet: yarn over, insert hook into stitch, yarn over, pull up a loop (3 loops on hook), yarn over, pull through 2 loops, yarn over, pull through last 2 loops.
- tr – treble crochet: yarn over twice, insert hook, yarn over, pull up a loop (4 loops), yarn over and pull through 2 loops three times. (Listed for reference; not used in this pattern.)
- ch-3 picot – chain 3, then slip stitch into the third chain from your hook. This makes a tiny decorative bump.
- ch-5 picot – chain 5, then slip stitch into the fifth chain from your hook. (Listed for reference; this pattern uses the ch-3 picot.)
- sp – space: the hole created by a chain (for example, a "ch-3 sp" is the little loop of 3 chains you work into).
- beg – beginning.
- rep – repeat: do the instruction again as many times as stated.
- st(s) – stitch(es).
- magic ring – an adjustable loop of yarn you crochet into, then pull tight so the center hole closes completely. If you prefer, chain 4 and join with a sl st to form a ring instead.
- join – slip stitch into the first stitch of the round to close the circle.
- fasten off – cut the yarn, pull the tail through the last loop, and tighten.
Gauge
Gauge: 6 dc and 2.5 rows measure approximately 1 inch (2.5 cm).
Gauge matters because it controls the finished size: if your stitches are bigger than this, your doily will be larger than 13 inches and may ripple; if smaller, it will be too small and stiff. To check, crochet a small flat swatch of double crochet about 4 inches square, then measure the middle 2 inches and count your stitches and rows. If you have more than 12 dc in 2 inches, your tension is tight — try a larger hook. If you have fewer, try a smaller hook. Because this is a flat doily, a slightly loose, relaxed tension is better than a tight one.
Beginner Tips Before You Start
- Use a stitch marker in the first stitch of each round. Doilies spiral outward and it is very easy to lose your place — the marker tells you exactly where to join.
- Do not pull your yarn too tight. Lace needs breathing room. Keep your chains loose enough that your hook slides in easily.
- Count every round. The stitch counts in parentheses at the end of each round are your safety net. If a count is off, fix it before moving on — errors multiply in a circle.
- Work into the chain spaces, not the individual chains, wherever the pattern says "in next ch-3 sp." This keeps the lace open and even.
- Keep your work flat. Lay the doily on the table after every few rounds. If it cups upward, your tension is too tight; if it ruffles, it is too loose.
- Don't fear the color change. You simply join the new color with a slip stitch in the indicated space and continue — no cutting mid-round.
Step-by-Step Instructions
Work in joined rounds. Each round begins with the stated number of chains (which counts as your first stitch where noted) and ends with a slip stitch join to the first stitch of the round.
Center Medallion (Rounds 1–8, Color A – avocado green)
Round 1: Make a magic ring. Ch 3 (counts as first dc), work 11 dc into ring. Join with sl st to top of beg ch-3. (12 dc)
Round 2: Ch 3, dc in same st. 2 dc in each st around. Join. (24 dc)
Round 3: Ch 3, dc in same st, dc in next st. *2 dc in next st, dc in next st; rep from * around. Join. (36 dc)
Round 4: Ch 3, dc in same st, dc in next 2 sts. *2 dc in next st, dc in next 2 sts; rep from * around. Join. (48 dc)
Round 5: Ch 1, sc in same st, ch 3, skip next st. *sc in next st, ch 3, skip next st; rep from * around. Join to first sc. (24 ch-3 sps)
Round 6: Sl st into first ch-3 sp, ch 3, 2 dc in same sp, ch 1. *3 dc in next ch-3 sp, ch 1; rep from * around. Join. (24 groups of 3 dc)
Round 7: Ch 1, sc in same st, ch 5, skip next 2 dc and ch-1 sp. *sc in next dc, ch 5, skip next 2 dc and ch-1 sp; rep from * around. Join. (24 ch-5 sps)
Round 8: Sl st into first ch-5 sp, ch 3, 3 dc in same sp, ch 2. *4 dc in next ch-5 sp, ch 2; rep from * around. Join. (24 groups of 4 dc)
Pineapple Motif Band (Rounds 9–15, Color A – avocado green)
Round 9: Ch 1, sc in same st, ch 7, skip next 3 dc and ch-2 sp. *sc in next dc, ch 7, skip next 3 dc and ch-2 sp; rep from * around. Join. (24 ch-7 sps)
Round 10: Sl st into first ch-7 sp, ch 3, 2 dc in same sp, ch 3, 3 dc in same sp (first pineapple base). *In next ch-7 sp work 3 dc, ch 3, 3 dc; rep from * around. Join. (24 pineapple bases)
Round 11: Ch 1, sc in same st, ch 3, skip next 2 dc, sc in next ch-3 sp, ch 3, skip next 2 dc, sc in next dc. *ch 3, skip next 2 dc, sc in next ch-3 sp, ch 3, skip next 2 dc, sc in next dc; rep from * around. Join. (48 ch-3 sps)
Round 12: Sl st into first ch-3 sp, ch 3, 2 dc in same sp, ch 1. *3 dc in next ch-3 sp, ch 1; rep from * around. Join. (48 groups of 3 dc)
Round 13: Ch 1, sc in same st, ch 4, skip next 2 dc and ch-1 sp. *sc in next dc, ch 4, skip next 2 dc and ch-1 sp; rep from * around. Join. (48 ch-4 sps)
Round 14: Sl st into first ch-4 sp, ch 3, 2 dc in same sp, ch 2, 3 dc in same sp. *In next ch-4 sp work 3 dc, ch 2, 3 dc; rep from * around. Join. (48 pineapple tips)
Round 15: Ch 1, sc in same st, ch 5, skip next 2 dc, sc in next ch-2 sp, ch 5, skip next 2 dc, sc in next dc. *ch 5, skip next 2 dc, sc in next ch-2 sp, ch 5, skip next 2 dc, sc in next dc; rep from * around. Join. (96 ch-5 sps)
Cream Accent Ring (Rounds 16–19, Color B – cream)
Round 16: Join Color B with sl st in any ch-5 sp. Ch 3, 2 dc in same sp, ch 1. *3 dc in next ch-5 sp, ch 1; rep from * around. Join. (96 groups of 3 dc)
Round 17: Ch 1, sc in same st, ch 3, skip next 2 dc and ch-1 sp. *sc in next dc, ch 3, skip next 2 dc and ch-1 sp; rep from * around. Join. (96 ch-3 sps)
Round 18: Sl st into first ch-3 sp, ch 3, 2 dc in same sp, ch 2, 3 dc in same sp. *In next ch-3 sp work 3 dc, ch 2, 3 dc; rep from * around. Join. (96 pineapple tips)
Round 19: Ch 1, sc in same st, ch 6, skip next 2 dc, sc in next ch-2 sp, ch 6, skip next 2 dc, sc in next dc. *ch 6, skip next 2 dc, sc in next ch-2 sp, ch 6, skip next 2 dc, sc in next dc; rep from * around. Join. (192 ch-6 sps)
Outer Lace and Scalloped Edge (Rounds 20–22, Color A – avocado green)
Round 20: Join Color A with sl st in any ch-6 sp. Ch 3, 3 dc in same sp, ch 2. *4 dc in next ch-6 sp, ch 2; rep from * around. Join. (192 groups of 4 dc)
Round 21: Ch 1, sc in same st, ch 8, skip next 3 dc and ch-2 sp. *sc in next dc, ch 8, skip next 3 dc and ch-2 sp; rep from * around. Join. (192 ch-8 sps)
Round 22 (scalloped edge): Sl st into first ch-8 sp, ch 1, sc in same sp, ch 3, ch-3 picot, ch 3, sc in same sp (first scallop). *In next ch-8 sp work sc, ch 3, ch-3 picot, ch 3, sc; rep from * around. Join with sl st to first sc. Fasten off. (192 scallops)
Assembly and Finishing
There is no seaming in this project — the doily is worked in one continuous piece from the center outward. Finishing is all about ends and blocking, and both matter enormously for lace.
- Weave in ends: Thread each yarn tail onto your tapestry needle. Turn the doily to the wrong side and weave the tail under 5–6 stitches, then back in the opposite direction for 2–3 stitches to lock it. Trim close but not flush. Do this for the starting tail, the Color A tail after Round 15, the Color B tail after Round 19, and the final tail.
- Soak: Fill a bowl with cool water and submerge the doily for 15–20 minutes until fully wet. Do not wring or twist.
- Press out water: Lay the doily on a towel, roll the towel up, and press gently to remove excess water.
- Pin out: Place the damp doily on a padded blocking mat. Pin the center first, then work outward, pinning each scallop point outward so every picot is visible and the pineapple lace opens fully. Measure across the diameter and adjust pins until it is a flat 13 inches.
- Dry completely — usually 24 hours — before removing the pins. Your doily will hold its shape permanently.
Pro Tips and Variations
- Change the colors: Swap avocado green for dusty rose, mustard, or teal for a different vintage palette. Keep the cream accent ring for contrast, or make the whole doily one color for a classic white lace look.
- Adjust the size: To make a smaller doily, stop after Round 15 or 19 and add a simple scalloped edge (sc, ch 3, ch-3 picot, ch 3, sc in each space). To make it larger, repeat Rounds 20–21 once more before the scalloped edge — just remember your stitch counts will increase.
- Substitute yarn: Cotton thread (size 10) with a 1.75 mm hook makes a fine heirloom doily; bulky cotton with a 6 mm hook makes a bold placemat. Always re-check gauge and adjust your hook so the fabric stays flat.
- Starch for extra crispness: For a stiffer, more sculptural finish, dip the blocked doily in a light sugar-and-water or commercial starch solution before pinning out.