Frosted Moon Drop Necklace Free Crochet Pattern
Frosted Moon Drop Necklace: A Free Beginner Crochet Pattern
Introduction
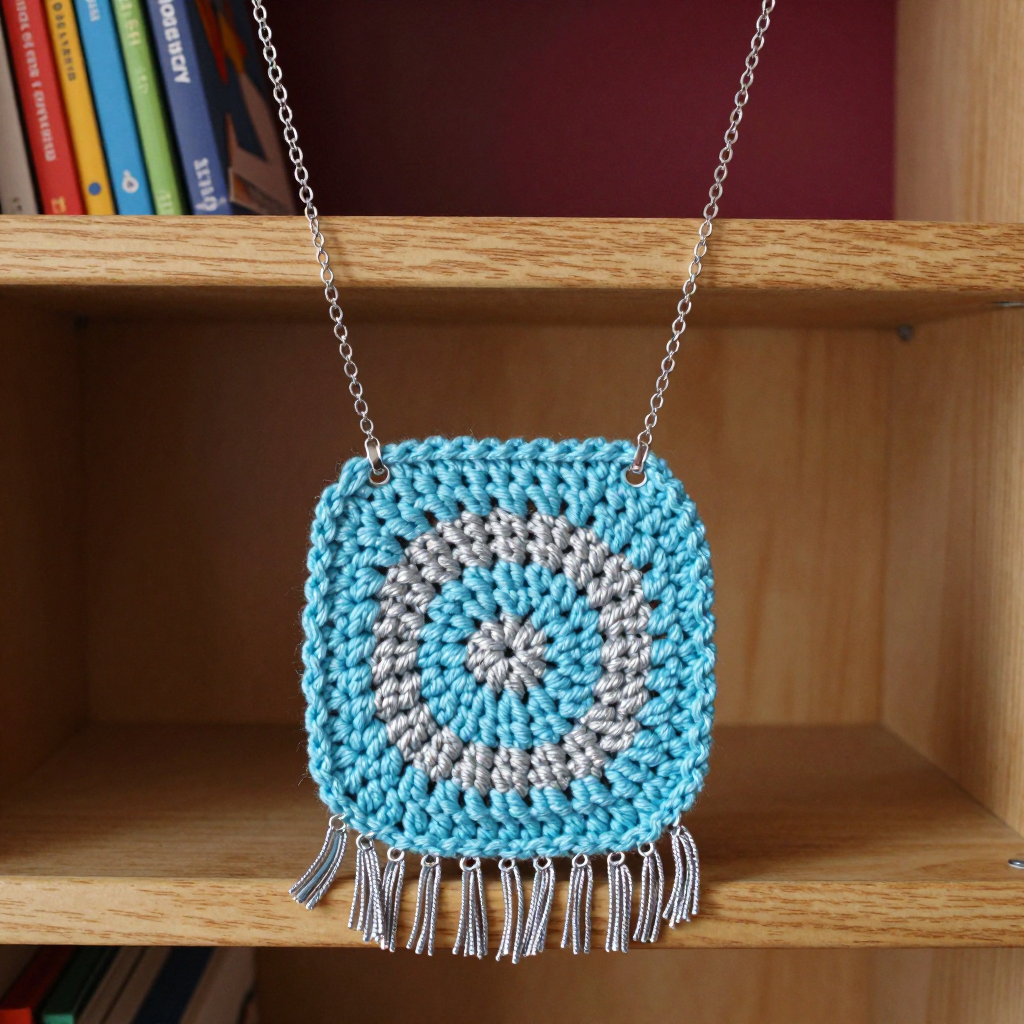
If you have never held a crochet hook before, this is the perfect first project to fall in love with. The Frosted Moon Drop Necklace is a tiny, flat, circular pendant made from a classic granny-square medallion, worked in icy blue and shimmering silver, then hung from a simple crocheted cord with a whisper of silver fringe at the bottom. It is small enough to finish in one cozy sitting, and forgiving enough that any little wobble disappears once you block it flat. The finished piece looks like a little frosted moon resting at your collarbone: smooth, light, and quietly bohemian. You will be amazed that something this pretty came off your very own hook.
Materials Needed
- Yarn: Worsted weight (category 4) acrylic or cotton yarn in ice blue (Color A) and silver (Color B). You need only a small amount of each — about 10 yards of Color A and 5 yards of Color B.
- Fringe thread: A small amount of silver metallic crochet thread (about 3 feet total).
- Hook: G/6 (4.0 mm) crochet hook.
- Stitch marker: 1 removable stitch marker (or a scrap of contrasting yarn) to mark your first stitch.
- Tapestry needle: A blunt-tipped needle with a large eye for weaving in ends.
- Scissors: Any small sharp pair.
- Finished size: Pendant is 2.25 inches (5.7 cm) in diameter after steam-blocking. Cord is 120 chains long (roughly 30 inches / 76 cm, depending on your tension).
Abbreviations and Beginner Glossary
- ch – chain: wrap the yarn over your hook and pull it through the loop already on your hook. This makes one chain stitch.
- sl st – slip stitch: insert your hook into the stitch, wrap yarn over, and pull it through both the stitch and the loop on your hook at the same time. It joins things without adding height.
- sc – single crochet: insert hook into stitch, yarn over, pull up a loop (2 loops on hook), yarn over, pull through both loops. One sc made.
- dc – double crochet: yarn over, insert hook into stitch, yarn over, pull up a loop (3 loops on hook), yarn over, pull through 2 loops, yarn over, pull through last 2 loops. One dc made.
- sp – space: the little gap created by a chain. You work into the gap, not into a stitch.
- ch-2 sp / ch-1 sp – a space made by 2 chains or 1 chain.
- st(s) – stitch(es).
- beg – beginning.
- magic ring – an adjustable loop of yarn you pull closed after working into it, so there is no hole in the center. (If you prefer, chain 4 and join with a sl st to form a ring instead.)
- join – connect the last stitch of a round to the first with a sl st.
- fasten off – cut the yarn leaving a tail, then pull the tail through the last loop to lock it.
- lark's-head knot – fold a strand in half, pull the fold through a space with your hook, then pull the two loose ends through that fold and pull tight.
- blocking – dampening and shaping the finished piece so it lies flat and even.
Gauge
Gauge: The first 2 rounds of the granny square measure 1.5 inches (3.8 cm) across. The finished pendant measures 2.25 inches (5.7 cm) in diameter.
Why gauge matters: Gauge is simply how big your stitches turn out. If your stitches are looser or tighter than the pattern expects, your pendant will come out larger or smaller than 2.25 inches. For a necklace this is mostly about looks, not fit, but matching gauge keeps the proportions right.
How to check: Work Rounds 1 and 2 of the pendant, then lay it flat and measure straight across. If it is bigger than 1.5 inches, try a smaller hook; if smaller, try a larger hook. You can simply use your practice piece as the start of your real pendant.
Beginner Tips Before You Start
- Use a stitch marker. Place it in the first stitch of each round so you always know where the round began and where to join.
- Do not pull your yarn too tight. Relaxed, even tension keeps the granny clusters soft and the pendant flat. Tight stitches make it cup and curl.
- Count your clusters. Each granny "cluster" is 3 double crochets. Counting in groups of 3 is much easier than counting single stitches.
- Work into the spaces, not the stitches. In Rounds 1–3 you crochet into the chain spaces. Only in Rounds 4–5 do you work into individual stitches.
- Keep your starting tail long. A 4-inch tail is easier to thread on a tapestry needle later.
- Steam-block before you attach the cord. A flat pendant hangs beautifully; a curly one does not.
Step-by-Step Instructions
Pendant (make 1)
Round 1: With Color A, make a magic ring. Ch 3 (this counts as your first dc), work 2 dc into the ring, ch 2, then [3 dc, ch 2] three times into the ring. Join with a sl st to the top of the beginning ch-3. (12 dc, 4 ch-2 sps)
Round 2: Sl st into the next 2 dc and into the first ch-2 sp. Ch 3, work [2 dc, ch 2, 3 dc] into that same ch-2 sp (this makes your first corner), ch 1. Then *[3 dc, ch 2, 3 dc] into the next ch-2 sp, ch 1; repeat from * around. Join with a sl st to the top of the beginning ch-3. (24 dc, 4 ch-2 sps, 4 ch-1 sps)
Round 3: Change to Color B. Sl st into the next 2 dc and into the first ch-2 sp. Ch 3, work [2 dc, ch 2, 3 dc] into that same sp, ch 1, then 3 dc into the next ch-1 sp, ch 1. Then *[3 dc, ch 2, 3 dc] into the next ch-2 sp, ch 1, 3 dc into the next ch-1 sp, ch 1; repeat from * around. Join with a sl st to the top of the beginning ch-3. (36 dc, 4 ch-2 sps, 8 ch-1 sps)
Round 4 (frame): Change to Color A. Ch 1, then sc in each dc and in each ch-1 sp all the way around, working 3 sc in each ch-2 corner sp. Join with a sl st to the first sc. (48 sc)
Round 5 (frame edge): Ch 1, sc in each sc around. Join with a sl st to the first sc. Fasten off and weave in ends. Lightly steam-block flat into a circle. (48 sc)
Cord
Cord: With Color B, leave a 4-inch tail and ch 120. Fasten off, leaving another 4-inch tail. (120 ch)
Attaching the cord: Thread one end of the cord through the top corner ch-2 space of the pendant and knot it securely. Repeat with the other end through the opposite top corner space to form a necklace loop. Trim the tails.
Silver Fringe
Cut 12 strands of silver metallic thread, each 3 inches long. Fold each strand in half. Insert your hook from front to back through the bottom corner ch-2 space of the pendant, pull the fold through, then pull the strand ends through the fold and tighten to make a lark's-head knot. Space the 12 strands evenly across the bottom edge of the pendant. Trim the fringe ends evenly to about 1 inch.
Assembly and Finishing
Weave in ends: Thread each yarn tail onto your tapestry needle and run it back and forth through the back of a few stitches, then trim close. Never knot your ends on the front of the piece.
Blocking: Pin the pendant flat, face up, onto a towel or blocking mat, mist it lightly with water (or hold a steam iron a few inches above it — do not press the iron onto the yarn), and let it dry completely. This opens up the granny clusters and makes the circle perfectly round.
Final check: Gently finger-press the pendant flat, adjust the cord so the pendant hangs centered, and fluff the fringe with your fingers.
Pro Tips and Variations
- Change the colors: Swap ice blue and silver for any two shades you love — lavender and pearl, blush and gold, or deep teal and copper all look lovely.
- Make it bigger or smaller: Add one more granny round (worked like Round 3) for a larger pendant, or stop after Round 2 for a tiny charm. Adjust the cord length to suit.
- Substitute yarn: Cotton gives a crisp, matte look; acrylic is soft and slightly shiny. Just check your gauge again if you switch.
- Change the cord: Replace the crocheted chain with a thin ribbon or a store-bought chain for a dressier finish.