Free Pattern: Rose and Grey Polka Dot Overlay Crochet Bookmark Pair
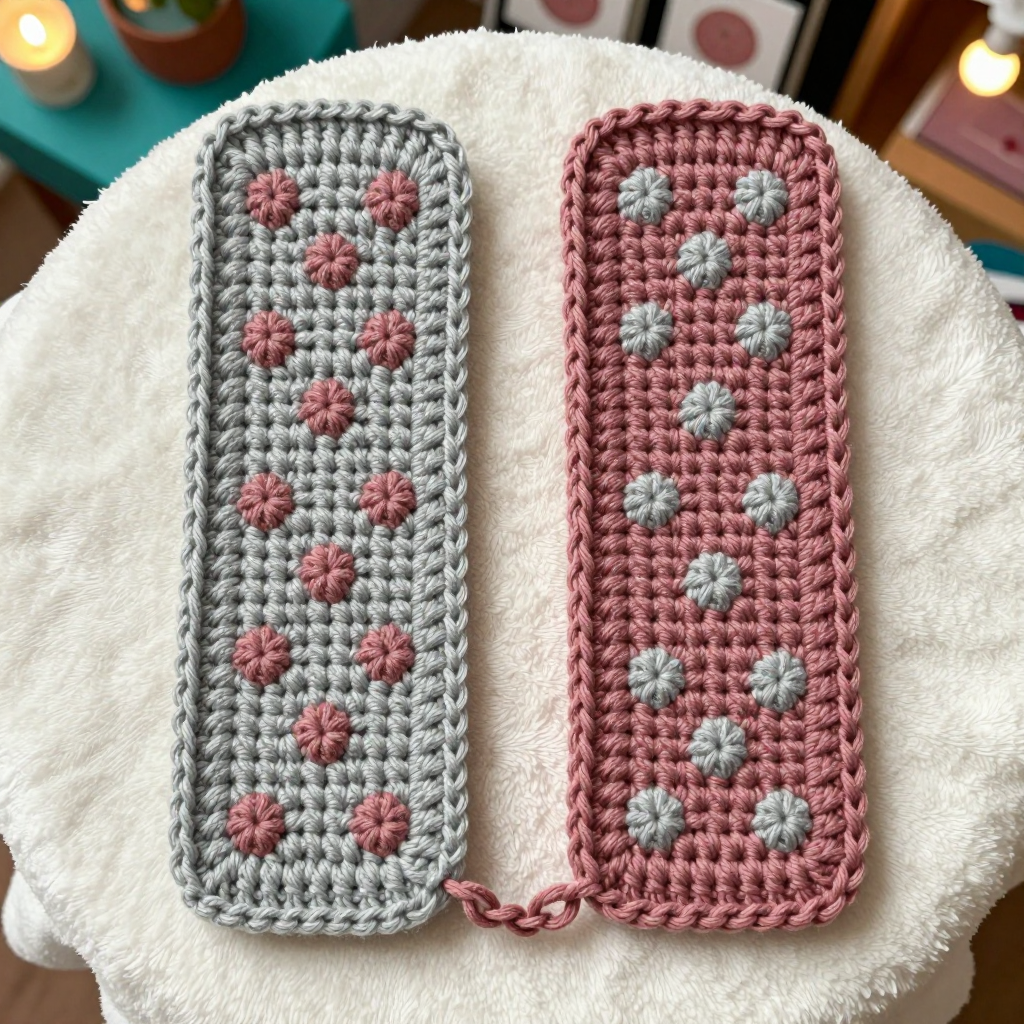
Rose and Grey Polka Dot Overlay Crochet Bookmark Pair
If you have never held a crochet hook before, this is the perfect first project for you. This matched pair of flat bookmarks is small, quick, and forgiving — you will finish your very first one in about an hour. Each bookmark is worked in soft bulky wool in dusty rose and light grey, scattered with little contrast polka dots that sit slightly raised on the surface, and finished with a doubled crocheted chain cord that ties the pair together. The finished pieces feel soft and matte, with a gentle ballet-core charm, and they slip neatly between the pages of your favorite book. By the end you will know how to chain, single crochet, slip stitch, and even work a fancy-sounding "overlay" stitch that is really just a single crochet in a sneaky spot.
Materials Needed
- Yarn: Bulky (weight 5) wool yarn, approximately 30 yds / 27 m total — 15 yds / 14 m in dusty rose and 15 yds / 14 m in light grey. The sample used a soft single-ply bulky wool.
- Hook: 5.0 mm (US H-8) crochet hook, or the size needed to match gauge.
- Stitch markers: 2 (helpful for marking your first stitch of each row).
- Tapestry needle: A blunt-tipped yarn needle for weaving in ends.
- Scissors: Sharp craft scissors for trimming yarn.
- Finished size: Each bookmark is 2 in / 5 cm wide x 7 in / 18 cm long (the body), plus a 2 in / 5 cm crocheted chain end that joins the pair.
Abbreviations and Beginner Glossary
- ch — chain. Make a loop of yarn on your hook, wrap the yarn over the hook, and pull it through the loop. That is one chain. Chains form your foundation.
- sc — single crochet. Insert your hook into the stitch, wrap yarn over the hook, pull up a loop (you now have 2 loops on the hook), wrap yarn over again, and pull through both loops. One single crochet made.
- sl st — slip stitch. Insert your hook into the stitch, wrap yarn over, and pull it straight through both the stitch and the loop on your hook in one motion. It makes a nearly invisible joining stitch.
- st(s) — stitch or stitches.
- RS — right side. The front, public-facing side of your work.
- WS — wrong side. The back side of your work (the side facing you on turning rows).
- overlay sc — a single crochet worked into the front loop only of a stitch one row below your working row, in the contrast color, leaving the current-row stitch unworked behind it. This is what makes the raised polka dot.
- front loop — every single crochet stitch has two little loops at its top, like a sideways "V." The one closer to you is the front loop.
- fasten off — cut the yarn a few inches from your work and pull the tail all the way through the last loop to lock it.
- weave in ends — thread a yarn tail onto a tapestry needle and sew it back and forth through the back of your fabric so it disappears.
Gauge
14 sc x 16 rows = 4 in / 10 cm in single crochet, worked flat and unblocked.
Why gauge matters: Gauge is simply how big your stitches come out. If your stitches are looser or tighter than mine, your bookmark will be wider or shorter than 2 x 7 inches. Because this project is small, a small difference adds up fast.
How to make a gauge swatch: With your grey yarn, chain 16. Single crochet in the second chain from the hook and in each chain across (15 sts). Work 16 rows of single crochet, turning at the end of each row. Lay it flat and measure a 4-inch square in the middle. If you have more than 14 stitches in 4 inches, your stitches are too tight — try a larger hook. If you have fewer than 14, your stitches are too loose — try a smaller hook.
Beginner Tips Before You Start
- Count every row. Seven stitches per row is easy to lose track of. Place a stitch marker in the first stitch of each row so you always know where the row begins.
- Do not pull the yarn too tight. Tension is the number one beginner struggle. Let the yarn flow; tight stitches make a stiff, narrow bookmark.
- Carry the contrast color loosely. When you switch to rose for a dot, leave a little slack along the side edge. If you pull it snug, the bookmark will pucker.
- Work the dot on the wrong-side row. Overlay dots are always made on WS rows so the dot pops out on the right side. Trust the pattern — it works.
- Keep your turning chain tiny. The "ch 1" at the start of each row is just a little lifter. Do not count it as a stitch.
- Make Bookmark A first. Once you have done the grey one, the rose one is simply the same pattern with the colors swapped.
Step-by-Step Instructions
Notes Before You Begin
Work both bookmarks flat, turning at the end of every row. Bookmark A is grey ground with dusty-rose dots. Bookmark B is dusty-rose ground with grey dots. Carry the contrast color loosely up the side edge; do not cut it between dots. Each dot covers 1 stitch and sits 4 rows apart, staggered. All stitches are US terms.
Bookmark A — Grey Ground, Dusty-Rose Dots
Row 1 (RS): With grey, ch 8. Sc in the 2nd ch from hook and in each ch across. (7 sc) Turn.
Rows 2–3: Ch 1, sc in each st across. (7 sc) Turn.
Row 4 (WS): Ch 1, sc in first 2 sts, join dusty rose, overlay sc in the front loop of the st 2 rows below the 3rd st, sc in next 4 sts with grey. (7 sc) Turn. Do not cut rose; carry it up the side.
Rows 5–7: Ch 1, sc in each st across with grey. (7 sc) Turn.
Row 8 (WS): Ch 1, sc in first 4 sts, overlay sc in rose in the front loop of the st 2 rows below the 5th st, sc in last 2 sts with grey. (7 sc) Turn.
Rows 9–11: Ch 1, sc in each st across with grey. (7 sc) Turn.
Row 12 (WS): Ch 1, sc in first st, overlay sc in rose in the front loop of the st 2 rows below the 2nd st, sc in next 4 sts, overlay sc in rose in the front loop of the st 2 rows below the 7th st, sc in last st with grey. (7 sc) Turn.
Rows 13–15: Ch 1, sc in each st across with grey. (7 sc) Turn.
Row 16 (WS): Ch 1, sc in first 3 sts, overlay sc in rose in the front loop of the st 2 rows below the 4th st, sc in last 3 sts with grey. (7 sc) Turn.
Rows 17–19: Ch 1, sc in each st across with grey. (7 sc) Turn.
Row 20 (WS): Ch 1, sc in first 5 sts, overlay sc in rose in the front loop of the st 2 rows below the 6th st, sc in last st with grey. (7 sc) Turn.
Rows 21–23: Ch 1, sc in each st across with grey. (7 sc) Turn.
Row 24 (WS): Ch 1, sc in first 2 sts, overlay sc in rose in the front loop of the st 2 rows below the 3rd st, sc in next 2 sts, overlay sc in rose in the front loop of the st 2 rows below the 6th st, sc in last st with grey. (7 sc) Turn.
Rows 25–28: Ch 1, sc in each st across with grey. (7 sc) Turn. Fasten off grey and rose, leaving a 4 in / 10 cm tail.
Check: 28 rows total, 7 sts per row. At 4 rows per inch this gives 7 in / 18 cm long; at 3.5 sts per inch, 7 sts gives 2 in / 5 cm wide.
Bookmark B — Dusty-Rose Ground, Grey Dots
Work exactly as Bookmark A, substituting dusty rose for grey and grey for dusty rose throughout, including the same dot placement on Rows 4, 8, 12, 16, 20 and 24. Every row count stays the same: 7 sts per row, 28 rows total.
Chain End (Joins the Pair)
Step 1: Hold both bookmarks with right sides facing out and bottom edges level.
Step 2: Join dusty rose with a sl st at the bottom-right corner of Bookmark A.
Step 3: Ch 30. Sl st to the bottom-right corner of Bookmark B. Ch 1, turn.
Step 4: Sl st in each ch back to Bookmark A, working over the chain to make a firm cord. Sl st to the Bookmark A corner. Fasten off and weave in ends.
Step 5: Repeat the chain cord once more alongside the first cord, joining the same two corners, to make a doubled 2 in / 5 cm chain end.
Assembly and Finishing
Weaving in ends: Thread each yarn tail onto your tapestry needle. Working on the wrong side, sew the tail back and forth through the backs of 4–5 stitches, then reverse direction and sew back through 2–3 more. Trim close to the fabric. Never knot your ends — knots work loose and show through.
Trimming carried yarn: Trim any carried contrast yarn at the side edges to 1/4 in / 6 mm so it does not show.
Blocking: Steam-block lightly. Hold a steam iron an inch or two above the fabric (never press it down) and let the steam relax the wool. Press only the edges flat with your fingers — do not flatten the raised overlay dots, or you will lose the polka-dot texture. Let the bookmarks dry completely flat before using them.
Pro Tips and Variations
- Change the colors: Try cream with sage dots, or navy with mustard dots. Any two bulky wool colors work — just keep one light and one dark so the dots stand out.
- Make it longer or shorter: Each extra 4 rows adds about 1 in / 2.5 cm. Add or remove rows in multiples of 4 so the dot spacing stays even, and add a dot row every 4th row to match.
- Substitute yarn: A worsted (weight 4) yarn held double, or a chunky cotton, will also work — but always swatch first, because a different yarn changes your gauge and therefore your finished size.
- Make a single bookmark: Skip the chain end entirely and simply weave in your tails for a standalone bookmark, or add a simple tassel at the top instead.