Eiffel Tower Bookmark Lace: Free Crochet Pattern for Parisian Chic Readers
Eiffel Tower Bookmark Lace: Free Crochet Pattern for Parisian Chic Readers
Introduction
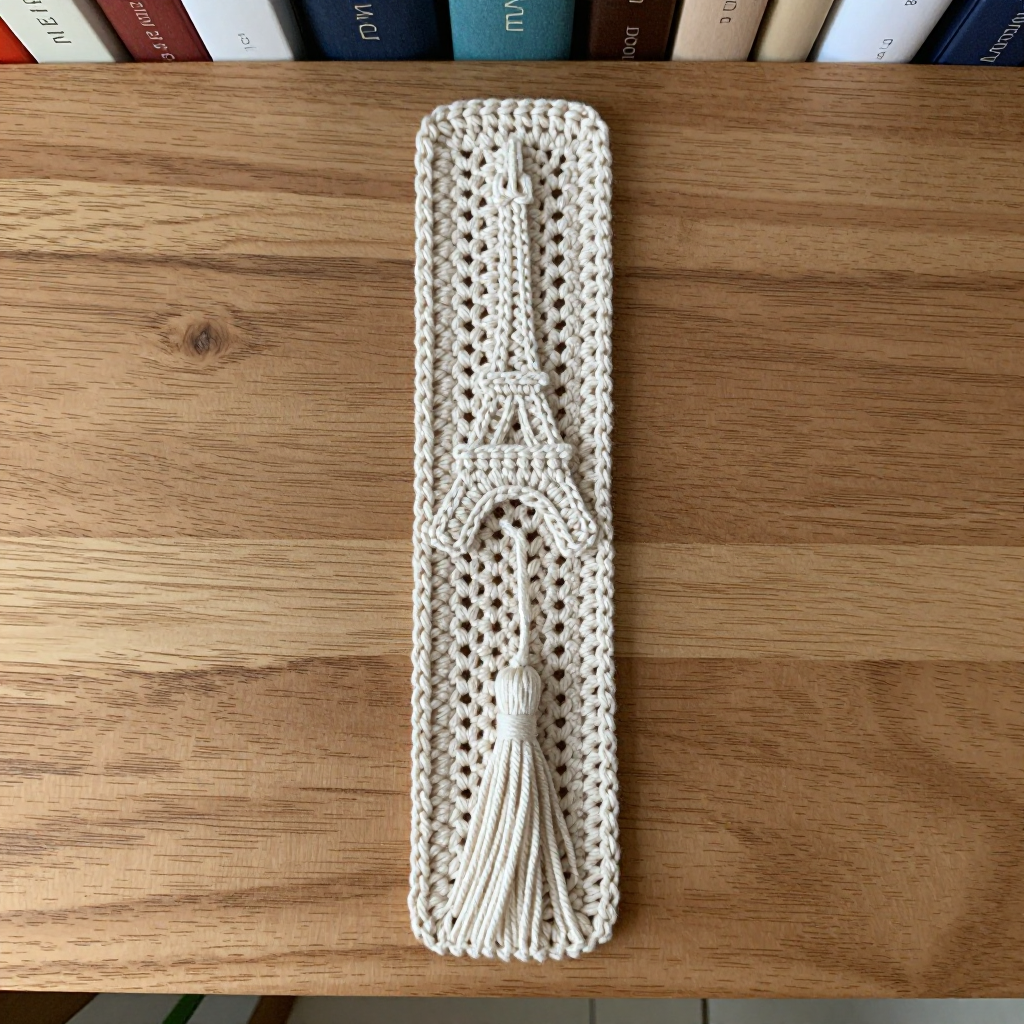
If you have ever wanted to make something beautiful with your own hands but felt a little nervous about starting, this is the perfect first project for you. This slim, airy bookmark is worked in soft écru cotton with a simple repeating stitch that creates delicate open "ladder" columns, then crowned with a tiny crocheted Eiffel Tower and finished with a sweet yarn tassel. It is quick enough to finish in a single cozy afternoon, and it makes a thoughtful, elegant gift for anyone who loves books, Paris, or both. The finished piece is about 2 inches wide and 7 inches long (plus the tassel), with a smooth, slightly lustrous cotton texture and crisp stitch definition that looks far more complicated than it really is. You only need one hook, one ball of yarn, and a few basic stitches — and we will walk through every single one together.
Materials Needed
- Yarn: Fine (2) sport-weight 100% mercerized cotton in écru (off-white) — approximately 15–20 g (30–40 m) total. The sample used DMC Petra No. 5 or a similar smooth cotton.
- Main hook: 2.5 mm (US B/1) crochet hook — used for the bookmark body and the tower.
- Detail hook: 2.0 mm (US 4 steel) hook — used for the fine tower details and edging.
- Stitch marker (one or two) — a small clip or safety pin used to mark a stitch so you do not lose your place.
- Tapestry needle — a large-eyed, blunt-tipped needle used for sewing pieces together and weaving in yarn ends.
- Small sharp scissors — for cutting yarn.
- Cardboard piece 2 in (5 cm) wide — used as a template for making the tassel.
Finished measurements: Bookmark body 2 in (5 cm) wide × 7 in (18 cm) long, excluding tassel. Tower appliqué 1 in (2.5 cm) wide at the base × 2.5 in (6.5 cm) tall. Tassel 2 in (5 cm) long. Total hanging length approximately 9.5 in (24 cm).
Abbreviations and Beginner Glossary
Every term below is explained as if you have never held a hook before. Read through this list once and you will be ready to begin.
- ch — chain. Make a loop with the yarn on your hook (a slip knot), then wrap the yarn over the hook and pull it through the loop on your hook. That is one chain. Chains form your starting foundation.
- sc — single crochet. Insert your hook into the next stitch, wrap the yarn over the hook, pull up a loop (you now have 2 loops on the hook), wrap the yarn over again, and pull it through both loops. One single crochet made.
- dc — double crochet. Wrap the yarn over the hook first, insert the hook into the next stitch, pull up a loop (3 loops on hook), wrap yarn over and pull through 2 loops, wrap yarn over and pull through the last 2 loops.
- tr — treble crochet. Wrap the yarn over the hook twice, insert into the stitch, pull up a loop (4 loops on hook), then wrap and pull through 2 loops three times.
- sl st — slip stitch. Insert the hook into the stitch, wrap the yarn over, and pull it through both the stitch and the loop on your hook in one motion. Used to join rounds or move without adding height.
- sc2tog — single crochet two stitches together (a decrease). Insert hook into the first stitch, pull up a loop, insert hook into the next stitch, pull up a loop (3 loops on hook), wrap yarn over and pull through all 3 loops. This turns 2 stitches into 1.
- sp — space. The little gap between stitches, usually under a chain.
- st(s) — stitch(es).
- sk — skip. Do not work into that stitch or chain; leave it empty.
- ch-1 sp — chain-1 space. The small gap created by a single chain in the row below.
- ch-3 sp — chain-3 space. The larger gap created by three chains in the row below.
- RS — right side. The "front" or prettier face of your work.
- WS — wrong side. The "back" face of your work.
- rep — repeat. Do the instruction again the number of times stated.
- turn — flip your work over so you can crochet back along the row you just made.
- fasten off — cut the yarn leaving a tail, then pull the tail through the last loop on your hook and tighten to secure.
Gauge
Bookmark body gauge: 9 pattern repeats (ladder stitch) = 4 in (10 cm) wide; 12 rows = 4 in (10 cm). Tower motif gauge: 1 in (2.5 cm) wide at the base, 2.5 in (6.5 cm) tall.
Why gauge matters: Gauge is simply how big your stitches come out. If your stitches are looser or tighter than the pattern's, your finished bookmark will be too wide or too narrow, and the tower may not fit the body. How to check: With your 2.5 mm hook and chosen yarn, chain 21 and work the ladder-stitch pattern for about 12 rows. Lay the swatch flat and measure a 4 in (10 cm) section across the width and 4 in (10 cm) up the height. If your swatch is wider than 4 in, try a smaller hook; if narrower, try a larger hook. Because this is a small accessory, a small difference is fine — but always check before you commit.
Beginner Tips Before You Start
- Count your chains carefully at the start. The foundation chain of 21 sets up the whole bookmark. Count twice before your first row.
- Use a stitch marker to clip onto your first stitch of each row so you never lose track of where a row begins and ends.
- Do not pull the yarn too tight. Keep your tension relaxed and even — tight stitches make the ladder openings close up and the bookmark stiff.
- Keep the ch-1 spaces open. When you skip a chain-1 space, leave it loose and airy; that openwork is what gives the bookmark its lace look.
- Work the tower slowly. The tower has decreases (sc2tog) that shape the triangle — count your stitches at the end of every row to stay on track.
- Practice the special stitch first. Make a tiny 10-chain practice swatch of ladder stitch before starting the real bookmark.
Step-by-Step Instructions
Special Stitch — Ladder Stitch (worked flat over an odd number of stitches)
Row 1 (RS): sc in 2nd ch from hook, *ch 1, sk next ch, sc in next ch; rep from * to end, turn.
Row 2: ch 1 (does not count as a st), sc in first sc, *ch 1, sk next ch-1 sp, sc in next sc; rep from * to end, turn.
Repeat Row 2 for the pattern. The ch-1 spaces form the open "ladder" columns.
Bookmark Body
With the 2.5 mm (US B/1) hook, ch 21.
Row 1 (RS): sc in 2nd ch from hook, *ch 1, sk next ch, sc in next ch; rep from * to end — (11 sc, 10 ch-1 sps). Turn.
Row 2: ch 1, sc in first sc, *ch 1, sk next ch-1 sp, sc in next sc; rep from * to end — (11 sc, 10 ch-1 sps). Turn.
Rows 3–21: Repeat Row 2 — (11 sc, 10 ch-1 sps). Do not fasten off.
Border (worked around the entire bookmark body)
Round 1: ch 1, work 1 sc in each sc and 1 sc in each ch-1 sp along the top edge (21 sc); work 1 sc in each row-end along the right side (21 sc); work 1 sc in each foundation ch along the bottom edge (21 sc); work 1 sc in each row-end along the left side (21 sc); join with sl st to first sc — (84 sc). Fasten off, weave in ends. Block lightly to 2 in × 7 in (5 cm × 18 cm).
Eiffel Tower Appliqué (worked in rows, bottom to top)
Use the 2.5 mm hook for the main body of the tower and switch to the 2.0 mm (US 4 steel) hook for the upper section and details. The tower is worked as a flat triangle with a flared base and a small spire.
With the 2.5 mm hook, ch 11.
Row 1 (RS): sc in 2nd ch from hook and in each ch across — (10 sc). Turn.
Row 2: ch 1, sc in first 2 sc, ch 3, sk 3 sc, sc in next 2 sc, ch 3, sk 3 sc, sc in last 2 sc — (6 sc, two ch-3 sps). Turn. These ch-3 spaces form the open "legs" of the tower base.
Row 3: ch 1, sc in first 2 sc, 3 sc in ch-3 sp, sc in next 2 sc, 3 sc in ch-3 sp, sc in last 2 sc — (12 sc). Turn.
Row 4: ch 1, sc in each sc across — (12 sc). Turn.
Row 5 (decrease): ch 1, sc2tog, sc in next 8 sc, sc2tog — (10 sc). Turn.
Row 6: ch 1, sc in each sc across — (10 sc). Turn.
Row 7 (decrease): ch 1, sc2tog, sc in next 6 sc, sc2tog — (8 sc). Turn.
Row 8: ch 1, sc in each sc across — (8 sc). Turn.
Row 9 (decrease): ch 1, sc2tog, sc in next 4 sc, sc2tog — (6 sc). Turn.
Row 10: ch 1, sc in each sc across — (6 sc). Turn.
Row 11 (decrease): ch 1, sc2tog, sc in next 2 sc, sc2tog — (4 sc). Turn.
Row 12: ch 1, sc in each sc across — (4 sc). Turn.
Row 13 (decrease): ch 1, sc2tog twice — (2 sc). Turn.
Row 14 (spire): ch 1, sc2tog — (1 sc). Do not fasten off.
Tower Edging and Cross-Bracing
With the 2.0 mm hook, work 1 sc in each row-end along both sloping sides of the tower, and 1 sc in each st along the base, working (sc, ch 1, sc) at the two bottom corners to keep them sharp. Join with sl st. Fasten off, leaving a 10 in (25 cm) tail for sewing.
Cross-bracing: with the 2.0 mm hook and a 12 in (30 cm) length of yarn, embroider two diagonal lines across the lower open section of the tower (from bottom-left to mid-right and bottom-right to mid-left) using straight stitches, then one horizontal line across the middle. Fasten off securely on the WS.
Tassel
Wrap écru yarn around the 2 in (5 cm) cardboard approximately 20 times. Slide the bundle off, tie a tight knot around the top with a 6 in (15 cm) length, and cut the bottom loops. Wrap yarn 4–5 times around the tassel about 0.5 in (1.3 cm) below the top knot to form the head; secure and weave in. Trim the ends evenly.
Assembly and Finishing
Attaching the tower: Pin the tower appliqué to the top portion of the bookmark body, centering it with the base approximately 1 in (2.5 cm) below the top border. Using the 2.5 mm hook and the reserved 10 in (25 cm) tail, sew the tower to the bookmark with small whip stitches (bring the needle up through both layers, over the edge, and down again in a neat spiral) along the base and lower sides only, leaving the upper spire free for a slight 3-D lift. Weave in ends.
Attaching the tassel: Using the 2.5 mm hook, attach the tassel to the bottom center of the bookmark with a sl st, then secure with a tapestry needle and weave in the tail.
Weaving in ends: Thread each loose yarn tail onto the tapestry needle and run it back and forth through the back of several stitches (about 1 in / 2.5 cm), then trim close to the work. Never knot your ends — weaving hides them invisibly.
Blocking: Mist the finished bookmark lightly with water, pin it flat to the measurements (2 in × 7 in / 5 cm × 18 cm) on a towel or blocking mat, and allow it to dry fully. This opens the ladder spaces and makes the cotton lie perfectly flat.
Care: Hand wash in cool water with mild soap, reshape, and dry flat.
Pro Tips and Variations
- Change the color: Swap the écru cotton for dusty rose, sage green, or classic navy for a different mood. A contrasting tower (for example, soft grey on cream) makes the appliqué pop.
- Adjust the size: To make a longer bookmark, simply add more repeats of Row 2 in the body (each extra row adds about 1/3 in / 8 mm). Keep the border stitch count consistent by working 1 sc into every sc, every ch-1 sp, and every row-end.
- Substitute yarn: Any fine (2) sport-weight cotton works beautifully. Avoid fuzzy or slippery yarns for your first attempt — smooth mercerized cotton shows the ladder stitch most clearly.
- Personalize the tower: Add a tiny embroidered star at the spire tip, or work the cross-bracing in a contrasting metallic thread for a subtle sparkle.