Free Pattern: Homestead Check Knit Bonnet in Fisherman Rib
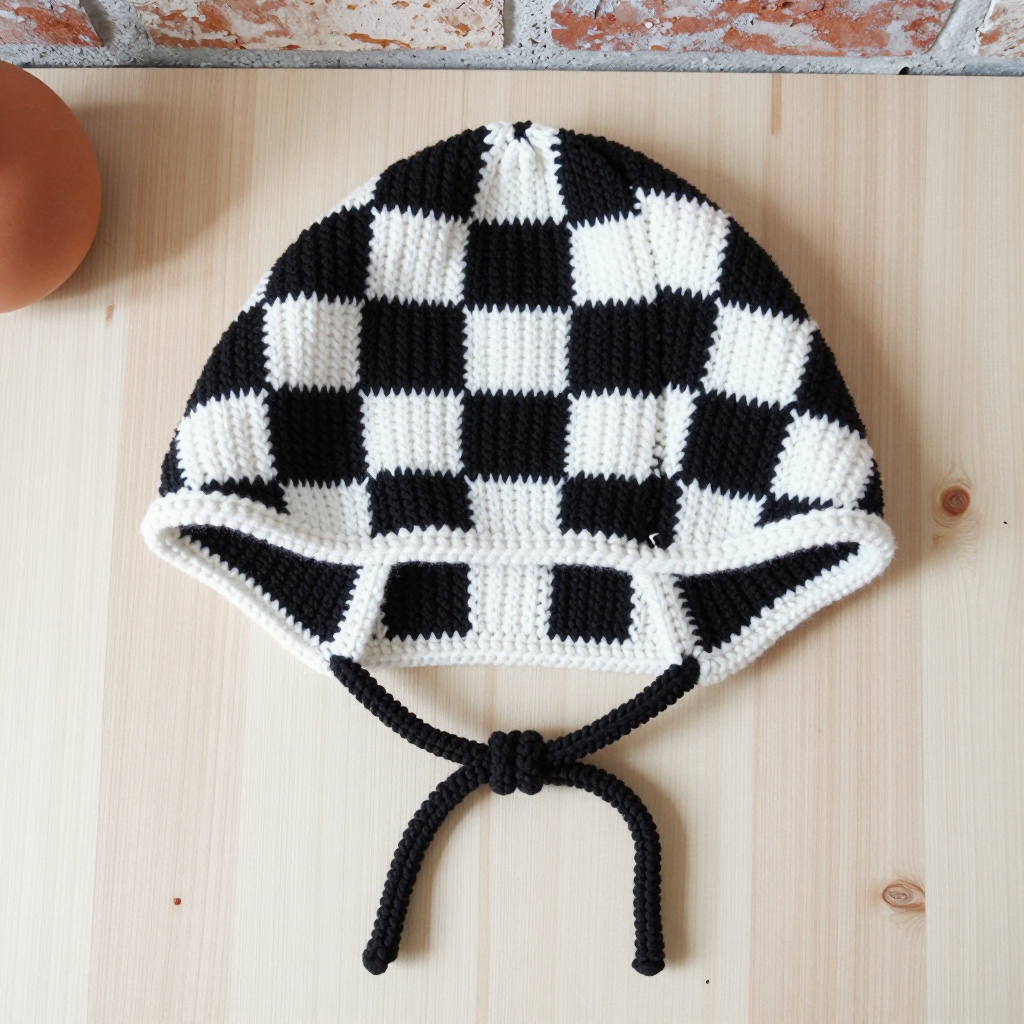
Free Pattern: Homestead Check Knit Bonnet in Fisherman Rib
Introduction
If you have never knitted a single stitch in your life, this bonnet is the perfect place to begin. The Homestead Check Knit Bonnet is a cozy, two-panel hat worked flat on straight needles in a deep, squishy fisherman rib, then seamed up the back for a rustic farmhouse finish. The bold black-and-white patchwork squares make it look far more complicated than it actually is, and the plush chenille yarn hides any little wobbles in your tension. When it is finished, you will hold a soft, velvety bonnet about 9 inches wide and 8 inches deep, with a thick, springy texture and two cheek ties that keep it snug on a toddler. It looks like something from a country farmhouse shop, but you made it yourself, one simple row at a time.
Materials Needed
- Yarn: Chenille plush yarn, bulky (weight category 5), approximately 120 yds (110 m) total: 60 yds (55 m) black (Color A) and 60 yds (55 m) white (Color B).
- Main needles: US 10 (6.0 mm) straight knitting needles.
- Tie needles: US 8 (5.0 mm) straight needles (for the I-cord ties and the optional edging).
- Stitch markers: 2 or more, to mark the right side and to keep track of your squares.
- Tapestry needle: a large blunt needle with an eye big enough for bulky yarn, for seaming and weaving in ends.
- Scissors: sharp, for cutting yarn cleanly.
- Finished size: Fits a toddler head circumference of 18–20 in (46–51 cm). Finished bonnet width across the crown: 9 in (23 cm). Depth from crown to nape: 8 in (20 cm).
Abbreviations and Beginner Glossary
- st / sts – stitch / stitches. One loop on your needle is one stitch.
- RS – right side. The side of the fabric that faces out when the bonnet is worn.
- WS – wrong side. The inside of the bonnet.
- K – knit. Insert the right needle into the front of the stitch, wrap the yarn around, and pull the loop through.
- P – purl. Insert the right needle into the front of the stitch from right to left, wrap the yarn around the front, and pull the loop through to the back.
- p1b – purl one below. Instead of working into the stitch on your needle, insert the needle into the stitch one row below it and purl that loop, then let the top stitch drop. This creates the deep fisherman rib texture.
- k2tog – knit two together. Insert the needle into the next two stitches at once and knit them as one. This decreases your stitch count by one.
- p2tog – purl two together. Purl the next two stitches as one. This also decreases by one.
- rep – repeat. Do the same thing again.
- * to * – repeat the instructions between the asterisks as many times as told.
- cast on – the very first step: making the starting loops on your needle.
- bind off – the last step: closing the live stitches so the fabric does not unravel.
- fasten off – cut the yarn and pull the tail through the last loop to secure it.
- I-cord – a thin knitted tube made by knitting a few stitches, sliding them back to the other end of the needle, and knitting them again.
- mattress stitch – a seaming method that joins two edges invisibly from the right side.
Gauge
12 sts and 14 rows = 4 in (10 cm) in fisherman rib on US 10 needles, measured unstretched.
Gauge simply means how big your stitches turn out. If your stitches are looser or tighter than this, your bonnet will come out bigger or smaller than 9 inches wide, and it may not fit. To check, cast on about 20 stitches with your main yarn and needles, work in fisherman rib for about 5 inches, then lay the swatch flat without pulling it and count how many stitches fit across 4 inches. If you have more than 12, your stitches are too small, so try a larger needle. If you have fewer than 12, try a smaller needle. This five-minute step saves hours of re-knitting later.
Beginner Tips Before You Start
- Mark your right side. Place a stitch marker on the right side of your work so you always know which row you are on. Color changes happen only on right-side rows.
- Do not pull the yarn tight. Chenille yarn is plush and squishy; if you tug it, the texture flattens. Let the yarn relax and keep your stitches even and loose.
- Carry the unused color loosely. When you switch from black to white, leave a small loop of the resting color along the side edge. If you pull it tight, the edge will pucker.
- Count your stitches after every decrease row. The shaping rows change your count, and the numbers in parentheses tell you exactly what you should have.
- Work the p1b slowly at first. Purl one below feels strange the first few times. Look for the loop one row down, purl it, and let the top stitch fall off.
- Keep a tally of your squares. Each square is 7 rows tall. After every 7 rows, check that your color block looks square, not stretched.
Step-by-Step Instructions
Stitch Guide: Fisherman Rib (Flat)
Worked over an even number of stitches.
Row 1 (RS): *K1, p1; rep from * to end.
Row 2 (WS): *P1b, k1; rep from * to end.
Repeat Row 2 for the pattern. Each knit column is worked as p1b on wrong-side rows, which creates the deep, squishy rib. Work all color changes on right-side rows, carrying the unused color loosely up the side edge.
Panel (make 2 identical)
With US 10 needles and Color A (black), cast on 28 sts.
Set up: Work in Fisherman Rib as above.
Checkerboard Color Sequence (each square is 7 sts wide x 7 rows tall):
Rows 1–7: Work in Color A (black). (28 sts)
Rows 8–14: Work in Color B (white). (28 sts)
Rows 15–21: Work in Color A (black). (28 sts)
Rows 22–28: Work in Color B (white). (28 sts)
Rows 29–35: Work in Color A (black). (28 sts)
Rows 36–42: Work in Color B (white). (28 sts)
Rows 43–49: Work in Color A (black). (28 sts)
Rows 50–56: Work in Color B (white). (28 sts)
Shape the Crown (top of bonnet)
Row 57 (RS): With Color A, k2tog, work in rib to last 2 sts, k2tog. (26 sts)
Row 58 (WS): Work even in pattern. (26 sts)
Row 59: K2tog, work in rib to last 2 sts, k2tog. (24 sts)
Row 60: Work even. (24 sts)
Row 61: K2tog, work in rib to last 2 sts, k2tog. (22 sts)
Row 62: Work even. (22 sts)
Row 63: K2tog, work in rib to last 2 sts, k2tog. (20 sts)
Row 64: Work even. (20 sts)
Row 65: K2tog, work in rib to last 2 sts, k2tog. (18 sts)
Row 66: Work even. (18 sts)
Row 67: K2tog, work in rib to last 2 sts, k2tog. (16 sts)
Row 68: Work even. (16 sts)
Row 69: K2tog, work in rib to last 2 sts, k2tog. (14 sts)
Row 70: Work even. (14 sts)
Row 71: K2tog, work in rib to last 2 sts, k2tog. (12 sts)
Row 72: Work even. (12 sts)
Row 73: K2tog, work in rib to last 2 sts, k2tog. (10 sts)
Row 74: Work even. (10 sts)
Row 75: K2tog, work in rib to last 2 sts, k2tog. (8 sts)
Row 76: Work even. (8 sts)
Row 77: K2tog, work in rib to last 2 sts, k2tog. (6 sts)
Row 78: Work even. (6 sts)
Row 79: K2tog, work in rib to last 2 sts, k2tog. (4 sts)
Row 80: Work even. (4 sts)
Row 81: K2tog, k2tog. (2 sts)
Row 82: P2tog. (1 st)
Fasten off last st. Repeat all instructions to make a second identical panel.
Cheek-Tie Cord (make 2)
With US 8 needles and Color A, cast on 3 sts.
I-cord: *K3, slide sts to other end of needle; rep from * until cord measures 8 in (20 cm).
Bind off. Make a second cord.
Edging (optional)
With US 8 needles and Color B, pick up and knit 1 st in each row along the front opening edge. Knit 2 rows. Bind off loosely. Repeat on the other front edge.
Assembly and Finishing
- Block both panels lightly. Lay each panel flat and mist it with water, then pat it gently to the finished measurements (9 in wide, 8 in deep). Let it dry completely. This evens out your stitches and sets the fisherman rib texture.
- Seam the back. Place the two panels with right sides together. Using Color A and your tapestry needle, sew them together along the back edge (the cast-on edge and the shaped crown edge) with mattress stitch. To do mattress stitch, slide the needle under the horizontal bar between the first and second stitch on one edge, then under the matching bar on the other edge, and pull gently. Work from the bottom up, keeping the seam flat and even.
- Turn right side out. Gently push the bonnet through the opening so the right side faces out. The seam should disappear into the inside.
- Attach the ties. Fold each I-cord in half. With Color A and your tapestry needle, sew one end of each cord securely to the lower front corner of the bonnet on each side. Sew through the cord several times so it cannot pull loose. Knot the free ends.
- Weave in ends. Thread each yarn tail onto your tapestry needle and weave it in and out through the wrong side of the fabric for about 2 inches, then trim. Never knot the tails; weaving hides them and keeps them secure.
- Steam lightly. Hold a steam iron just above the surface (never press it down) to set the texture and soften the chenille. Let the bonnet dry fully before wearing.
Pro Tips and Variations
- Change the colors. Swap black and white for cream and camel, or dusty rose and gray, for a softer farmhouse look. Keep one color light and one dark so the checkerboard still reads clearly.
- Adjust the size. For a smaller baby, cast on 24 sts and work 6 squares of 6 rows each; for a larger child, cast on 32 sts and add one more square. Keep the crown decreases the same, working two stitches together at each end of every right-side row.
- Substitute the yarn. Any bulky (category 5) yarn works, but choose a soft, plush one so the bonnet stays comfortable. If you use a smoother yarn, your gauge may change, so always knit a new swatch.
- Add a pom-pom. Sew a small black or white pom-pom to the top of the crown for extra charm, or leave it plain for a cleaner, more rustic finish.