Fawnlight Raccoon Rattle Free Pattern: Knitted Chevron Sunset Ombre Baby Toy
Fawnlight Raccoon Rattle: A Free Beginner Knitting Pattern
Introduction
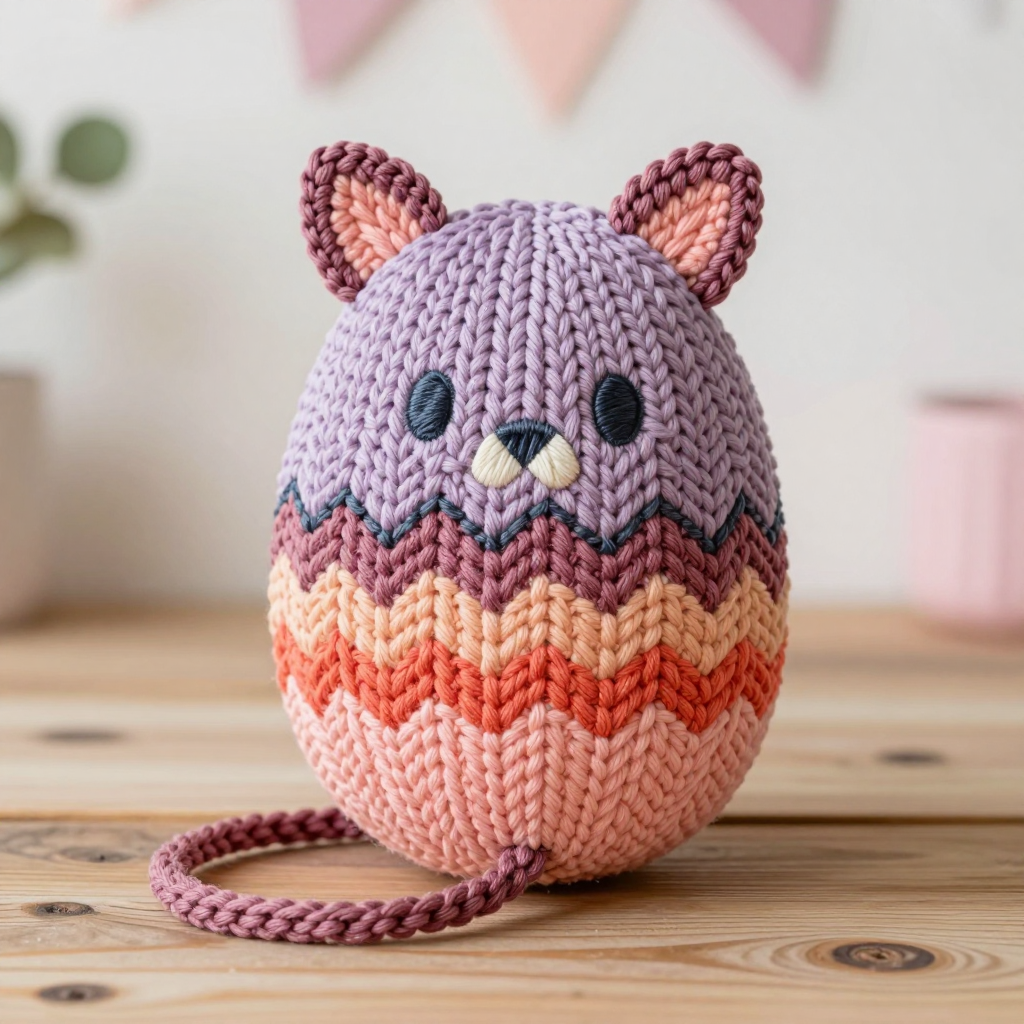
If you have ever wanted to make a tiny, magical gift with your own hands, this Fawnlight Raccoon Rattle is the perfect first toy project. It is a small, egg-shaped knitted rattle worked in soft worsted cotton, striped in warm sunset shades that fade from peach at the bottom to soft plum at the top. The chevron pattern creates gentle zigzag ridges across the surface, and two little pointed ears, an embroidered charcoal mask, and a plum yarn-cord handle finish it off. It fits in the palm of your hand at about 3 inches wide and 4 inches tall, and it makes a soft, gentle rattle sound when shaken. This project is ideal for a complete beginner because it uses only the most basic stitches, works up in a few hours, and teaches you the skills of knitting in the round, increasing, decreasing, and simple embroidery.
Materials Needed
- Yarn: Worsted weight (category 4) cotton yarn, approximately 40–50 yards total. You need small amounts of sunset ombre shades: peach, coral, apricot, dusty rose, and soft plum. You also need about 2 yards of dark charcoal for the face and about 2 yards of cream for the muzzle accents.
- Needles: US 5 (3.75 mm) double-pointed needles (a set of 4 or 5) OR a 9-inch circular needle if you prefer the magic loop method.
- Tapestry needle: A blunt-tipped needle with a large eye for seaming and embroidery.
- Stitch marker: One removable marker to mark the beginning of each round.
- Scissors: Sharp small scissors for cutting yarn.
- Stuffing: A small amount of polyester fiberfill.
- Rattle insert: One 15 mm plastic rattle insert, or a securely sealed small plastic capsule filled with beads.
- Finished size: Body approximately 3 inches (7.5 cm) wide at the widest point and 4 inches (10 cm) tall. Handle loop approximately 3 inches (7.5 cm) long when looped.
Abbreviations and Beginner Glossary
- k – knit. Insert the right needle into the front of the stitch on the left needle, wrap the yarn around, and pull it through to make a new stitch.
- p – purl. Insert the right needle into the front of the stitch, wrap the yarn around the front, and pull it through to make a new stitch.
- kfb – knit into front and back of the same stitch. Knit the stitch normally but do not slip it off; then knit into the back of the same stitch and slip it off. This makes one extra stitch (an increase).
- k2tog – knit two stitches together. Insert the needle into two stitches at once and knit them as one. This reduces the stitch count by one (a decrease).
- ssk – slip, slip, knit. Slip one stitch knitwise, slip the next stitch knitwise, then insert the left needle into the front of both slipped stitches and knit them together. This is a decrease that leans to the left.
- st(s) – stitch or stitches.
- rnd(s) – round or rounds. One complete circle of knitting when working in the round.
- stockinette stitch – when working flat, knit on right-side rows and purl on wrong-side rows. When working in the round, knit every round.
- I-cord – a thin knitted tube made by knitting a few stitches, sliding them to the other end of the needle, and knitting them again.
- satin stitch – embroidery where you work straight stitches side by side to fill a shape smoothly.
- straight stitch – a single straight embroidery stitch from one point to another.
Gauge
24 stitches and 32 rows = 4 inches (10 cm) in stockinette stitch worked flat, blocked. The chevron pattern measures approximately 3 inches (7.5 cm) wide at its widest point and 4 inches (10 cm) tall.
Why gauge matters: Gauge is how many stitches and rows fit into a certain measurement. If your stitches are too loose, your rattle will be larger than planned and the stuffing may show through. If they are too tight, it will be smaller and stiff. To check your gauge, cast on about 30 stitches with your chosen yarn and needles, work in stockinette stitch for about 4 inches, then measure a 4-inch square in the middle of the swatch. Count the stitches across and the rows up. If you have more stitches than 24, try a larger needle; if you have fewer, try a smaller needle.
Beginner Tips Before You Start
- Use a stitch marker. Place it at the beginning of every round so you always know where a new round starts. This prevents you from losing your place.
- Do not pull the yarn too tight. When you change colors or work the first stitch of a new needle, keep the tension relaxed. Tight yarn makes the fabric stiff and can make the rattle insert hard to fit inside.
- Count your stitches after every increase round. The stitch counts in parentheses tell you exactly how many stitches you should have. If the number is wrong, fix it before moving on.
- Carry colors loosely. When you change from one sunset shade to the next, leave a little slack on the inside of the work so the fabric does not pucker.
- Stuff little by little. Add fiberfill in small pieces rather than one big lump so the rattle stays smooth and egg-shaped.
- Keep the rattle insert centered. Wrap it in a small amount of fiberfill before pushing it inside so it does not rattle against the side of the toy.
Step-by-Step Instructions
Body
Using US 5 (3.75 mm) needles and peach yarn, cast on 8 sts. Distribute the stitches evenly across 3 double-pointed needles (or use magic loop). Join to work in the round, being careful not to twist the stitches. Place a stitch marker at the beginning of the round.
Rnd 1: Kfb in each st around. (16 sts)
Rnd 2: Knit. (16 sts)
Rnd 3: [Kfb, k1] around. (24 sts)
Rnd 4: Knit. (24 sts)
Rnd 5: [Kfb, k2] around. (32 sts)
Rnd 6: Knit. (32 sts)
Rnd 7: [Kfb, k3] around. (40 sts)
Rnd 8: Knit. (40 sts)
Rnd 9: [Kfb, k4] around. (48 sts)
Rnd 10: Knit. (48 sts)
Change to coral yarn.
Rnd 11 (setup): [K1, kfb, k6, ssk, k1, k2tog, k6, kfb, k1] around. (48 sts)
Rnd 12: Knit. (48 sts)
Rnd 13: [K1, kfb, k6, ssk, k1, k2tog, k6, kfb, k1] around. (48 sts)
Rnd 14: Knit. (48 sts)
Rnd 15: [K1, kfb, k6, ssk, k1, k2tog, k6, kfb, k1] around. (48 sts)
Rnd 16: Knit. (48 sts)
Change to apricot yarn.
Rnds 17–22: Repeat Rnds 13–14 three times, maintaining the chevron pattern. (48 sts)
Change to dusty rose yarn.
Rnds 23–28: Repeat Rnds 13–14 three times, maintaining the chevron pattern. (48 sts)
Change to soft plum yarn.
Rnds 29–32: Repeat Rnds 13–14 twice, maintaining the chevron pattern. (48 sts)
Shape top of head:
Rnd 33: [K2tog, k4] around. (40 sts)
Rnd 34: Knit. (40 sts)
Rnd 35: [K2tog, k3] around. (32 sts)
Rnd 36: Knit. (32 sts)
Rnd 37: [K2tog, k2] around. (24 sts)
Rnd 38: Knit. (24 sts)
Insert the rattle capsule now. Wrap the plastic rattle insert in a small amount of polyester fiberfill to soften the sound and prevent it from shifting. Push it gently into the body through the opening. Add a small amount of fiberfill around the rattle to hold it centered, but do not overstuff.
Rnd 39: [K2tog, k1] around. (16 sts)
Rnd 40: Knit. (16 sts)
Rnd 41: [K2tog] around. (8 sts)
Cut the yarn, leaving a 6-inch tail. Thread the tail through the remaining 8 sts using a tapestry needle, pull tight to close the top, and weave in the end securely on the inside.
Ears (make 2)
Using US 5 (3.75 mm) needles and dusty rose yarn, cast on 6 sts. Work back and forth in stockinette stitch (knit on the right side, purl on the wrong side) for 4 rows.
Next row (right side): K2tog, k2, k2tog. (4 sts)
Next row: Purl. (4 sts)
Next row: K2tog twice. (2 sts)
Next row: Purl. (2 sts)
Next row: K2tog. (1 st)
Cut the yarn, pull it through the last stitch, and fasten off. Make a second ear identically.
Sew the ears to the top sides of the head, approximately 1 inch (2.5 cm) apart, using the cast-on edge as the base and the pointed tip facing upward and slightly outward. Use small, secure stitches and weave in the ends.
Face Embroidery
Using dark charcoal yarn and a tapestry needle, embroider the raccoon mask. Work two small satin-stitch ovals for the eyes, approximately 1/4 inch (6 mm) wide, positioned about 1/2 inch (1.25 cm) apart on the front of the body and about 1 inch (2.5 cm) below the top of the head. Add a small straight-stitch triangle for the nose centered below the eyes, about 1/4 inch (6 mm) wide. Using cream yarn, add two tiny straight stitches beneath the nose for a subtle muzzle highlight. Keep all embroidery secure and avoid long floats on the inside.
Handle Loop
Using US 5 (3.75 mm) double-pointed needles and soft plum yarn, cast on 3 sts. Work a knitted I-cord as follows: knit 3 sts, then slide the stitches to the other end of the needle without turning, pull the yarn snugly across the back, and knit 3 sts. Repeat until the cord measures approximately 6 inches (15 cm) long. Bind off all stitches. Fold the cord in half to form a loop and sew both ends securely to the bottom center of the body using a tapestry needle and matching yarn. Reinforce the attachment with several extra stitches to make it baby-safe.
Assembly and Finishing
Seaming the ears: Thread a tapestry needle with dusty rose yarn. Hold each ear against the top side of the head with the pointed tip facing up and slightly outward. Sew around the base of the ear with small, even stitches, going through both the ear and the body. Repeat for the second ear, spacing them about 1 inch (2.5 cm) apart.
Attaching the handle: Fold the I-cord in half. Place both raw ends at the bottom center of the body. Sew them down with a matching plum yarn, making several passes through each end and into the body. Give the loop a gentle tug to check that it is secure.
Weaving in ends: Thread each loose yarn tail onto the tapestry needle and weave it in and out of the stitches on the inside of the body for about 1 inch. Trim the excess close to the fabric. Never leave a loose end on the outside where a baby could pull it.
Blocking: Lightly mist the finished rattle with water and gently shape it with your hands into a smooth egg shape. Do not soak it, because the fiberfill and rattle insert should stay dry. Let it air-dry completely. Check that the rattle insert is secure and that all embroidery and attachments are firmly sewn. The finished rattle should measure approximately 3 inches (7.5 cm) wide and 4 inches (10 cm) tall, not including the handle loop.
Pro Tips and Variations
- Change the colors: Swap the sunset ombre shades for a woodland palette of moss green, bark brown, and cream, or use a single solid color for a classic look. Change colors at the beginning of any round to create your own stripe sequence.
- Adjust the size: To make a larger rattle, use a thicker yarn and larger needles, and add one more increase round before the chevron section. To make a smaller one, use a lighter yarn and smaller needles. Always check your gauge first.
- Substitute the yarn: Any worsted weight cotton or cotton-blend yarn will work. Avoid fuzzy or fluffy yarns for a baby toy, because loose fibers can shed. Acrylic yarn is also acceptable but may make the rattle sound sharper.
- Add a hanging loop: Instead of a base handle, knit a longer I-cord and attach it to the top of the head so the rattle can hang from a stroller or crib. Always reinforce the attachment securely.