Ember & Ash Convertible Mitts Free Pattern
Ember & Ash Convertible Mitts — Free Beginner Crochet Pattern
Introduction
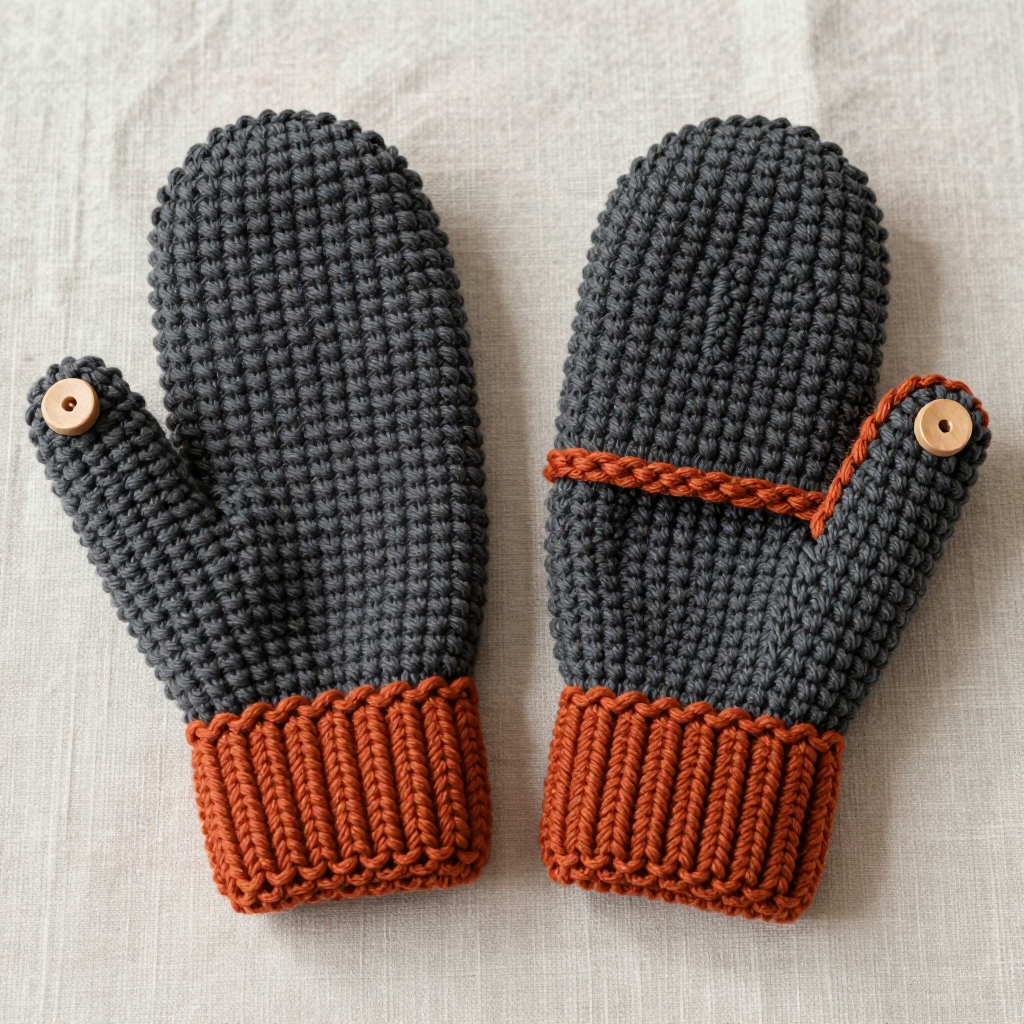
If you have ever wanted to make something you will actually wear every single day, these convertible mitts are for you. They are perfect for the absolute beginner who has just learned a few basic stitches and wants a real, useful project to practice on — no complicated shaping, no scary counting, just simple half double crochet worked in a friendly circle. What makes them special is the clever fold-back flap: wear it down over your fingers for cozy warmth on a cold walk, then flip it back and button it out of the way when you need your fingertips to text, unlock a door, or hold a hot coffee. The finished mitts look soft and slightly fuzzy, with a deep charcoal body, a warm rust-orange cuff, and a neat little wooden button on the back of each hand. They feel thick and squishy, stretch gently to hug your hand, and have a lovely handmade texture that makes people ask, "Wait, you made those?"
Materials Needed
- Yarn: Worsted weight yarn (also called Category 4 or "medium" yarn). You will need approximately 180–220 yards total for the pair. The sample uses a deep charcoal gray for the main body and flap, plus a rust-orange contrast for the cuffs. One standard 3.5 oz (100 g) skein of each color is plenty.
- Crochet hook: Size H/8 (5.0 mm). (For a smaller mitt, use a 4.5 mm hook — see Pro Tips.)
- Stitch markers: At least 2 (one per mitt). These can be plastic clip markers, safety pins, or even a short scrap of contrasting yarn.
- Tapestry needle: A blunt-tipped yarn needle with a large eye, for weaving in ends and sewing on buttons.
- Scissors: Any sharp pair for cutting yarn.
- Buttons: Two 0.75-inch (about 2 cm) buttons — one per mitt. Wooden buttons look lovely with this yarn.
- Measuring tape: For checking gauge and hand size.
Finished size: Adult medium. The finished mitt fits a hand circumference of 7–8 inches (18–20 cm) around the knuckles. The cuff measures about 3 inches (7.5 cm) tall, and the hand section is about 4 inches (10 cm) from cuff to top edge. The fold-back flap is about 2.5 inches (6 cm) long and 2.5 inches (6 cm) wide.
Abbreviations and Beginner Glossary
Do not panic if these look like a secret code — every single one is explained below in plain English. Read through this list once before you start and it will all make sense.
- ch — chain. Make a loop of yarn on your hook, then pull the working yarn through that loop. Each one you make is a "chain stitch." Chains are used to start a round and to create open spaces (like the thumb hole).
- sl st — slip stitch. Insert your hook into the stitch, yarn over, and pull that loop straight through both the stitch and the loop already on your hook in one motion. It makes a nearly invisible joining stitch.
- sc — single crochet. Insert hook into stitch, yarn over, pull up a loop (2 loops on hook), yarn over, pull through both loops. You will have 1 loop left. This is the shortest, tightest basic stitch.
- hdc — half double crochet. Yarn over first (wrap the yarn around your hook once), insert hook into stitch, yarn over, pull up a loop (3 loops on hook), yarn over, pull through all 3 loops at once. You will have 1 loop left. This is the main stitch of this pattern — it is taller than a single crochet but shorter than a double crochet, and it makes a soft, squishy fabric.
- st / sts — stitch / stitches. One completed stitch, or several of them.
- rnd / rnds — round / rounds. One complete trip around the circle. Because these mitts are worked in a circle, we call each pass a "round" instead of a "row."
- join — join with a slip stitch. After working all the way around, you slip stitch into the first stitch of that round to close the circle.
- magic ring — an adjustable loop of yarn that you crochet into, then pull tight to close the center hole. It is the standard way to start a project worked in the round. (If you prefer, you can chain 4 and join with a slip stitch to make a small ring instead — it works just as well for a beginner.)
- yarn over — wrap the working yarn over your hook from back to front. This is the motion you do before pulling through loops.
- fasten off — cut the yarn a few inches from your work, then pull the tail all the way through the last loop on your hook to lock it. This stops the yarn from unraveling.
- weave in ends — use the tapestry needle to thread the loose yarn tails back through the fabric so they are hidden and secure.
- turn — flip your work over (like turning a page) so you work back in the opposite direction. Used only for the flat flap, not for the round body.
- skip — do not work into that stitch. You simply leave it empty and move to the next one. This is how the thumb hole is created.
- evenly — spaced out at roughly equal distances, without bunching or stretching.
Gauge
Gauge: 14 hdc x 12 rounds = 4 inches (10 cm) in half double crochet worked in the round.
Why gauge matters: Gauge is simply how big your stitches turn out. If your stitches are bigger than the pattern expects, your mitt will be too loose and slide off. If they are smaller, the mitt will be too tight to get your hand into. Checking gauge first saves you from crocheting an entire mitt that does not fit.
How to make a gauge swatch: Using your H/8 (5.0 mm) hook and your charcoal yarn, make a magic ring, chain 2, and work 14 hdc into the ring. Join with a slip stitch. Work 11 more rounds of hdc (chain 2, hdc in each stitch around, join) so you have 12 rounds total. Lay the swatch flat and measure across the middle with your measuring tape. If 14 stitches measure 4 inches and 12 rounds measure 4 inches, you are spot on. If your swatch is bigger than 4 inches, go down one hook size (to 4.5 mm). If it is smaller than 4 inches, go up one hook size (to 5.5 mm).
Beginner Tips Before You Start
- Use a stitch marker to track your rounds. Place a marker in the very first stitch of each round. When you get back to the marker, you know you have completed a full round and it is time to join. This one habit prevents almost every beginner mistake.
- Do not pull your yarn too tight. Beginners often crochet very tightly out of nervousness, which makes the fabric stiff and the mitt too small to put on. Keep your tension relaxed and even — the yarn should glide, not fight you.
- Count your stitches at the end of every round. The pattern tells you the stitch count in parentheses after each round. Take five seconds to count and confirm. If you are off by one or two, fix it right away — it is much easier than discovering it ten rounds later.
- Remember that the chain 2 at the start of each round does NOT count as a stitch. It is just a little "ladder" to get your yarn up to the right height. Your first real stitch goes into the first stitch of the previous round, not into the chain.
- Try the mitt on as you go. After Round 10, slip it onto your hand. It should feel snug but comfortable. This is your chance to adjust before you commit to the thumb hole.
- Make the two mitts one after the other, not weeks apart. Your tension will be most consistent if you work both mitts in the same sitting or on the same day, so they match in size.
Step-by-Step Instructions
PATTERN NOTES: The mitts are worked in the round from the cuff upward. The thumb opening is created by skipping stitches and chaining over them. The fold-back flap is worked separately along the top edge and joined with a simple button and crocheted loop. The chain 2 at the start of each round does NOT count as a stitch. Use a stitch marker to mark the beginning of each round. Make two mitts, following every round twice.
Cuff (make 2)
Round 1: With rust-orange yarn, make a magic ring. Chain 2. Work 10 hdc into the ring. Join with a slip stitch to the first hdc. Pull the magic ring tail tight to close the center hole. (10 hdc)
Round 2: Chain 2. Work 2 hdc into each stitch around (this means two separate hdc in the same stitch, which doubles the count). Join with a slip stitch to the first hdc. (20 hdc)
Round 3: Chain 2. Work 1 hdc in each stitch around. Join with a slip stitch to the first hdc. (20 hdc)
Round 4: Chain 2. Work 1 hdc in each stitch around. Join with a slip stitch to the first hdc. (20 hdc)
Round 5: Chain 2. Work 1 hdc in each stitch around. Join with a slip stitch to the first hdc. Fasten off the rust-orange yarn, leaving a 4-inch tail. (20 hdc)
Hand
Round 6: Join charcoal yarn with a slip stitch into any stitch of Round 5. Chain 2. Work 1 hdc in each stitch around. Join with a slip stitch to the first hdc. (20 hdc)
Round 7: Chain 2. Work 1 hdc in each stitch around. Join with a slip stitch to the first hdc. (20 hdc)
Round 8: Chain 2. Work 1 hdc in each stitch around. Join with a slip stitch to the first hdc. (20 hdc)
Round 9: Chain 2. Work 1 hdc in each stitch around. Join with a slip stitch to the first hdc. (20 hdc)
Round 10: Chain 2. Work 1 hdc in each stitch around. Join with a slip stitch to the first hdc. (20 hdc) — Try the mitt on now to check the fit.
Thumb Opening
Round 11: Chain 2. Work 1 hdc in each of the next 3 stitches. Chain 5. Skip the next 5 stitches (this gap becomes the thumb opening). Work 1 hdc in each remaining stitch around. Join with a slip stitch to the first hdc. (15 hdc + 5 chains)
Round 12: Chain 2. Work 1 hdc in each stitch around, and work 1 hdc into each of the 5 chains from the previous round (insert your hook under the chain, not into a stitch). Join with a slip stitch to the first hdc. (20 hdc)
Round 13: Chain 2. Work 1 hdc in each stitch around. Join with a slip stitch to the first hdc. (20 hdc)
Round 14: Chain 2. Work 1 hdc in each stitch around. Join with a slip stitch to the first hdc. (20 hdc)
Round 15: Chain 2. Work 1 hdc in each stitch around. Join with a slip stitch to the first hdc. (20 hdc)
Round 16: Chain 2. Work 1 hdc in each stitch around. Join with a slip stitch to the first hdc. (20 hdc)
Round 17: Chain 1. Work 1 sc in each stitch around (this makes a neat, firm edge). Join with a slip stitch to the first sc. Fasten off, leaving a 4-inch tail. (20 sc)
Thumb Edging
Round 1 (thumb): Join charcoal yarn with a slip stitch at the thumb opening. Chain 1. Work 12 sc evenly around the opening (work into the stitches and chains that form the edge of the hole, spacing them so they lie flat). Join with a slip stitch to the first sc. Fasten off, leaving a 4-inch tail. (12 sc)
Fold-Back Flap
Note: The flap is worked flat (back and forth in rows), not in the round. Find the back of the hand — the side opposite your thumb — and count 10 stitches across the top edge (the Round 17 edge).
Row 1: With charcoal yarn, join with a slip stitch at the top edge of the mitt at the back of the hand. Chain 2. Work 1 hdc in each of the next 10 stitches across the back of the hand. Turn your work. (10 hdc)
Row 2: Chain 2. Work 1 hdc in each stitch across. Turn. (10 hdc)
Row 3: Chain 2. Work 1 hdc in each stitch across. Turn. (10 hdc)
Row 4: Chain 2. Work 1 hdc in each stitch across. Turn. (10 hdc)
Row 5: Chain 2. Work 1 hdc in each stitch across. Turn. (10 hdc)
Row 6: Chain 2. Work 1 hdc in each stitch across. Turn. (10 hdc)
Row 7: Chain 1. Work 1 sc in each stitch across (this gives the flap a tidy finished edge). Fasten off, leaving a long 12-inch tail for sewing. (10 sc)
Assembly and Finishing
1. Weave in the ends. Thread each loose yarn tail onto your tapestry needle. Working on the wrong side (the inside) of the mitt, poke the needle through the fabric for about 1 inch, then weave back the other way for another inch so the tail is locked in. Trim the yarn close to the fabric. Do this for every tail on both mitts.
2. Make the button loops. With charcoal yarn, chain 6, then slip stitch into the first chain to form a small loop. Fasten off, leaving a 6-inch tail. Make one loop for each mitt. Using the tapestry needle, sew the loop securely to the center of the flap's final row (Row 7), with the loop pointing toward the fingers.
3. Sew on the buttons. Place a button on the front of the mitt near the top edge, positioned so the flap's loop reaches it comfortably when the flap is folded down. Using the tapestry needle and a double strand of charcoal yarn, sew through the button holes several times to secure it firmly. Repeat on the second mitt.
4. Test the flap. Fold the flap down over the fingers and slip the loop over the button. It should sit flat and snug. If the loop is too tight, undo it and make a chain 7 loop instead; if too loose, make a chain 5 loop.
5. Block the mitts (optional but recommended). Lightly mist the finished mitts with cool water from a spray bottle until damp but not soaking. Lay them flat on a towel, gently pat them into shape, and smooth the edges with your fingers. Let them dry completely overnight. Blocking relaxes the stitches, evens out any wobbles, and makes the fabric look professionally finished.
6. Final check. Try both mitts on. Make sure the thumb hole is comfortable, the flap folds back easily, and no ends are poking out. You are done!
Pro Tips and Variations
- Change the colors. Try a cream body with a forest-green cuff, or a soft gray body with a mustard cuff. You can also work the flap in the contrast color for a bold two-tone look. Any worsted-weight yarn works — just keep the same gauge.
- Adjust the size. For a smaller mitt (fits a 6–7 inch hand), use a 4.5 mm hook and follow the pattern exactly as written. For a larger mitt (fits an 8–9 inch hand), add 2 stitches to the starting ring in Round 1 (work 12 hdc instead of 10), which gives you 24 stitches after Round 2 — then work every subsequent round with 24 stitches instead of 20, and work 6 hdc before the thumb opening instead of 3.
- Substitute the yarn. A wool or wool-blend worsted yarn will be warmer and block more beautifully than acrylic. A soft acrylic is more affordable and machine washable. Just always check your gauge with the new yarn before you begin.
- Add a ribbed cuff. For a stretchier, more professional-looking cuff, work Rounds 3–5 in back-loop-only hdc (insert your hook only under the back loop of each stitch instead of both loops). This creates a lovely ridged texture that grips the wrist.