Cloud Whisper Mesh Cowl Free Pattern
Cloud Whisper Mesh Cowl — Free Beginner Crochet Pattern
Introduction
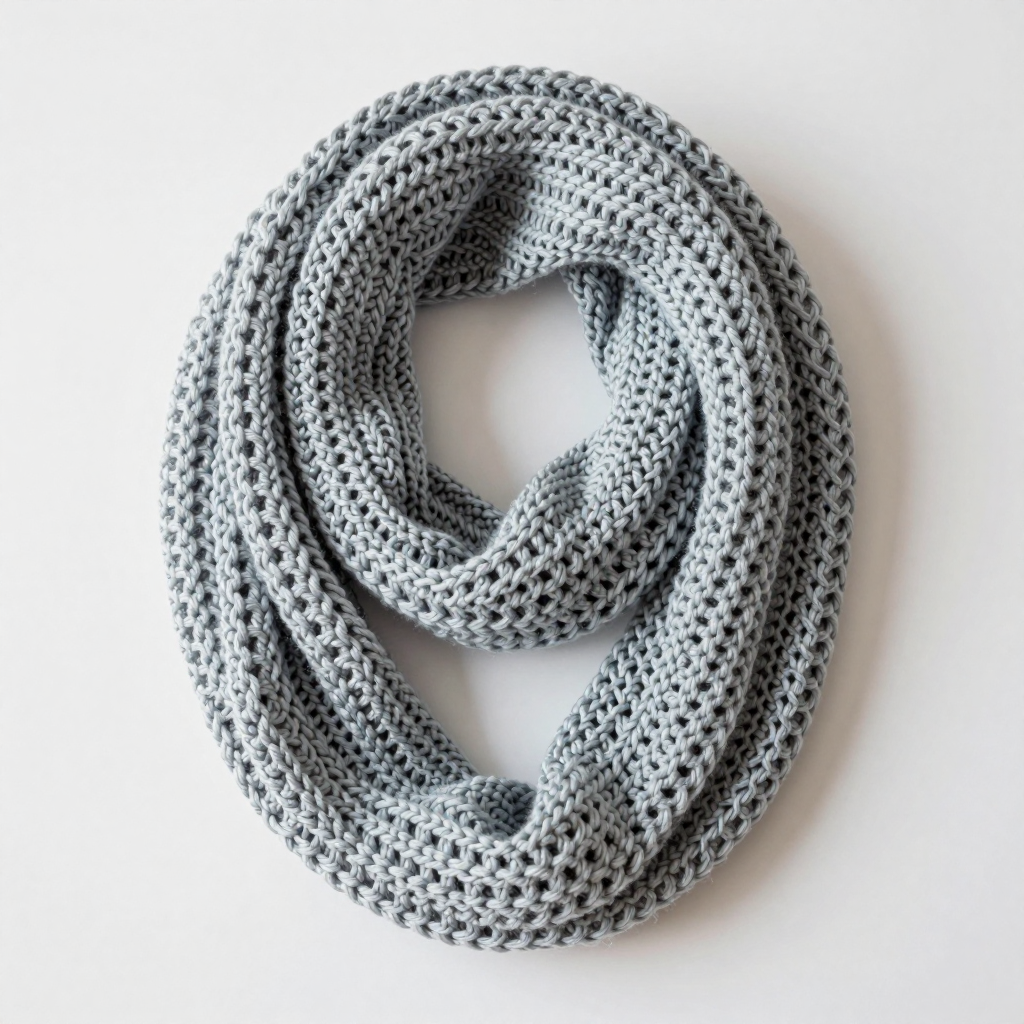
If you have ever wanted to make something beautiful with your own hands but felt intimidated by complicated patterns, this Cloud Whisper Mesh Cowl is the perfect place to begin. It is designed for complete beginners — people who have never held a crochet hook before — and it uses only the most basic stitches in a simple, soothing rhythm. The finished cowl is a soft, featherlight infinity scarf that drifts around your neck like morning mist, with an open mesh texture that looks far more intricate than it actually is. Worked in a pale silver-blue worsted weight yarn, it feels gentle against the skin, drapes beautifully, and can be worn in a single relaxed loop or doubled for warmth. Best of all, it comes together in just a few hours, making it a wonderful first project or a quick, satisfying gift.
Materials Needed
- Yarn: Worsted weight (category 4) yarn, approximately 150–180 yards (about one standard skein). The sample shown uses a soft pale silver-blue (colorway: Morning Mist). An acrylic or acrylic-wool blend works beautifully and is forgiving for beginners.
- Crochet hook: Size I/9 — that is 5.5 mm. (The "I/9" is the US size and "5.5 mm" is the metric size; they are the same hook.)
- Stitch markers: At least 2, to mark the beginning of each round and to mark your first stitch.
- Tapestry needle: A blunt-tipped yarn needle with a large eye, used for weaving in yarn ends at the finish.
- Scissors: Any sharp pair for cutting yarn.
- Measuring tape: For checking gauge and finished size.
Finished size: Approximately 27 inches in circumference and 8 inches wide — a continuous loop that can be worn in a single relaxed loop or doubled around the neck.
Abbreviations and Beginner Glossary
Every abbreviation used in this pattern is listed below with a plain-English explanation. Read through this list before you begin — you do not need to memorize it, just refer back whenever you need to.
- ch — chain: Make a loop of yarn on your hook (a slip knot), then wrap the yarn over the hook and pull it through the loop already on the hook. That is one chain. A row of chains is the foundation of most crochet.
- sl st — slip stitch: Insert your hook into the stitch or space indicated, wrap the yarn over the hook, and pull it through both the stitch and the loop on your hook in one motion. It creates an almost invisible join and does not add height.
- sc — single crochet: Insert your hook into the stitch, wrap the yarn over the hook, pull up a loop (you now have 2 loops on the hook), wrap the yarn over again, and pull through both loops. (Note: this pattern does not actually use single crochet in the working rows, but it is listed here because it is a foundational stitch you will meet in almost every pattern.)
- dc — double crochet: Wrap the yarn over your hook once, insert the hook into the stitch or space indicated, wrap the yarn over and pull up a loop (3 loops on hook), wrap the yarn over and pull through the first 2 loops (2 loops remain), wrap the yarn over and pull through the last 2 loops (1 loop remains). This is a taller stitch than single crochet and is the main stitch of this cowl.
- st / sts — stitch / stitches: A single completed crochet stitch, or several of them.
- sp / sps — space / spaces: The little gap created by a chain (for example, a "ch-1 space" is the hole made by one chain stitch). You will work your hook into these spaces rather than into the top of a stitch.
- ch-1 space, ch-2 space: The hole formed by one or two chain stitches in the previous round. When the pattern says "dc in each ch-2 space," you put your hook through that hole and work a double crochet into it.
- skip: Do not work into the next stitch — simply pass over it and move to the following one.
- join with a sl st: After working all the way around, connect the last stitch to the first stitch of the round using a slip stitch, so the round closes into a circle.
- beginning ch-3 / ch-4 / ch-5: The chain you make at the start of a round. It stands in for (counts as) the first stitch of that round, so you do not work into the very first stitch again.
- 3rd ch of the beginning ch-4 (or ch-5): When you join at the end of the round, you insert your hook into the third chain from the bottom of that starting chain — this is where the top of the "pretend" double crochet sits.
- top of the beginning ch-3: The upper edge of the starting chain, where you insert your hook to join the round.
- repeat from * : Go back to the asterisk (*) in the instruction and work the sequence again, as many times as directed.
- fasten off: Cut the yarn a few inches from your work, then pull the tail all the way through the last loop on your hook to lock it so it will not unravel.
- weave in ends: Thread a yarn tail onto a tapestry needle and sew it back and forth through the fabric so it is hidden and secure.
- block: Gently dampen the finished piece and lay it flat to dry in shape, which evens out the stitches and opens the mesh.
Gauge
Gauge: 4 mesh repeats (ch-3 spaces) = 4 inches; 4 rows = 3 inches in the open mesh pattern.
Why gauge matters: Gauge is simply how big your stitches turn out — how many stitches and rows fit into a set measurement. Every crocheter holds the yarn a little differently: some pull tight, some work loosely. If your gauge is different from the pattern's, your finished cowl will come out larger or smaller than 27 inches around and 8 inches wide. Checking gauge first means no surprises at the end.
How to make a gauge swatch: Using your 5.5 mm hook and your chosen yarn, chain 20 and work a few rows of the mesh pattern (alternating a double-crochet row and a mesh row) until your swatch is about 5 inches tall. Lay it flat without stretching it. Measure across 4 inches and count how many chain-3 spaces you see — you should count 4. Then measure 3 inches up and count the rows — you should count 4. If you have more spaces and rows than this in the same measurement, your stitches are too small: try again with a larger hook. If you have fewer, your stitches are too big: try a smaller hook. Because this cowl is a loose, forgiving accessory, a small difference will not ruin it — but a swatch tells you what to expect.
Beginner Tips Before You Start
- Use stitch markers to track your rounds. Place a marker in the very first stitch of each round (or in the starting chain) so you always know where the round began and where to join. This one habit prevents most beginner mistakes.
- Do not pull your yarn too tight. Beginners often grip the yarn hard, which makes stiff, cramped stitches and a cowl that will not drape. Keep a relaxed, even tension — the yarn should glide, not fight.
- Count your stitches at the end of every round. The pattern tells you the stitch count in parentheses, like (72 dc). If your count is off by one or two, fix it right away by adding or removing a stitch — it is much easier to correct one round than to discover the problem ten rounds later.
- Keep your starting chain untwisted. When you join the first chain into a ring, make sure the chain lies flat and does not spiral. If it twists now, the whole cowl will twist.
- Work into the spaces, not the stitches, on mesh rounds. On the mesh rounds you will place your double crochet into the little chain spaces (the holes), not into the tops of stitches. This is what creates the airy lattice look.
- Take breaks and stretch your hands. Crochet is a gentle craft, but new hand movements can tire your fingers. A few minutes' rest keeps your tension even and your hands happy.
Step-by-Step Instructions
This cowl is worked in the round — meaning you crochet in a continuous circle, joining each round with a slip stitch, so there is no seam to sew at the end. Each round is written out individually below. The number in parentheses at the end of each round is your stitch count — check it before moving on.
Setup
Round 1: Ch 72. Being careful not to twist the chain, join with a sl st to the first ch to form a ring. (72 ch)
Round 2: Ch 3 (this counts as your first dc). Work 1 dc in each ch around the ring. Join with a sl st to the top of the beginning ch-3. (72 dc)
Mesh Body
Round 3: Ch 4 (this counts as your first dc plus a ch 1). Skip the next st. *Dc in the next st, ch 1, skip the next st; repeat from * around. Join with a sl st to the 3rd ch of the beginning ch-4. (36 dc, 36 ch-1 spaces)
Round 4: Ch 3 (counts as first dc). Work 1 dc in each ch-1 space and 1 dc in each dc around. Join with a sl st to the top of the beginning ch-3. (72 dc)
Round 5: Ch 5 (this counts as your first dc plus a ch 2). Skip the next st. *Dc in the next st, ch 2, skip the next st; repeat from * around. Join with a sl st to the 3rd ch of the beginning ch-5. (36 dc, 36 ch-2 spaces)
Round 6: Ch 3 (counts as first dc). Work 1 dc in each ch-2 space and 1 dc in each dc around. Join with a sl st to the top of the beginning ch-3. (72 dc)
Repeat the Mesh Body
Now repeat Rounds 3 through 6 two more times, working each round exactly as written above. That means:
Round 7: Work as Round 3. (36 dc, 36 ch-1 spaces)
Round 8: Work as Round 4. (72 dc)
Round 9: Work as Round 5. (36 dc, 36 ch-2 spaces)
Round 10: Work as Round 6. (72 dc)
Round 11: Work as Round 3. (36 dc, 36 ch-1 spaces)
Round 12: Work as Round 4. (72 dc)
Round 13: Work as Round 5. (36 dc, 36 ch-2 spaces)
Round 14: Work as Round 6. (72 dc)
Final Mesh Rounds
Finally, repeat Rounds 3 and 4 once more:
Round 15: Work as Round 3. (36 dc, 36 ch-1 spaces)
Round 16: Work as Round 4. (72 dc)
Fasten off after Round 16: cut the yarn a few inches from your work and pull the tail all the way through the last loop on your hook to lock it.
Assembly and Finishing
Because this cowl is worked in one continuous piece in the round, there is no seaming required — the only finishing work is hiding your yarn ends and blocking the piece.
- Weaving in ends: Thread the starting tail and the ending tail onto your tapestry needle. Working on the inside of the cowl, sew each tail back and forth through the fabric for about 2 inches, changing direction once or twice so it cannot work loose. Trim the yarn close to the fabric. Do not knot the tails — weaving is more secure and invisible.
- Blocking: Lightly mist the finished cowl with water until it is damp but not soaking. Lay it flat on a towel or blocking mat and gently stretch the mesh open so the chain spaces are even and the cowl measures about 27 inches around and 8 inches wide. Smooth the edges into a neat circle. Leave it to dry completely, away from direct heat. Do not apply heavy steam — it can flatten the airy texture that makes this cowl special.
- Final check: Once dry, try the cowl on. It should slip easily over your head and drape in a soft, relaxed loop.
Pro Tips and Variations
- Change colors for a striped effect: Work Rounds 1–2 in one color, then switch to a second color for the mesh body, or change color at the start of every fourth round for soft stripes. Simply fasten off the old color and join the new one with a slip stitch in the same stitch where you joined the previous round.
- Adjust the size: To make the cowl wider or narrower, add or remove rounds in multiples of 4 (the mesh pattern repeats every 4 rounds). To change the circumference, start with a chain in a multiple of 2 — for example, ch 60 for a snugger cowl or ch 84 for a roomier one — and adjust the stitch counts in the solid rounds to match.
- Substitute yarn: A DK weight (category 3) yarn with a 4.5 mm hook will give a finer, lacier cowl; a bulky (category 5) yarn with a 6.5 mm hook will give a chunky, cozy version. Always make a gauge swatch first so you know what size you will get.
- Add a decorative edge: For a finished look, work one final round of single crochet evenly around the top and bottom edges of the cowl, working 1 sc in each stitch or space. This gives a neat, slightly firmer border without losing the airy mesh.