Clover Acorn Convertible Cuff Cap Free Crochet Pattern
Clover Acorn Convertible Cuff Cap — Free Beginner Crochet Pattern
Introduction
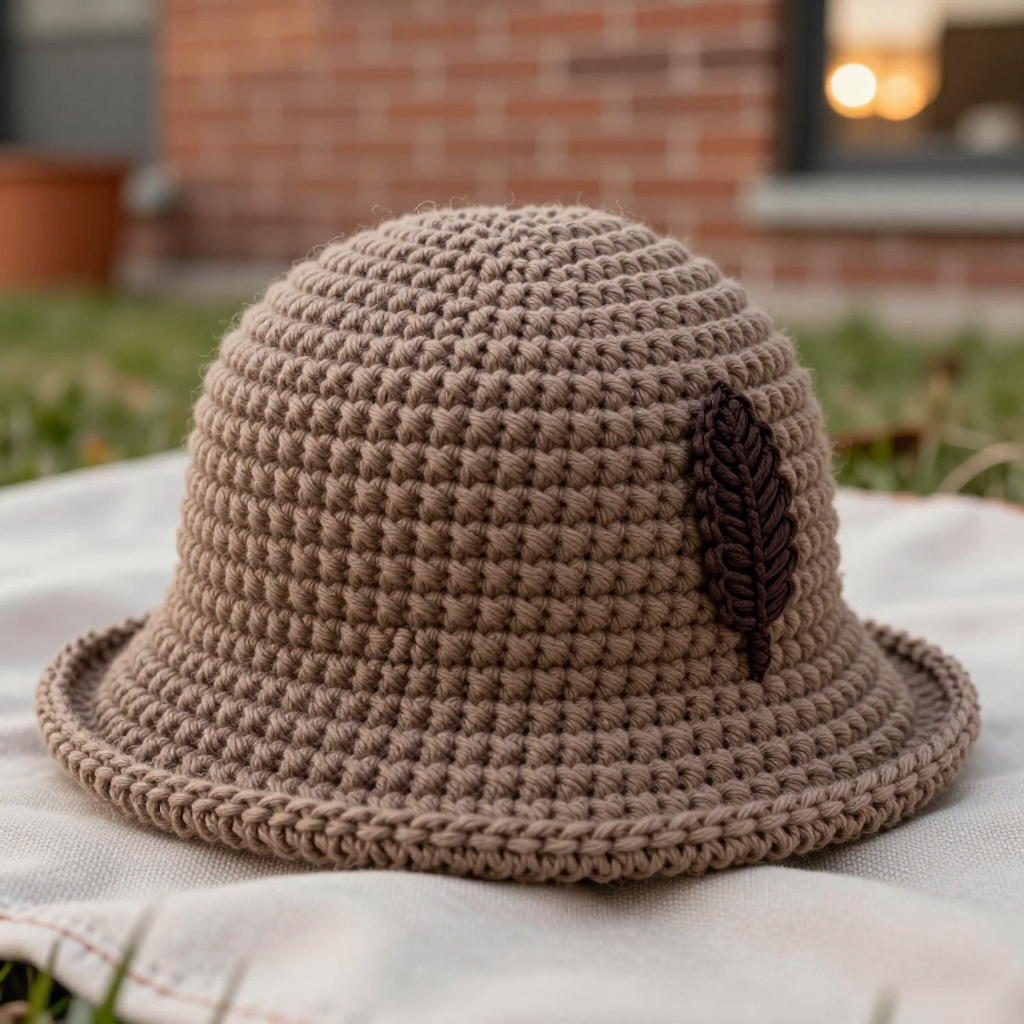
If you have ever wanted to make a hat that looks like you bought it at a little woodland boutique, this is the project for you. The Clover Acorn Convertible Cuff Cap is a snug, earthy mocha bucket-style cap worked almost entirely in one simple stitch — single crochet — so it is perfect for someone who has just learned to hold a hook. What makes it special is the wide gathered cuff, crocheted as its own separate strip and sewn on, which means you can wear it folded up for a tidy little cap or left down for a slouchier bucket look. The finished hat is soft, warm, and slightly ridged from the spiral of single crochet rounds, with a tiny dark chocolate feather appliqué stitched above the cuff on one side. It feels like a hug for your head and looks far more complicated than it actually is.
Materials Needed
- Yarn (main color): Medium (4) worsted weight yarn, approximately 220 yards (200 m) of mocha brown — this covers both the cap and the cuff.
- Yarn (feather): A small amount — about 8 yards — of dark chocolate brown worsted weight yarn.
- Crochet hook: Size I/9 (5.5 mm). (The "I/9" is the US size; 5.5 mm is the metric size. They are the same hook.)
- Stitch marker: 1, to mark the first stitch of each round.
- Tapestry needle: A blunt, large-eyed needle for seaming and weaving in ends.
- Scissors.
- Finished size: Fits a head circumference of 21–23 inches (average adult). Cap height from crown to lower edge, cuff unfolded, is about 8 inches. The cuff is about 2.5 inches tall.
Abbreviations and Beginner Glossary
- ch — chain. Make a loop of yarn over your hook and pull it through the loop already on your hook. That is one chain.
- sc — single crochet. Insert your hook into the stitch, yarn over, pull up a loop (2 loops on hook), yarn over again, pull through both loops. One single crochet made.
- sl st — slip stitch. Insert hook into stitch, yarn over, pull the yarn straight through both the stitch and the loop on your hook in one motion. It makes a flat, tight stitch.
- sc2tog — single crochet 2 together. A decrease: insert hook into first stitch, pull up a loop, insert hook into next stitch, pull up a loop (3 loops on hook), yarn over, pull through all 3 loops. Two stitches become one. (Listed here for completeness — this pattern does not use it.)
- hdc — half double crochet. Yarn over, insert hook into stitch, pull up a loop (3 loops on hook), yarn over, pull through all 3 loops at once.
- dc — double crochet. Yarn over, insert hook into stitch, pull up a loop (3 loops on hook), yarn over, pull through 2 loops, yarn over, pull through last 2 loops.
- st(s) — stitch or stitches.
- rnd — round. One complete circle of stitches worked in the round.
- magic ring — an adjustable loop of yarn you crochet into, then pull closed so there is no hole in the middle. If it feels tricky, you can instead chain 4 and join with a slip stitch to make a ring, then work into that ring.
- 2 sc in next st — work two single crochets into the same stitch. This is an increase and makes the circle grow.
- work even — crochet one stitch into each stitch with no increases or decreases, so the piece stays the same width.
- fasten off — cut the yarn a few inches from your work, pull the tail all the way through the last loop, and tug gently to lock it.
Gauge
14 sc x 16 rounds = 4 inches (10 cm) in single crochet worked in the round.
Why gauge matters: Gauge is how many stitches and rounds fit into 4 inches of your crochet. If your stitches are bigger than mine, your hat will come out too large; if they are smaller, it will be too tight. Checking first saves you from frogging (unravelling) a whole hat.
How to make a gauge swatch: Chain 20, then work single crochet in rows (or in the round) until the piece is about 4 inches tall. Lay it flat and measure 4 inches across the middle — count the stitches. Then measure 4 inches up and count the rounds. If you have more than 14 stitches in 4 inches, your tension is tight — try a larger hook. If you have fewer, try a smaller hook. Wash and dry your swatch the way you plan to wash the hat, because yarn can relax.
Beginner Tips Before You Start
- Use your stitch marker every single round. Because the cap is worked in a spiral (no joining), it is very easy to lose track of where a round begins. Clip the marker into the first stitch of the round and move it up each time you come back to it.
- Do not pull your yarn tight. Beginners often choke the hook. Keep a relaxed, even tension — the yarn should glide, not squeak. Tight stitches make a stiff, small hat.
- Count your crown rounds out loud. Rounds 2–12 each add exactly 6 stitches. If your count is off by one, the whole circle will wobble. Count at the end of every increase round.
- Work the cuff strip loosely. The cuff needs to stretch, so keep your chain and single crochets relaxed. If the strip curls up like a tube, that is normal — it will flatten when seamed.
- Try the cap on as you go. After Round 12 the crown should measure about 6.5 inches across. Slip it on your head to check the fit before you work the straight sides.
- Keep your feather tail long. You will use that 10-inch tail to stitch the center vein and to sew the feather down, so do not trim it short.
Step-by-Step Instructions
Important note: The cap is worked in continuous rounds (a spiral) in single crochet. Do not join or turn at the end of each round unless the pattern tells you to. Place a stitch marker in the first stitch of each round and move it up as you go.
Cap
Rnd 1: Make a magic ring. Work 6 sc into the ring. Pull the ring closed. (6 sc)
Rnd 2: 2 sc in each st around. (12 sc)
Rnd 3: [2 sc in next st, 1 sc in next st] around. (18 sc)
Rnd 4: [2 sc in next st, 1 sc in each of next 2 sts] around. (24 sc)
Rnd 5: [2 sc in next st, 1 sc in each of next 3 sts] around. (30 sc)
Rnd 6: [2 sc in next st, 1 sc in each of next 4 sts] around. (36 sc)
Rnd 7: [2 sc in next st, 1 sc in each of next 5 sts] around. (42 sc)
Rnd 8: [2 sc in next st, 1 sc in each of next 6 sts] around. (48 sc)
Rnd 9: [2 sc in next st, 1 sc in each of next 7 sts] around. (54 sc)
Rnd 10: [2 sc in next st, 1 sc in each of next 8 sts] around. (60 sc)
Rnd 11: [2 sc in next st, 1 sc in each of next 9 sts] around. (66 sc)
Rnd 12: [2 sc in next st, 1 sc in each of next 10 sts] around. (72 sc)
Your crown should now measure about 6.5 inches across, giving a circumference of roughly 20.5 inches before the cap relaxes. The finished cap stretches to fit 21–23 inches comfortably.
Rnds 13–34: Sc in each st around, working even. (72 sc)
At the end of Rnd 34 the cap measures about 8 inches from crown to lower edge. Do not fasten off yet.
Lower Edge Band
Rnd 35: Sc in each st around. (72 sc)
Rnd 36: Sl st in each st around for a firm, tidy edge. Fasten off and weave in ends. (72 sl sts)
Cuff (make as a separate piece)
The cuff is worked flat in rows, then seamed into a ring and gathered slightly before attaching.
Set-up: Ch 12.
Row 1: Sc in 2nd ch from hook and in each ch across. (11 sc) Turn.
Row 2: Ch 1, sc in each st across. (11 sc) Turn.
Rows 3–72: Repeat Row 2 until the strip measures about 20 inches long, unstretched. (11 sc) Fasten off, leaving a 20-inch tail.
Seam the Cuff
Fold the strip in half lengthwise with right sides facing out. Using the long tail and your tapestry needle, whipstitch the two short ends together to form a ring. (Whipstitch means: bring the needle up through both layers, over the edge, and back up again, making small even stitches all along the join.) Weave in the starting end.
Gather the Cuff
Thread a fresh length of yarn onto the tapestry needle and run a gathering stitch along the top edge of the cuff ring. (A gathering stitch is simply a running stitch — up and down through the edge — that you pull like a drawstring.) Draw it up gently until the top edge measures about 20 inches around, matching the cap's lower edge. Distribute the gathers evenly. Do not pull too tightly — the cuff should still stretch.
Attach the Cuff to the Cap
Turn the cap wrong side out. Slip the cuff ring over the cap so the cuff's gathered top edge aligns with the cap's lower edge (Rnd 35/36). Pin in place, distributing the gathers evenly. Using matching mocha yarn and the tapestry needle, whipstitch the cuff to the cap all the way around, catching both layers. Fasten off and weave in ends. Turn the cap right side out and fold the cuff up.
Feather Appliqué (make 1, in dark chocolate brown)
Set-up: Ch 9.
Row 1: Sl st in 2nd ch from hook, sc in next ch, hdc in next ch, dc in each of next 3 ch, hdc in next ch, sc in last ch. Do not turn. (8 sts along one side)
Row 2: Working back along the opposite side of the starting chain, sc in first ch, hdc in next ch, dc in each of next 3 ch, hdc in next ch, sl st in last ch. Fasten off, leaving a 10-inch tail. (8 sts along second side)
The piece forms a small, pointed leaf/feather shape about 2.5 inches long. Use the tail to stitch a short center vein down the middle of the feather with a few straight stitches, then weave in ends.
Attach the Feather
Position the feather on the front of the cap just above the cuff, angled slightly to one side. Pin in place and sew down securely with matching dark brown yarn, catching only the top layer of the cap so the stitches don't show inside. Weave in ends.
Assembly and Finishing
Weaving in ends: Thread each yarn tail onto the tapestry needle and run it back and forth through the inside of several stitches (about 1 inch), then change direction once and run it through a few more. Trim close to the work. Never tie a knot — knots work loose and make lumps.
Seaming check: Run your finger around the cuff join. If any gathers look bunched or uneven, unpick a few whipstitches and redistribute before fastening off for good.
Blocking: Lightly steam the cap (hold a steam iron an inch or two above the surface — never press it down) or mist it with water. Shape the cap over a bowl or your hand so the crown is round and the cuff sits flat, then let it dry completely. This relaxes the stitches, evens out your tension, and gives the hat a soft, professional finish.
To wear: Fold the cuff up for a tidy cap, or leave it down for a slouchier bucket look.
Pro Tips and Variations
- Change the color story: Work the cap in a lighter oatmeal or cream and the feather in rust or mustard for an autumn look. You can also work the cuff in a contrasting color — just add about 60 yards of a second shade.
- Adjust the size: For a smaller head, stop the crown increases at Round 11 (66 sts) and work Rnds 13–34 even at 66 sts. For a larger head, add one more increase round (Rnd 13: [2 sc in next st, 1 sc in each of next 11 sts] around = 78 sts) and work the sides even at 78 sts. Keep the cuff strip the same length and gather it to fit.
- Substitute yarn: Any medium (4) worsted weight yarn works — acrylic is easy-care, wool is warmest, and cotton gives a crisper bucket shape. Always swatch, because different fibers crochet at different gauges.
- Make more feathers: Crochet two or three feathers in slightly different browns and layer them on the side of the cap for a fuller woodland look. Each one takes only a few minutes.