Whimsical Woodland Gnome Trio Free Pattern – Crochet a Cozy Forest Family
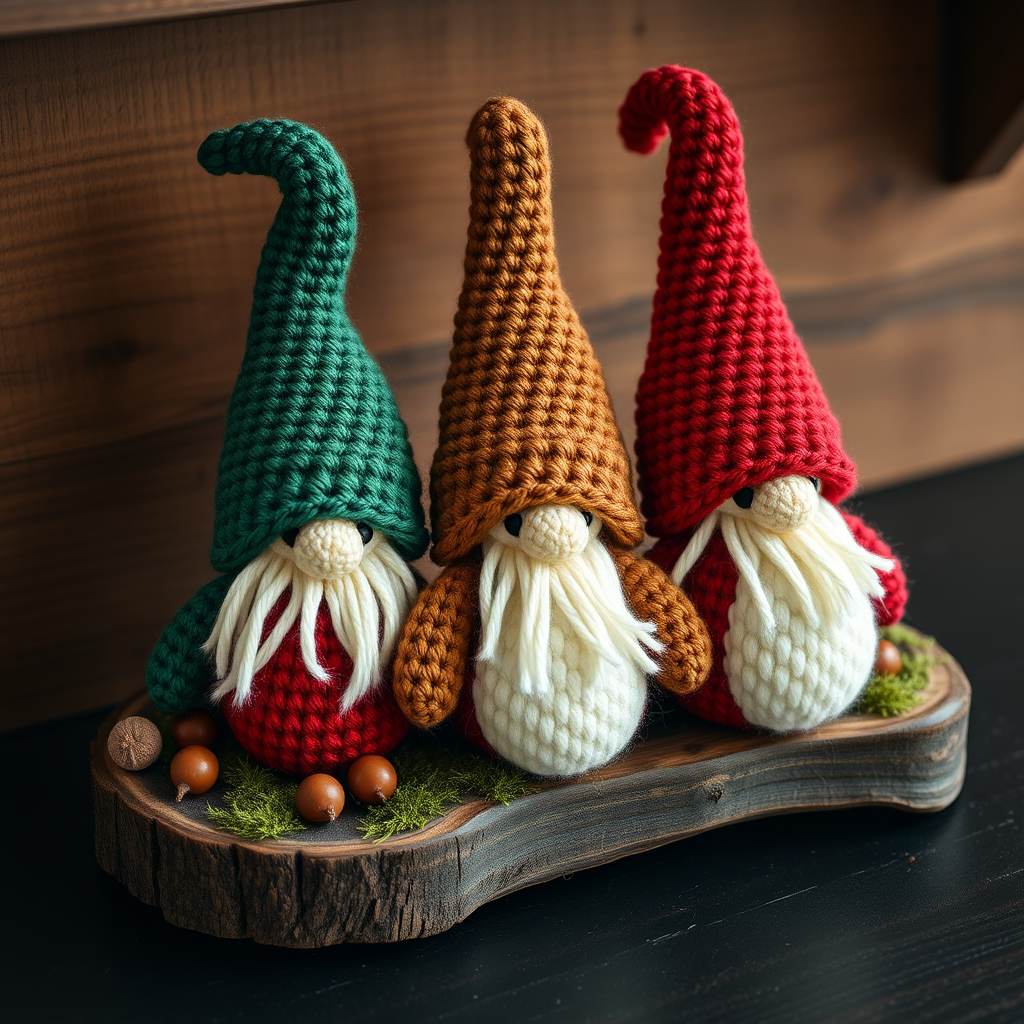
Whimsical Woodland Gnome Trio Free Pattern – Crochet a Cozy Forest Family
Bring a touch of enchanted forest charm to your home with this adorable trio of crochet gnomes, each with their own unique personality and cozy winter attire. Perfect for gifting or as a whimsical shelf decoration, these soft yarn companions are sure to spark joy. Whether you're a seasoned crocheter or just starting your amigurumi journey, this pattern is designed to be approachable and rewarding. Let's dive into creating your very own forest family!
Materials Needed
Before you begin, gather all your supplies. Having everything ready will make the process smooth and enjoyable. Here's what you'll need:
- Yarn: Worsted weight yarn in the following colors:
- Forest green (for one gnome body and hat)
- Warm brown (for one gnome body and hat, plus noses)
- Soft red (for one gnome body and hat)
- Cream (for all three heads)
- White (for all three beards)
- Black (for eyes)
- Crochet Hook: 3.5mm (E-4) hook
- Yarn needle for sewing pieces together
- Polyester fiberfill stuffing for a soft, plump finish
- Stitch marker to keep track of rounds
- Scissors
Gauge: 4 inches = 18 stitches and 20 rows in single crochet. (Gauge is not critical for this project, but maintaining consistent tension will ensure your gnomes are uniform in size.)
Abbreviations
Familiarize yourself with these standard crochet abbreviations before starting:
- MR: Magic ring
- sc: Single crochet
- inc: Increase (2 sc in the same stitch)
- dec: Decrease (sc 2 stitches together)
- st(s): Stitch(es)
- rnd: Round
- ch: Chain
Step-by-Step Instructions
This pattern creates three gnomes, each with a body, head, hat, beard, nose, and eyes. You'll make all pieces for one gnome at a time, or work assembly-line style—whatever suits your crafting flow. Let's begin!
Gnome Body (Make 3 – one in each color: forest green, warm brown, soft red)
The body forms the plump, rounded base of your gnome. Work in continuous rounds without joining unless specified.
- Rnd 1: Make a magic ring, work 6 sc into the ring. (6 sts)
- Rnd 2: Inc in each stitch around. (12 sts)
- Rnd 3: (Sc in next st, inc) around. (18 sts)
- Rnd 4: (Sc in next 2 sts, inc) around. (24 sts)
- Rnd 5: (Sc in next 3 sts, inc) around. (30 sts)
- Rnd 6: (Sc in next 4 sts, inc) around. (36 sts)
- Rnd 7-12: Sc in each stitch around. (36 sts) – This creates the straight sides of the body.
- Rnd 13: (Sc in next 4 sts, dec) around. (30 sts)
- Rnd 14: (Sc in next 3 sts, dec) around. (24 sts)
- Rnd 15: (Sc in next 2 sts, dec) around. (18 sts)
- Stuff firmly with polyester fiberfill. Make sure the body is plump but not overly stretched.
- Rnd 16: (Sc in next st, dec) around. (12 sts)
- Rnd 17: Dec around. (6 sts)
- Fasten off and weave in the end securely.
Gnome Head (Make 3 – cream yarn)
The head is slightly smaller than the body and will be attached on top. Keep your tension consistent for a smooth, round shape.
- Rnd 1: MR, 6 sc in ring. (6 sts)
- Rnd 2: Inc in each st around. (12 sts)
- Rnd 3: (Sc in next st, inc) around. (18 sts)
- Rnd 4: (Sc in next 2 sts, inc) around. (24 sts)
- Rnd 5: (Sc in next 3 sts, inc) around. (30 sts)
- Rnd 6-10: Sc in each st around. (30 sts) – Straight rounds for the head's height.
- Rnd 11: (Sc in next 3 sts, dec) around. (24 sts)
- Rnd 12: (Sc in next 2 sts, dec) around. (18 sts)
- Stuff the head firmly to maintain its shape.
- Rnd 13: (Sc in next st, dec) around. (12 sts)
- Rnd 14: Dec around. (6 sts)
- Fasten off, leaving a long tail (about 12 inches) for sewing the head to the body.
Gnome Hat (Make 3 – matching body color)
The hat is tall and slightly crooked for that whimsical gnome look. The increases create a gentle flare at the base.
- Rnd 1: MR, 6 sc in ring. (6 sts)
- Rnd 2: (Sc in next st, inc) around. (9 sts)
- Rnd 3: (Sc in next 2 sts, inc) around. (12 sts)
- Rnd 4: (Sc in next 3 sts, inc) around. (15 sts)
- Rnd 5: (Sc in next 4 sts, inc) around. (18 sts)
- Rnd 6: (Sc in next 5 sts, inc) around. (21 sts)
- Rnd 7-12: Sc in each st around. (21 sts) – Straight section.
- Rnd 13: (Sc in next 6 sts, inc) around. (24 sts)
- Rnd 14-16: Sc in each st around. (24 sts)
- Rnd 17: (Sc in next 7 sts, inc) around. (27 sts)
- Rnd 18-20: Sc in each st around. (27 sts)
- Rnd 21: (Sc in next 8 sts, inc) around. (30 sts)
- Rnd 22-24: Sc in each st around. (30 sts)
- Fasten off, leaving a long tail for sewing. The hat should naturally curve slightly; you can accentuate this when attaching it to the head.
Gnome Beard (Make 3 – white yarn)
The beard is worked in rows, not rounds, creating a flat, triangular shape that fits under the nose.
- Row 1: Ch 11, sc in 2nd ch from hook and in each ch across. (10 sts)
- Row 2: Ch 1, turn, sc in next 2 sts, dec, sc in next 2 sts, dec, sc in next 2 sts. (8 sts)
- Row 3: Ch 1, turn, sc in next 2 sts, dec, sc in next 2 sts, dec. (6 sts)
- Row 4: Ch 1, turn, sc in next st, dec, sc in next st, dec. (4 sts)
- Row 5: Ch 1, turn, dec twice. (2 sts)
- Fasten off, leaving a long tail for sewing. The beard will have a slight point at the bottom, perfect for a gnome's chin.
Nose (Make 3 – warm brown yarn)
A small, round nose adds character. Stuff it lightly so it stays soft but defined.
- Rnd 1: MR, 6 sc in ring. (6 sts)
- Rnd 2: Inc in each st around. (12 sts)
- Rnd 3: Sc in each st around. (12 sts)
- Rnd 4: Dec around. (6 sts)
- Fasten off, leaving a long tail. Stuff lightly and set aside for assembly.
Eyes (Make 6 – black yarn)
These are tiny circles that bring your gnomes to life.
- Rnd 1: MR, 6 sc in ring. (6 sts)
- Fasten off, leaving a long tail for sewing. You'll attach two eyes to each gnome.
Assembly
Now comes the fun part—bringing your gnomes together! Follow these steps carefully for a polished finish.
- Attach the head to the body: Using the long tail from the head, sew the head onto the top of the body. Align the bottom of the head with the top of the body, using a whip stitch or mattress stitch for a seamless join. Weave in the end securely.
- Sew on the beard: Position the beard on the front of the head, just below where the hat will sit. The pointed end should face downward. Sew it in place using the long tail, making sure it's centered.
- Attach the nose: Place the nose in the center of the face, just above the top of the beard. Sew it on securely, weaving the tail into the head.
- Add the eyes: Sew two eyes onto each gnome's face, positioned above the nose and slightly to each side. Make sure they're level for a friendly expression.
- Attach the hat: Fold the hat slightly to one side for that classic crooked gnome look. Sew it to the top of the head, covering the crown. The hat should sit snugly, with the brim flaring out slightly over the forehead.
- Weave in all ends: Use your yarn needle to hide any remaining tails inside the pieces. Trim any excess yarn.
Finishing Touches
Your whimsical woodland gnome trio is complete! For an extra special touch, consider adding a small loop of yarn at the top of each hat if you'd like to hang them as ornaments. Display them on a rustic shelf, nestled among acorns and moss, or gift them to a loved one for a handmade hug. These gnomes are sure to bring a cozy, magical forest vibe to any space. Happy crocheting!



