Scholar's Hourglass and Scroll Free Crochet Pattern: A Dark Academia Amigurumi Set
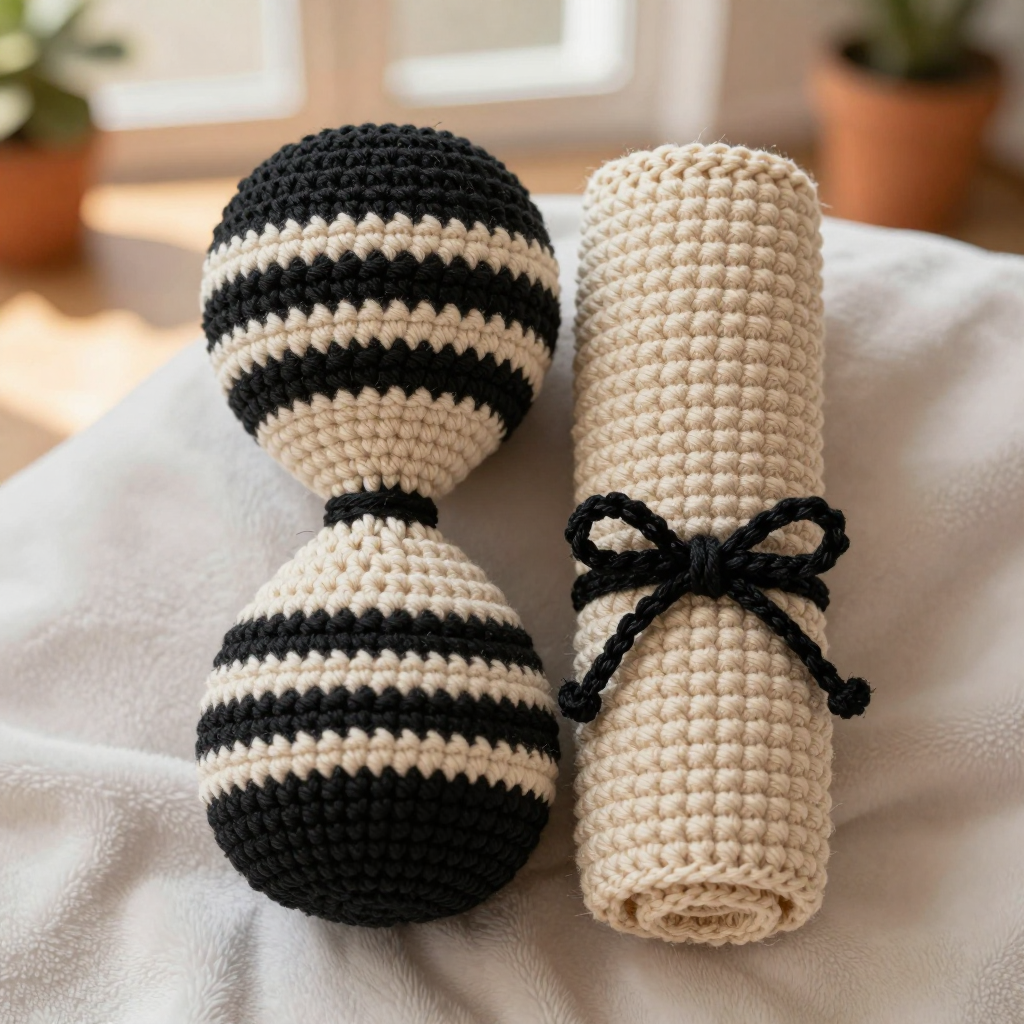
Scholar's Hourglass and Scroll: A Dark Academia Amigurumi Set
Introduction
Welcome to your very first amigurumi adventure! This Scholar's Hourglass and Scroll set is the perfect project for a complete beginner who wants to make something that looks genuinely impressive on a desk or bookshelf. It is a moody, dark academia piece: an ink-black and parchment-cream striped hourglass with two rounded bulbs and a narrow pinched waist, paired with a rolled parchment scroll tied with a little crocheted cord bow. The finished hourglass stands about 7 inches tall and feels soft, squishy, and satisfyingly weighty in your hand, while the scroll is a taut, tidy tube about 6 inches long. Everything is made from simple single crochet stitches worked in a spiral, so if you can make a slip knot and a single crochet, you can make this set.
Materials Needed
- Yarn: Worsted weight (category 4) acrylic or cotton-blend yarn. You need 1 skein each in Ink Black (A) and Parchment Cream (B). Total usage is approximately 120 yards of black and 90 yards of cream for both pieces.
- Crochet hook: Size H/8 (5.0 mm).
- Stitch marker: At least one, to mark the first stitch of each round.
- Tapestry needle: A blunt-tipped yarn needle for seaming and weaving in ends.
- Scissors: Sharp craft scissors for cutting yarn.
- Stuffing: Polyester fiberfill for both pieces.
- Optional: A small amount of craft wire or a pipe cleaner (or a rolled strip of cardstock) to make the scroll extra taut.
- Finished sizes: Hourglass approx. 7 in tall x 3.5 in wide at the caps, 1.5 in wide at the waist. Scroll approx. 6 in long x 1.75 in diameter. Cord approx. 14 in long.
Abbreviations and Beginner Glossary
- ch – chain. Make a slip knot on your hook, wrap the yarn over the hook, and pull it through the loop on your hook. That is one chain.
- sc – single crochet. Insert your hook into the stitch, wrap the yarn over the hook, pull up a loop (you now have 2 loops on the hook), wrap the yarn over again, and pull it through both loops. One single crochet made.
- 2 sc in next st – make two single crochet stitches into the same stitch. This increases your stitch count by one.
- sc2tog – single crochet two stitches together (a decrease). Insert your hook into the first stitch, pull up a loop, insert your hook into the next stitch, pull up a loop (3 loops on hook), wrap the yarn over, and pull through all 3 loops. Two stitches become one.
- st / sts – stitch / stitches.
- rnd / rnds – round / rounds. One complete circle of stitches worked in a spiral.
- magic ring – an adjustable loop you make with your yarn, then work your first stitches into it and pull the tail tight to close the center hole.
- [ ] – brackets mean "repeat everything inside the brackets" as many times as the instruction says (usually "around," meaning all the way around the round).
- around – work the instruction into every stitch of the round, all the way back to your stitch marker.
- fasten off – cut the yarn leaving a tail, then pull the tail through the last loop on your hook to lock it.
- whipstitch – a simple seaming stitch: bring the needle through both edges from front to back, over and over, like tiny slanted stitches.
- mattress stitch – a seaming stitch that goes side to side under the edge loops to create an invisible join.
Gauge
Gauge: 8 sc x 9 rounds = 2 inches (5 cm) in single crochet worked in the round.
Gauge simply means how big your stitches turn out. It matters because if your stitches are looser or tighter than mine, your hourglass will come out bigger or smaller than 7 inches tall. To check, crochet a small flat swatch of single crochet about 3 inches square, then lay a ruler across the middle and count how many stitches fit in 2 inches and how many rows fit in 2 inches. If you have more than 8 stitches, go up one hook size; if you have fewer, go down one hook size. It is worth the five minutes!
Beginner Tips Before You Start
- Use your stitch marker every single round. Place it in the first stitch of each round so you always know where a round begins and ends. Amigurumi is worked in a spiral, so without a marker it is easy to lose your place.
- Do not pull your yarn too tight. Keep your tension relaxed and even. Tight stitches make it very hard to insert your hook, and they make lumpy stuffing.
- Stuff as you go. The pattern tells you exactly when to stuff. Stuff firmly but in small pinches so the shape stays smooth and round, not bumpy.
- Change colors on the last pull-through of the previous stitch. To switch from black to cream, begin your final single crochet in black, but pull the cream yarn through the last two loops. This makes a neat color change.
- Count out loud. Counting your stitches at the end of each round catches mistakes early, before they grow.
- Keep your tension loose on the waist. The narrow waist is what makes the hourglass shape, so resist the urge to overstuff it.
Step-by-Step Instructions
Note: All pieces are worked in continuous spirals. Do not join or turn unless the pattern says so. Place a stitch marker in the first stitch of each round.
Hourglass: Bottom Bulb
Begin at the base with color A (Ink Black).
Rnd 1: With A, make a magic ring, 6 sc into ring. (6 sts)
Rnd 2: 2 sc in each st around. (12 sts)
Rnd 3: [Sc in next st, 2 sc in next st] around. (18 sts)
Rnd 4: [Sc in next 2 sts, 2 sc in next st] around. (24 sts)
Rnd 5: [Sc in next 3 sts, 2 sc in next st] around. (30 sts)
Rnd 6: [Sc in next 4 sts, 2 sc in next st] around. (36 sts)
Rnds 7–8: Sc in each st around. (36 sts)
Change to B (Parchment Cream).
Rnds 9–10: With B, sc in each st around. (36 sts)
Change to A.
Rnds 11–12: With A, sc in each st around. (36 sts)
Change to B.
Rnds 13–14: With B, sc in each st around. (36 sts)
Change to A.
Rnd 15: With A, sc in each st around. (36 sts)
Rnd 16: [Sc in next 4 sts, sc2tog] around. (30 sts)
Rnd 17: [Sc in next 3 sts, sc2tog] around. (24 sts)
Rnd 18: [Sc in next 2 sts, sc2tog] around. (18 sts)
Rnd 19: [Sc in next st, sc2tog] around. (12 sts)
Stuff the bulb firmly with fiberfill, shaping it into a rounded cylinder. Do not fasten off; continue to the waist.
Hourglass: Waist
Rnd 20: With A, sc in each st around. (12 sts)
Rnd 21: Sc in each st around. (12 sts)
Rnd 22: Sc in each st around. (12 sts)
The waist stays at 12 sts (about 1.5 in wide) to create the hourglass pinch. Add a small pinch of fiberfill into the waist only if needed to hold shape; keep it narrow.
Hourglass: Top Bulb
Worked upward from the waist.
Rnd 23: With A, [sc in next st, 2 sc in next st] around. (18 sts)
Rnd 24: [Sc in next 2 sts, 2 sc in next st] around. (24 sts)
Rnd 25: [Sc in next 3 sts, 2 sc in next st] around. (30 sts)
Rnd 26: [Sc in next 4 sts, 2 sc in next st] around. (36 sts)
Change to B.
Rnds 27–28: With B, sc in each st around. (36 sts)
Change to A.
Rnds 29–30: With A, sc in each st around. (36 sts)
Change to B.
Rnds 31–32: With B, sc in each st around. (36 sts)
Change to A.
Rnds 33–34: With A, sc in each st around. (36 sts)
Stuff the top bulb firmly, matching the bottom bulb's fullness.
Rnd 35: [Sc in next 4 sts, sc2tog] around. (30 sts)
Rnd 36: [Sc in next 3 sts, sc2tog] around. (24 sts)
Rnd 37: [Sc in next 2 sts, sc2tog] around. (18 sts)
Rnd 38: [Sc in next st, sc2tog] around. (12 sts)
Rnd 39: Sc2tog around. (6 sts)
Fasten off, leaving a 6-in tail. Thread the tail through the last 6 sts and pull closed. Weave in the end.
Scroll
Worked flat in rows, then seamed into a taut tube. Use color B.
With B, ch 26.
Row 1: Sc in 2nd ch from hook and in each ch across. (25 sts)
Rows 2–40: Ch 1, turn, sc in each st across. (25 sts)
Fasten off, leaving a long 24-in tail for seaming.
Cord
With A, leave a 4-in starting tail, ch 45. Fasten off, leaving a 4-in tail. (Cord approx. 14 in long.)
Assembly and Finishing
Hourglass finishing: Use your tapestry needle to nudge the stuffing so both bulbs are even and the waist is visibly pinched. Optional: with A, work a single round of slip stitch around the waist line for a crisp definition.
Seaming the scroll: Fold the rectangle in half lengthwise with right sides together. Using your tapestry needle and the long tail, whipstitch or mattress stitch the long edges together to form a tube about 6 in long. Seam one short end closed. Turn the tube right side out. Insert a length of craft wire or a rolled strip of cardstock if a very taut scroll is desired, then stuff lightly and evenly with fiberfill. Seam the remaining short end closed. Roll the tube into a scroll shape and tack the roll with a few hidden stitches in B so it holds.
Adding the cord: Wrap the cord around the scroll twice and tie in a small bow at the front; use the tails to tack the bow in place. Weave in ends.
Final assembly: Place the hourglass and scroll side by side as a desk vignette. If desired, stitch the scroll lightly to the hourglass base with 2–3 hidden stitches in matching yarn so the set stays together.
Weaving in ends: Thread each tail onto the tapestry needle and run it back and forth through the inside of the piece for about an inch, then trim close. Never knot your ends; weaving hides them.
Blocking: Lightly mist both pieces with water, gently reshape the hourglass waist with your fingers, and let them air-dry overnight. Do not soak amigurumi; a light mist is enough.
Pro Tips and Variations
- Change the colors: Swap Ink Black and Parchment Cream for deep burgundy and antique gold, or forest green and ivory, for a different dark academia mood. Keep two contrasting colors so the stripes read clearly.
- Adjust the size: To make a larger hourglass, use a thicker yarn and a larger hook (such as bulky weight with a J/10 hook) and follow the same rounds; your piece will simply come out bigger. To make a smaller one, use sport weight yarn with a D/3 hook.
- Substitute yarn: Cotton yarn gives crisp, defined stitches and a matte finish; acrylic gives a softer, fuzzier look. Either works, but always check your gauge first.
- Make the scroll extra special: Add a few surface slip stitches in black across the scroll to suggest "writing," or leave the scroll unrolled and flat as a small bookmark instead.


