Whimsical Button Blossom Bouquet Free Crochet Pattern
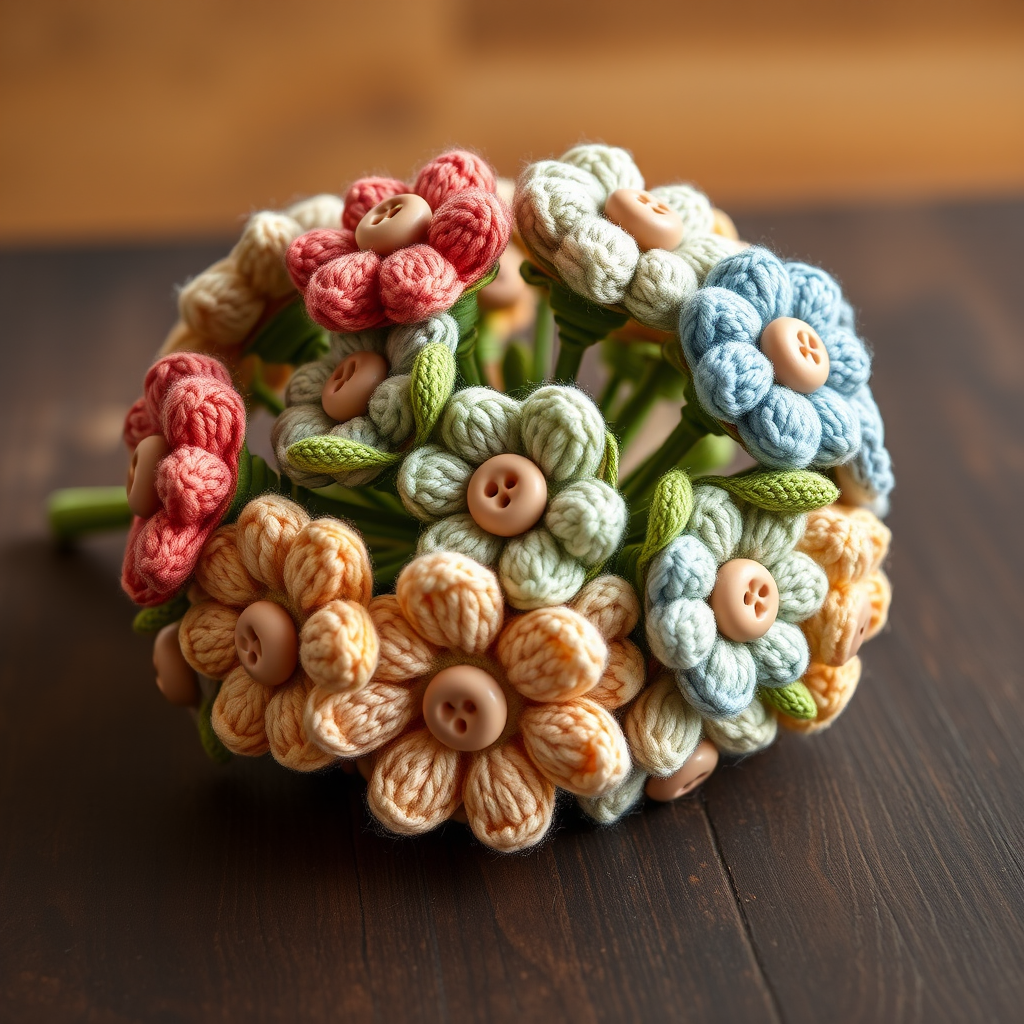
Whimsical Button Blossom Bouquet: A Free Crochet Pattern for Everlasting Charm
Imagine a bouquet that never wilts, never needs water, and adds a permanent splash of cozy color to your favorite corner of the house. That's exactly what you'll create with this delightful Whimsical Button Blossom Bouquet crochet pattern. This project is a perfect blend of simplicity and charm, making it an ideal weekend project for both beginners and experienced crocheters alike. With its plush, textured petals and vintage-style button centers, this handmade bouquet brings a unique, rustic warmth to any room. Let's dive in and craft a floral arrangement that will brighten your home for years to come.
Materials Needed
Before we begin, gather your supplies. This project is wonderfully portable and requires minimal, easy-to-find materials. Here's your complete shopping list:
- Yarn: Worsted weight cotton yarn in assorted colors for petals (think coral, mustard, sage, dusty blue, cream) and a small amount of contrasting yarn for the flower centers.
- Crochet Hook: US G/6 (4.0 mm) crochet hook. This size works perfectly with worsted weight yarn to create a tight, sturdy fabric.
- Buttons: Small, vintage-style buttons for the flower centers (optional but highly recommended for that whimsical touch).
- Stuffing: Polyester fiberfill for lightly stuffing the flower centers.
- Stems: Floral wire or wooden dowels, cut to about 12 inches each.
- Green Yarn: For making leaves and wrapping the stems.
- Notions: Yarn needle, scissors, and a hot glue gun (optional, for securing stems).
Gauge: Gauge is not critical for this project. The most important thing is to maintain a tight tension while crocheting to ensure the stuffing doesn't show through. If your stitches are loose, consider using a slightly smaller hook.
Step-by-Step Instructions
Let's get crocheting! This pattern uses standard US crochet abbreviations. Here's a quick refresher: ch (chain), sc (single crochet), hdc (half double crochet), dc (double crochet), sl st (slip stitch), mr (magic ring), inc (increase: 2 sc in same stitch), dec (decrease: sc 2 together).
Crocheting the Flower Petals (Make 5 per flower)
Each flower is composed of five identical, rounded petals that are sewn together at the base. Follow these steps carefully for each petal:
- Start with a Magic Ring: With your chosen petal color, create a magic ring (mr).
- Round 1: Chain 1 (this counts as your first single crochet), then work 5 more single crochets into the ring. Pull the tail tight to close the ring completely. Join with a slip stitch to the first stitch. You should now have 6 single crochets.
- Round 2: Chain 1. Work an increase (2 sc) in each stitch around. Join with a slip stitch. You'll have 12 single crochets.
- Round 3: Chain 1. *Single crochet in the next stitch, increase in the next stitch.* Repeat from * to * around. Join with a slip stitch. You'll have 18 single crochets.
- Round 4: Chain 1. *Single crochet in the next 2 stitches, increase in the next stitch.* Repeat from * to * around. Join with a slip stitch. You'll have 24 single crochets.
- Round 5: Chain 1. *Single crochet in the next 3 stitches, increase in the next stitch.* Repeat from * to * around. Join with a slip stitch. You'll have 30 single crochets.
- Round 6: Chain 1. Single crochet in each stitch around (no increases). Join with a slip stitch. You'll still have 30 single crochets. This final round creates the gentle cup shape of the petal.
- Finish: Fasten off, leaving a long tail (about 12 inches) for sewing the petals together.
Creating the Flower Center (Make 1 per flower)
The center is a small, domed disc that sits in the middle of the petals. It's quick and easy to make:
- Start with a Magic Ring: With your contrasting center color, create a magic ring.
- Round 1: Chain 1, work 6 single crochets into the ring. Pull tight to close. Join with a slip stitch. (6 sc)
- Round 2: Chain 1. Work an increase in each stitch around. Join with a slip stitch. (12 sc)
- Round 3: Chain 1. *Single crochet in the next stitch, increase in the next stitch.* Repeat from * to * around. Join with a slip stitch. (18 sc)
- Round 4: Chain 1. Single crochet in each stitch around (no increases). Join with a slip stitch. (18 sc)
- Finish: Fasten off, leaving a long tail for sewing.
Assembling the Flower
Now for the fun part—bringing your flower together! This is where the magic happens.
- Arrange the Petals: Lay your five petals out in a circle, overlapping their bases slightly. This creates a full, lush look.
- Sew the Petals Together: Using the long tails from the petals, thread your yarn needle. Whipstitch the petals together securely at their bases, going through all layers to create a strong seam. Weave in the ends.
- Attach the Center: Place the flower center in the middle of the petal circle. Using its long tail, sew it to the petals, working your needle around the edge of the center disc. Leave a small opening.
- Stuff the Center: Gently stuff the center with a small amount of polyester fiberfill to give it a soft, domed shape. Don't overstuff—you want it to be plush, not lumpy.
- Close the Opening: Finish sewing the center closed, weaving in the yarn tail securely.
- Add the Button: If you're using a button, sew it onto the very center of the flower. This adds that charming, tactile, vintage detail that makes this bouquet so special.
Creating the Stem and Leaves
Your flower is complete, but it needs a stem to stand tall. Here's how to finish it:
- Prepare the Stem: Cut a piece of floral wire or use a wooden dowel, about 12 inches long.
- Insert the Stem: Carefully insert the stem through the back of the flower, pushing it up into the center. To secure it, you can use a dab of hot glue at the base or sew around the stem where it meets the flower to hold it firmly in place.
- Crochet the Leaves: With green yarn, chain 10. Starting in the 2nd chain from the hook, work: single crochet, half double crochet, double crochet, double crochet, double crochet, double crochet, half double crochet, single crochet, slip stitch in the last chain. This creates an elongated, leaf-like shape. Fasten off, leaving a tail. Make 2-3 leaves per flower.
- Attach the Leaves: Sew the leaves onto the stem using the yarn needle and the tails you left. Position them at different heights for a natural look.
- Wrap the Stem: Starting at the base of the flower, wrap the stem tightly with green yarn. Secure the yarn at the top and bottom with a small knot or a dab of hot glue. This gives a clean, polished finish.
Finishing Touches for Your Bouquet
You've made one beautiful flower! Now, let's turn it into a stunning bouquet:
- Make More Flowers: Repeat the entire process to create as many flowers as you'd like. A bouquet of 5-7 flowers looks lovely and full.
- Arrange the Bouquet: Gather your finished flowers together, varying the stem heights for an organic, natural arrangement.
- Tie It Together: Secure the stems with a ribbon or a length of yarn tied into a pretty bow.
- Display: Place your whimsical button blossom bouquet in a vase, a mason jar, or simply lean it against a shelf for a cozy, handmade touch to your home decor.
And there you have it—a gorgeous, everlasting bouquet that you made entirely by hand. This pattern is wonderfully customizable, so feel free to experiment with different color combinations, yarn textures, or even add a few extra leaves. Happy crocheting, and enjoy your beautiful, whimsical creation!



